Cirkit Designer Logo
Cirkit Designer
Your all-in-one circuit design IDE
Home / 
Component Documentation

How to Use Adafruit WICED Feather: Examples, Pinouts, and Specs

Image of Adafruit WICED Feather
Cirkit Designer LogoDesign with Adafruit WICED Feather in Cirkit Designer

Introduction

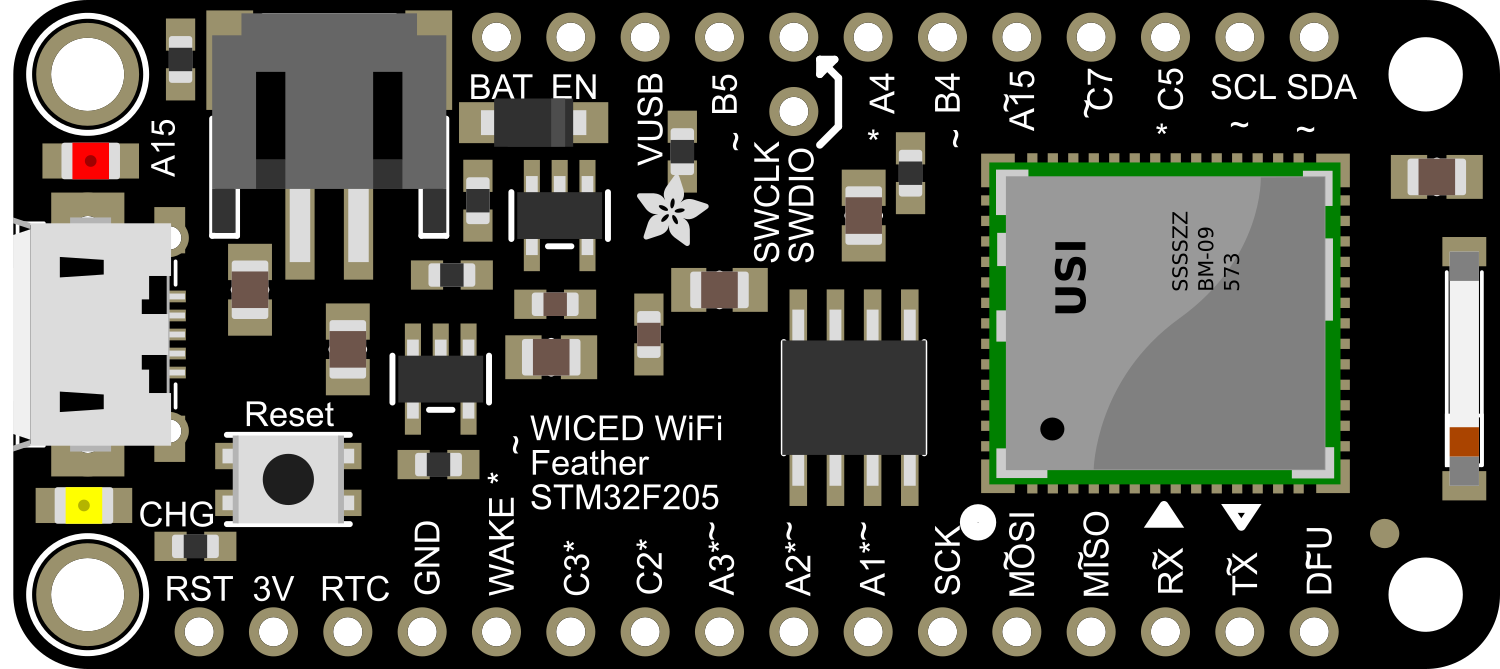
The Adafruit WICED Feather is an innovative development board that integrates the robust Feather platform with the wireless capabilities of Broadcom's WICED (Wireless Internet Connectivity for Embedded Devices) platform. This board is designed for hobbyists, engineers, and makers who require Wi-Fi connectivity for their projects. It is ideal for Internet of Things (IoT) applications, wireless sensor networks, smart home devices, and other projects that demand internet connectivity and wireless communication.

Explore Projects Built with Adafruit WICED Feather

Use Cirkit Designer to design, explore, and prototype these projects online. Some projects support real-time simulation. Click "Open Project" to start designing instantly!
Arduino UNO and OLED FeatherWing Display: Battery-Powered Hello World Project
Image of ARDUINO_SSD1306: A project utilizing Adafruit WICED Feather in a practical application
This circuit consists of an Arduino UNO connected to an Adafruit OLED FeatherWing display via I2C communication (SDA and SCL lines). The Arduino is powered through a Vcc source and provides 3.3V and GND connections to the OLED display. The Arduino runs a program to display 'Hello, World!' on the OLED screen.
Cirkit Designer LogoOpen Project in Cirkit Designer
ESP32-Based Vibration Feedback System with Quad Alphanumeric Display and ADXL343 Accelerometer
Image of EC444 - Quest 3: A project utilizing Adafruit WICED Feather in a practical application
This circuit features an Adafruit HUZZAH32 ESP32 Feather board as the central microcontroller, which is connected to an Adafruit Quad AlphaNumeric Featherwing display and an Adafruit ADXL343 accelerometer via I2C communication (SCL and SDA lines). The ESP32 controls a vibration motor connected to one of its GPIO pins (A5_IO4) and shares a common power supply (3.3V) and ground (GND) with the other components. The purpose of this circuit is likely to read acceleration data, display information on the alphanumeric display, and provide haptic feedback through the vibration motor.
Cirkit Designer LogoOpen Project in Cirkit Designer
Touch-Sensitive Interface with Adafruit MPR121 and Feather 32u4 Bluefruit
Image of MPR121: A project utilizing Adafruit WICED Feather in a practical application
This circuit integrates an Adafruit MPR121 capacitive touch sensor with an Adafruit Feather 32u4 Bluefruit microcontroller. The MPR121 is powered by the Feather and communicates via I2C (SCL and SDA) to detect touch inputs, which can be processed or transmitted wirelessly by the Feather.
Cirkit Designer LogoOpen Project in Cirkit Designer
Adafruit Feather 32u4 Bluefruit with MPR121 Capacitive Touch Sensor Interface
Image of ALi WTSE: A project utilizing Adafruit WICED Feather in a practical application
This circuit integrates an Adafruit MPR121 capacitive touch sensor with an Adafruit Feather 32u4 Bluefruit microcontroller. The MPR121 is powered by the 3.3V supply from the Feather and communicates with the microcontroller via I2C, with SCL connected to pin 3 and SDA connected to pin 2 of the Feather. This setup allows the Feather to detect touch inputs from the MPR121 for further processing or wireless communication.
Cirkit Designer LogoOpen Project in Cirkit Designer

Explore Projects Built with Adafruit WICED Feather

Use Cirkit Designer to design, explore, and prototype these projects online. Some projects support real-time simulation. Click "Open Project" to start designing instantly!
Image of ARDUINO_SSD1306: A project utilizing Adafruit WICED Feather in a practical application
Arduino UNO and OLED FeatherWing Display: Battery-Powered Hello World Project
This circuit consists of an Arduino UNO connected to an Adafruit OLED FeatherWing display via I2C communication (SDA and SCL lines). The Arduino is powered through a Vcc source and provides 3.3V and GND connections to the OLED display. The Arduino runs a program to display 'Hello, World!' on the OLED screen.
Cirkit Designer LogoOpen Project in Cirkit Designer
Image of EC444 - Quest 3: A project utilizing Adafruit WICED Feather in a practical application
ESP32-Based Vibration Feedback System with Quad Alphanumeric Display and ADXL343 Accelerometer
This circuit features an Adafruit HUZZAH32 ESP32 Feather board as the central microcontroller, which is connected to an Adafruit Quad AlphaNumeric Featherwing display and an Adafruit ADXL343 accelerometer via I2C communication (SCL and SDA lines). The ESP32 controls a vibration motor connected to one of its GPIO pins (A5_IO4) and shares a common power supply (3.3V) and ground (GND) with the other components. The purpose of this circuit is likely to read acceleration data, display information on the alphanumeric display, and provide haptic feedback through the vibration motor.
Cirkit Designer LogoOpen Project in Cirkit Designer
Image of MPR121: A project utilizing Adafruit WICED Feather in a practical application
Touch-Sensitive Interface with Adafruit MPR121 and Feather 32u4 Bluefruit
This circuit integrates an Adafruit MPR121 capacitive touch sensor with an Adafruit Feather 32u4 Bluefruit microcontroller. The MPR121 is powered by the Feather and communicates via I2C (SCL and SDA) to detect touch inputs, which can be processed or transmitted wirelessly by the Feather.
Cirkit Designer LogoOpen Project in Cirkit Designer
Image of ALi WTSE: A project utilizing Adafruit WICED Feather in a practical application
Adafruit Feather 32u4 Bluefruit with MPR121 Capacitive Touch Sensor Interface
This circuit integrates an Adafruit MPR121 capacitive touch sensor with an Adafruit Feather 32u4 Bluefruit microcontroller. The MPR121 is powered by the 3.3V supply from the Feather and communicates with the microcontroller via I2C, with SCL connected to pin 3 and SDA connected to pin 2 of the Feather. This setup allows the Feather to detect touch inputs from the MPR121 for further processing or wireless communication.
Cirkit Designer LogoOpen Project in Cirkit Designer

Technical Specifications

Key Technical Details

  • Microcontroller: STM32F205 120MHz ARM Cortex-M3
  • Wi-Fi Network Processor: Broadcom BCM43362
  • Operating Voltage: 3.3V
  • Input Voltage: USB 5V or LiPo battery (3.7V)
  • Output Current: 500mA peak
  • Flash Memory: 1MB
  • RAM: 128KB
  • Wi-Fi Standards: 802.11b/g/n
  • Security Protocols: WEP, WPA, WPA2
  • PCB Dimensions: 51mm x 23mm x 8mm
  • Weight: 6.2 grams

Pin Configuration and Descriptions

Pin Number Function Description
1 GND Ground
2 3V3 3.3V power supply
3 BAT Battery input for LiPo batteries
4 EN Enable pin for the regulator
5 USB USB power input
6 SCK Serial Clock for SPI communication
7 MISO Master In Slave Out for SPI communication
8 MOSI Master Out Slave In for SPI communication
9 WKP Wake-up pin, used to wake the module from sleep
10 RX UART receive pin
11 TX UART transmit pin
12 SDA Serial Data for I2C communication
13 SCL Serial Clock for I2C communication
14 #0 - #11, A0 - A5 General purpose I/O pins and analog inputs

Usage Instructions

Integrating with a Circuit

To use the Adafruit WICED Feather in a circuit:

  1. Powering the Board: Connect the board to a USB power source or attach a 3.7V LiPo battery to the BAT pin.
  2. Connecting to Wi-Fi: Use the WICED SDK to configure the Wi-Fi settings and connect to a network.
  3. Interfacing with Sensors/Actuators: Connect sensors or actuators to the GPIO pins, taking care to match the voltage levels and current capabilities.

Important Considerations and Best Practices

  • Power Supply: Ensure that the power supply is stable and within the specified voltage range.
  • Antenna: The board comes with a built-in PCB antenna. For better range, an external u.FL antenna can be connected.
  • Firmware Updates: Regularly update the board's firmware to the latest version for improved performance and security.
  • ESD Precautions: Handle the board with proper electrostatic discharge precautions to avoid damaging the sensitive components.

Example Code for Arduino UNO

#include <Wire.h>
#include <SPI.h>
#include <WiFi.h>

// Your network SSID (name)
char ssid[] = "yourNetwork"; 
// Your network password
char pass[] = "secretPassword"; 

void setup() {
  // Initialize serial communication
  Serial.begin(9600);

  // Check for the presence of the shield
  if (WiFi.status() == WL_NO_SHIELD) {
    Serial.println("WiFi shield not present");
    // Don't continue if the shield is not present
    while (true);
  }

  // Attempt to connect to WiFi network
  while (WiFi.begin(ssid, pass) != WL_CONNECTED) {
    Serial.print(".");
    // Wait 10 seconds for connection
    delay(10000);
  }

  Serial.println("Connected to WiFi");
  printWiFiStatus();
}

void loop() {
  // Main logic for your project would go here
}

void printWiFiStatus() {
  // Print the SSID of the network you're attached to
  Serial.print("SSID: ");
  Serial.println(WiFi.SSID());

  // Print your board's IP address
  IPAddress ip = WiFi.localIP();
  Serial.print("IP Address: ");
  Serial.println(ip);

  // Print the received signal strength
  long rssi = WiFi.RSSI();
  Serial.print("Signal strength (RSSI):");
  Serial.print(rssi);
  Serial.println(" dBm");
}

Troubleshooting and FAQs

Common Issues

  • Wi-Fi Connection Failure: Ensure the SSID and password are correct. Check the signal strength and the distance from the router.
  • Board Not Recognized: Verify the USB cable is working and the drivers are installed correctly.
  • Low Power: If using a battery, ensure it is charged. For USB, check that the source can supply sufficient current.

Solutions and Tips

  • Resetting the Board: If the board becomes unresponsive, use the reset button to restart it.
  • Firmware Upgrade: Periodically check for firmware updates from Adafruit to ensure optimal performance.
  • Signal Strength: Use an external antenna if you experience weak signal strength.

FAQs

Q: Can I use the Adafruit WICED Feather with Arduino IDE? A: Yes, you can program the board using the Arduino IDE with the appropriate board package installed.

Q: What is the maximum voltage for the GPIO pins? A: The maximum voltage for the GPIO pins is 3.3V. Applying higher voltages can damage the board.

Q: How do I update the firmware on the Adafruit WICED Feather? A: Firmware updates can be done through the WICED SDK or via the bootloader using a USB connection.

Q: Can I power the board using both USB and battery at the same time? A: Yes, the board has a built-in charging circuit for the LiPo battery when powered via USB.

For further assistance, consult the Adafruit forums or the extensive online documentation available on the Adafruit website.