How to Use ISD1820 Audio Module: Examples, Pinouts, and Specs
Introduction
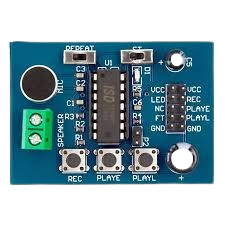
The ISD1820 Audio Module is a versatile voice recording and playback device designed for easy integration into electronic projects. It allows users to record short audio messages (up to 10 seconds) and play them back with minimal effort. The module features a built-in microphone for recording, a speaker output for playback, and simple control pins for interfacing with microcontrollers or standalone operation.
Explore Projects Built with ISD1820 Audio Module

Explore Projects Built with ISD1820 Audio Module
Common Applications and Use Cases
- Voice prompts or alerts in embedded systems
- DIY voice-controlled devices
- Interactive toys and games
- Security systems with audio notifications
- Educational projects for learning about audio processing
Technical Specifications
The ISD1820 Audio Module is designed for simplicity and ease of use. Below are its key technical details:
Key Technical Details
- Operating Voltage: 3.3V to 5V DC
- Recording Duration: Up to 10 seconds
- Playback Modes: Edge-triggered or level-triggered
- Microphone: Built-in electret microphone
- Speaker Output: Supports 8Ω speakers (recommended power: 0.5W to 1W)
- Control Pins: PLAYE, PLAYL, REC, FT, P-E
- Dimensions: Approximately 38mm x 42mm
Pin Configuration and Descriptions
The ISD1820 module has a simple pinout for easy interfacing. Below is the pin configuration:
| Pin Name | Type | Description |
|---|---|---|
| VCC | Power Input | Connect to 3.3V or 5V DC power supply. |
| GND | Ground | Connect to the ground of the power supply. |
| REC | Input | Active HIGH pin to start recording. Hold HIGH to record audio. |
| PLAYE | Input | Edge-triggered playback. A HIGH pulse plays the recorded audio once. |
| PLAYL | Input | Level-triggered playback. Hold HIGH to continuously play the recorded audio. |
| FT | Input | Feed-through mode. When HIGH, the microphone input is directly sent to output. |
| SP+ | Output | Positive terminal for connecting an external speaker. |
| SP- | Output | Negative terminal for connecting an external speaker. |
Usage Instructions
The ISD1820 Audio Module is straightforward to use, whether in standalone mode or interfaced with a microcontroller like the Arduino UNO.
Using the Module in a Circuit
- Power the Module: Connect the VCC pin to a 3.3V or 5V power source and the GND pin to ground.
- Recording Audio:
- Press and hold the REC button (or set the REC pin HIGH) to record audio using the built-in microphone.
- Release the button (or set the REC pin LOW) to stop recording.
- Playing Audio:
- Press the PLAYE button (or send a HIGH pulse to the PLAYE pin) for edge-triggered playback.
- Alternatively, press and hold the PLAYL button (or set the PLAYL pin HIGH) for continuous playback.
- Feed-Through Mode:
- Set the FT pin HIGH to enable feed-through mode, where the microphone input is directly sent to the speaker output.
- Speaker Connection:
- Connect an 8Ω speaker to the SP+ and SP- pins for audio output.
Important Considerations and Best Practices
- Use a regulated power supply to avoid noise or damage to the module.
- Ensure the speaker impedance is 8Ω for optimal performance.
- Avoid recording in noisy environments for better audio quality.
- If using the module with a microcontroller, use pull-down resistors on control pins to prevent floating states.
Example: Interfacing with Arduino UNO
Below is an example of how to control the ISD1820 module using an Arduino UNO:
// ISD1820 Audio Module Control with Arduino UNO
// Connect the ISD1820 pins to the Arduino as follows:
// REC -> Pin 2, PLAYE -> Pin 3, PLAYL -> Pin 4

#define REC_PIN 2    // Pin for recording
#define PLAYE_PIN 3  // Pin for edge-triggered playback
#define PLAYL_PIN 4  // Pin for level-triggered playback

void setup() {
  pinMode(REC_PIN, OUTPUT);    // Set REC pin as output
  pinMode(PLAYE_PIN, OUTPUT);  // Set PLAYE pin as output
  pinMode(PLAYL_PIN, OUTPUT);  // Set PLAYL pin as output

  digitalWrite(REC_PIN, LOW);    // Ensure REC is LOW initially
  digitalWrite(PLAYE_PIN, LOW);  // Ensure PLAYE is LOW initially
  digitalWrite(PLAYL_PIN, LOW);  // Ensure PLAYL is LOW initially
}

void loop() {
  // Example: Record audio for 5 seconds
  digitalWrite(REC_PIN, HIGH);  // Start recording
  delay(5000);                  // Record for 5 seconds
  digitalWrite(REC_PIN, LOW);   // Stop recording

  delay(2000);  // Wait for 2 seconds

  // Example: Play the recorded audio once
  digitalWrite(PLAYE_PIN, HIGH);  // Trigger playback
  delay(100);                     // Short delay for edge trigger
  digitalWrite(PLAYE_PIN, LOW);   // Stop playback trigger

  delay(5000);  // Wait for 5 seconds before repeating
}
Troubleshooting and FAQs
Common Issues and Solutions
No Sound from the Speaker:
- Ensure the speaker is properly connected to the SP+ and SP- pins.
- Verify that the module is powered with the correct voltage (3.3V to 5V).
- Check if the audio was recorded successfully.
Poor Audio Quality:
- Record in a quieter environment to reduce background noise.
- Use a higher-quality external microphone if needed.
Module Not Responding:
- Double-check all connections, especially the power supply and control pins.
- Ensure the control pins are not left floating; use pull-down resistors if necessary.
Playback Stops Abruptly:
- Ensure the playback mode (edge-triggered or level-triggered) is correctly configured.
- Check if the recorded audio duration exceeds the module's 10-second limit.
FAQs
Q: Can I use an external microphone with the ISD1820?
A: The module is designed for its built-in microphone, but you can modify the circuit to use an external microphone if needed.
Q: How can I increase the recording duration?
A: The ISD1820 is limited to 10 seconds of recording. To increase duration, consider using a different module or combining multiple ISD1820 modules.
Q: Can I control the module with a 3.3V microcontroller?
A: Yes, the ISD1820 is compatible with both 3.3V and 5V logic levels.
Q: Is it possible to store multiple recordings?
A: No, the ISD1820 can only store one recording at a time. Recording a new message will overwrite the previous one.