Cirkit Designer
Your all-in-one circuit design IDE
Home /
Component Documentation
How to Use UHF RFID: Examples, Pinouts, and Specs
Introduction
Ultra High Frequency Radio Frequency Identification (UHF RFID) is a wireless communication technology used for tracking and identifying objects using radio waves in the frequency range of 300 MHz to 3 GHz. UHF RFID systems are widely used in various industries for inventory management, asset tracking, supply chain logistics, and access control. The technology offers long read ranges, high data transfer rates, and the ability to read multiple tags simultaneously.
Explore Projects Built with UHF RFID
Arduino Mega 2560 and UHF RFID-Based Animal Tag Detection System with GPS
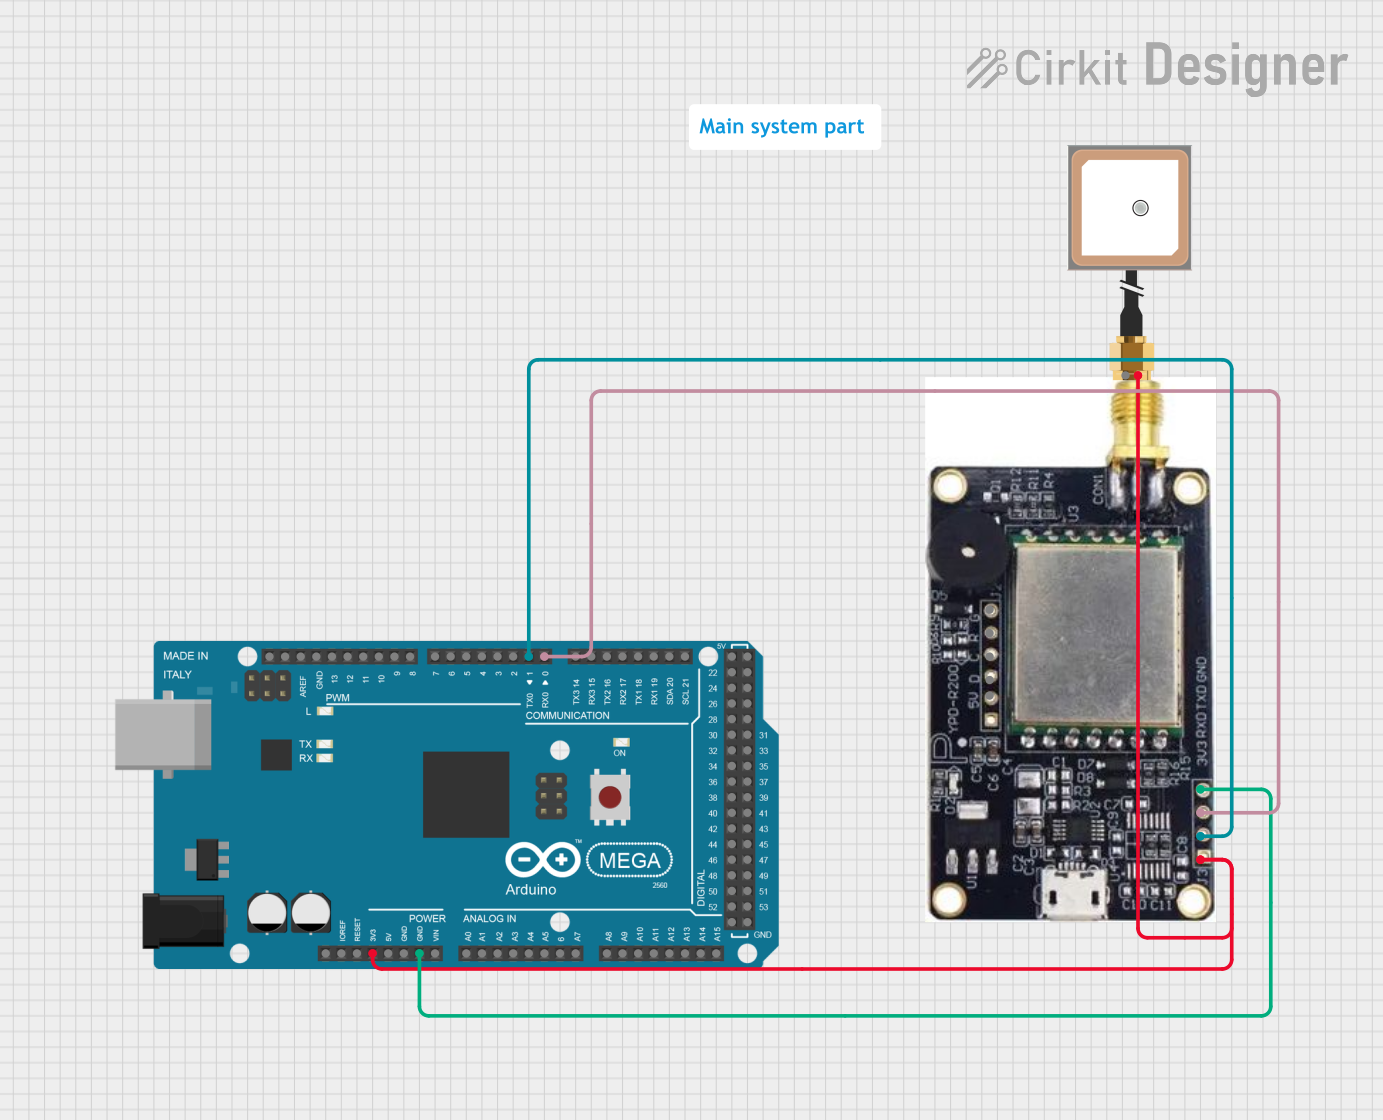
This circuit integrates an Arduino Mega 2560 with a UHF RFID module and a GPS antenna. The Arduino reads RFID tag data from the UHF RFID module and processes it to detect specific tags, while the GPS antenna is powered but not actively used in the provided code.
ESP32-Based Battery-Powered RFID Reader with OLED Display and Distance Sensor
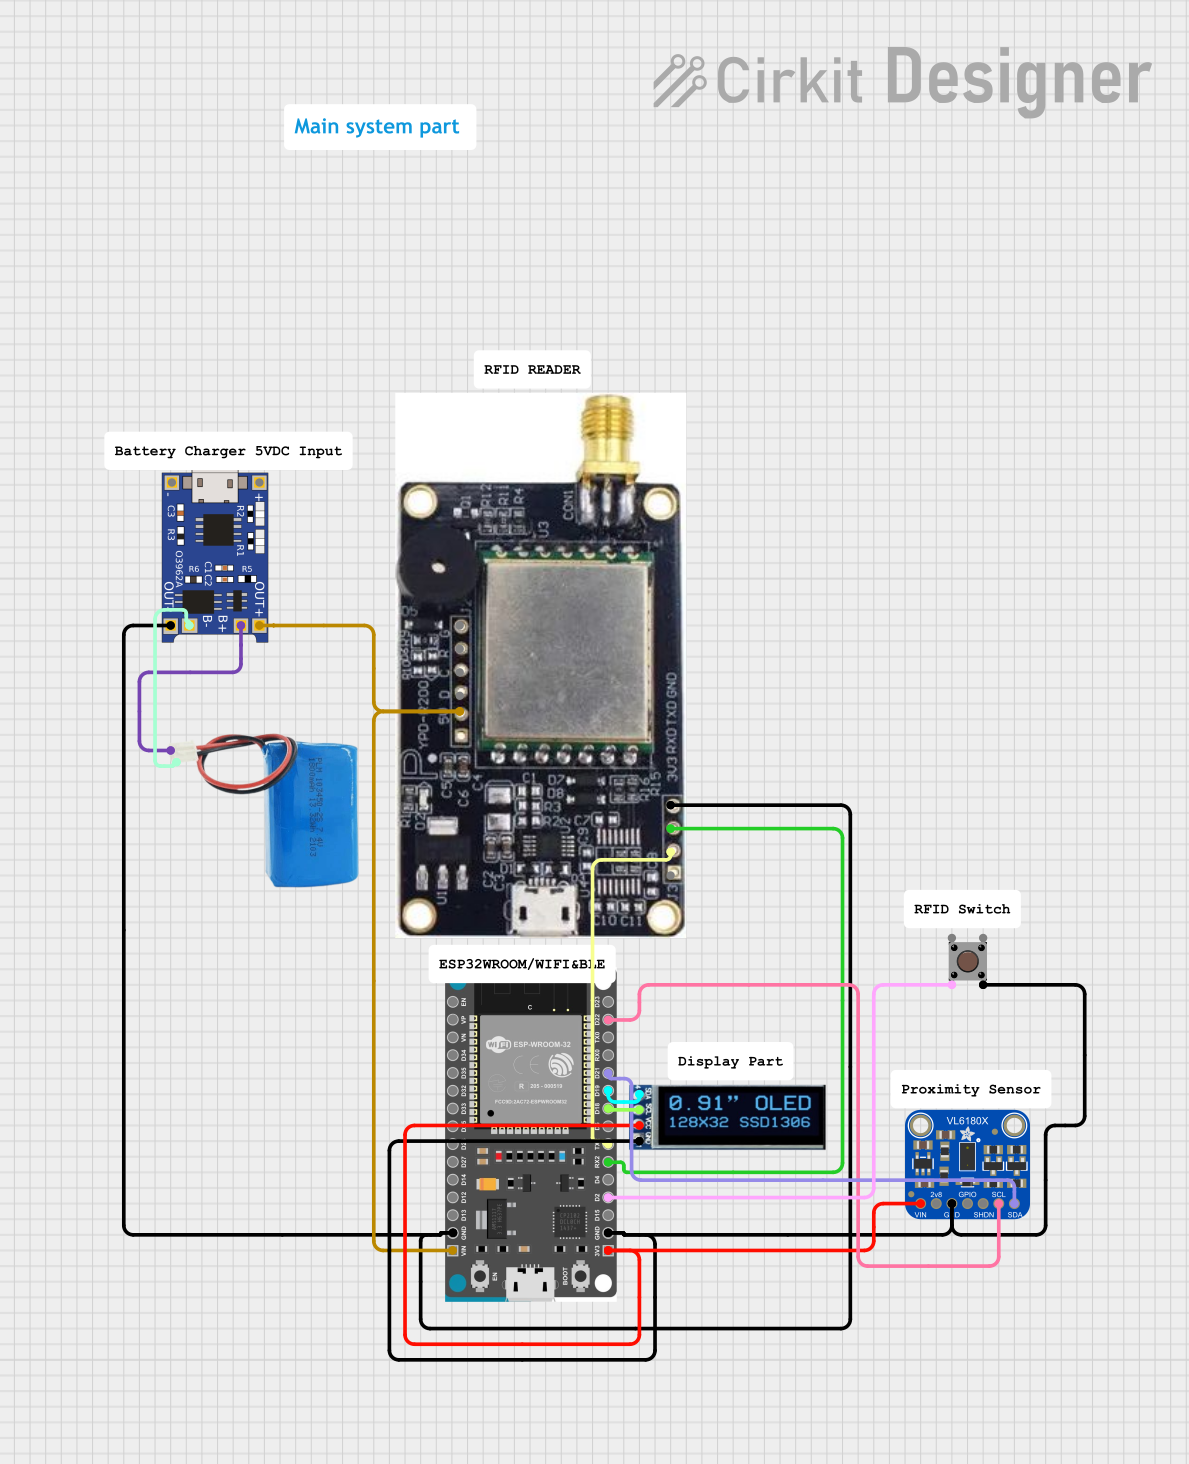
This circuit features an ESP32 microcontroller interfaced with a UHF RFID module, an Adafruit VL6180X Time of Flight Distance Sensor, an OLED display, and a pushbutton. The ESP32 reads distance data from the VL6180X sensor and displays it on the OLED, while also monitoring the state of the pushbutton and communicating with the RFID module via UART.
Arduino and ESP8266 RFID Door Lock System with WiFi Connectivity
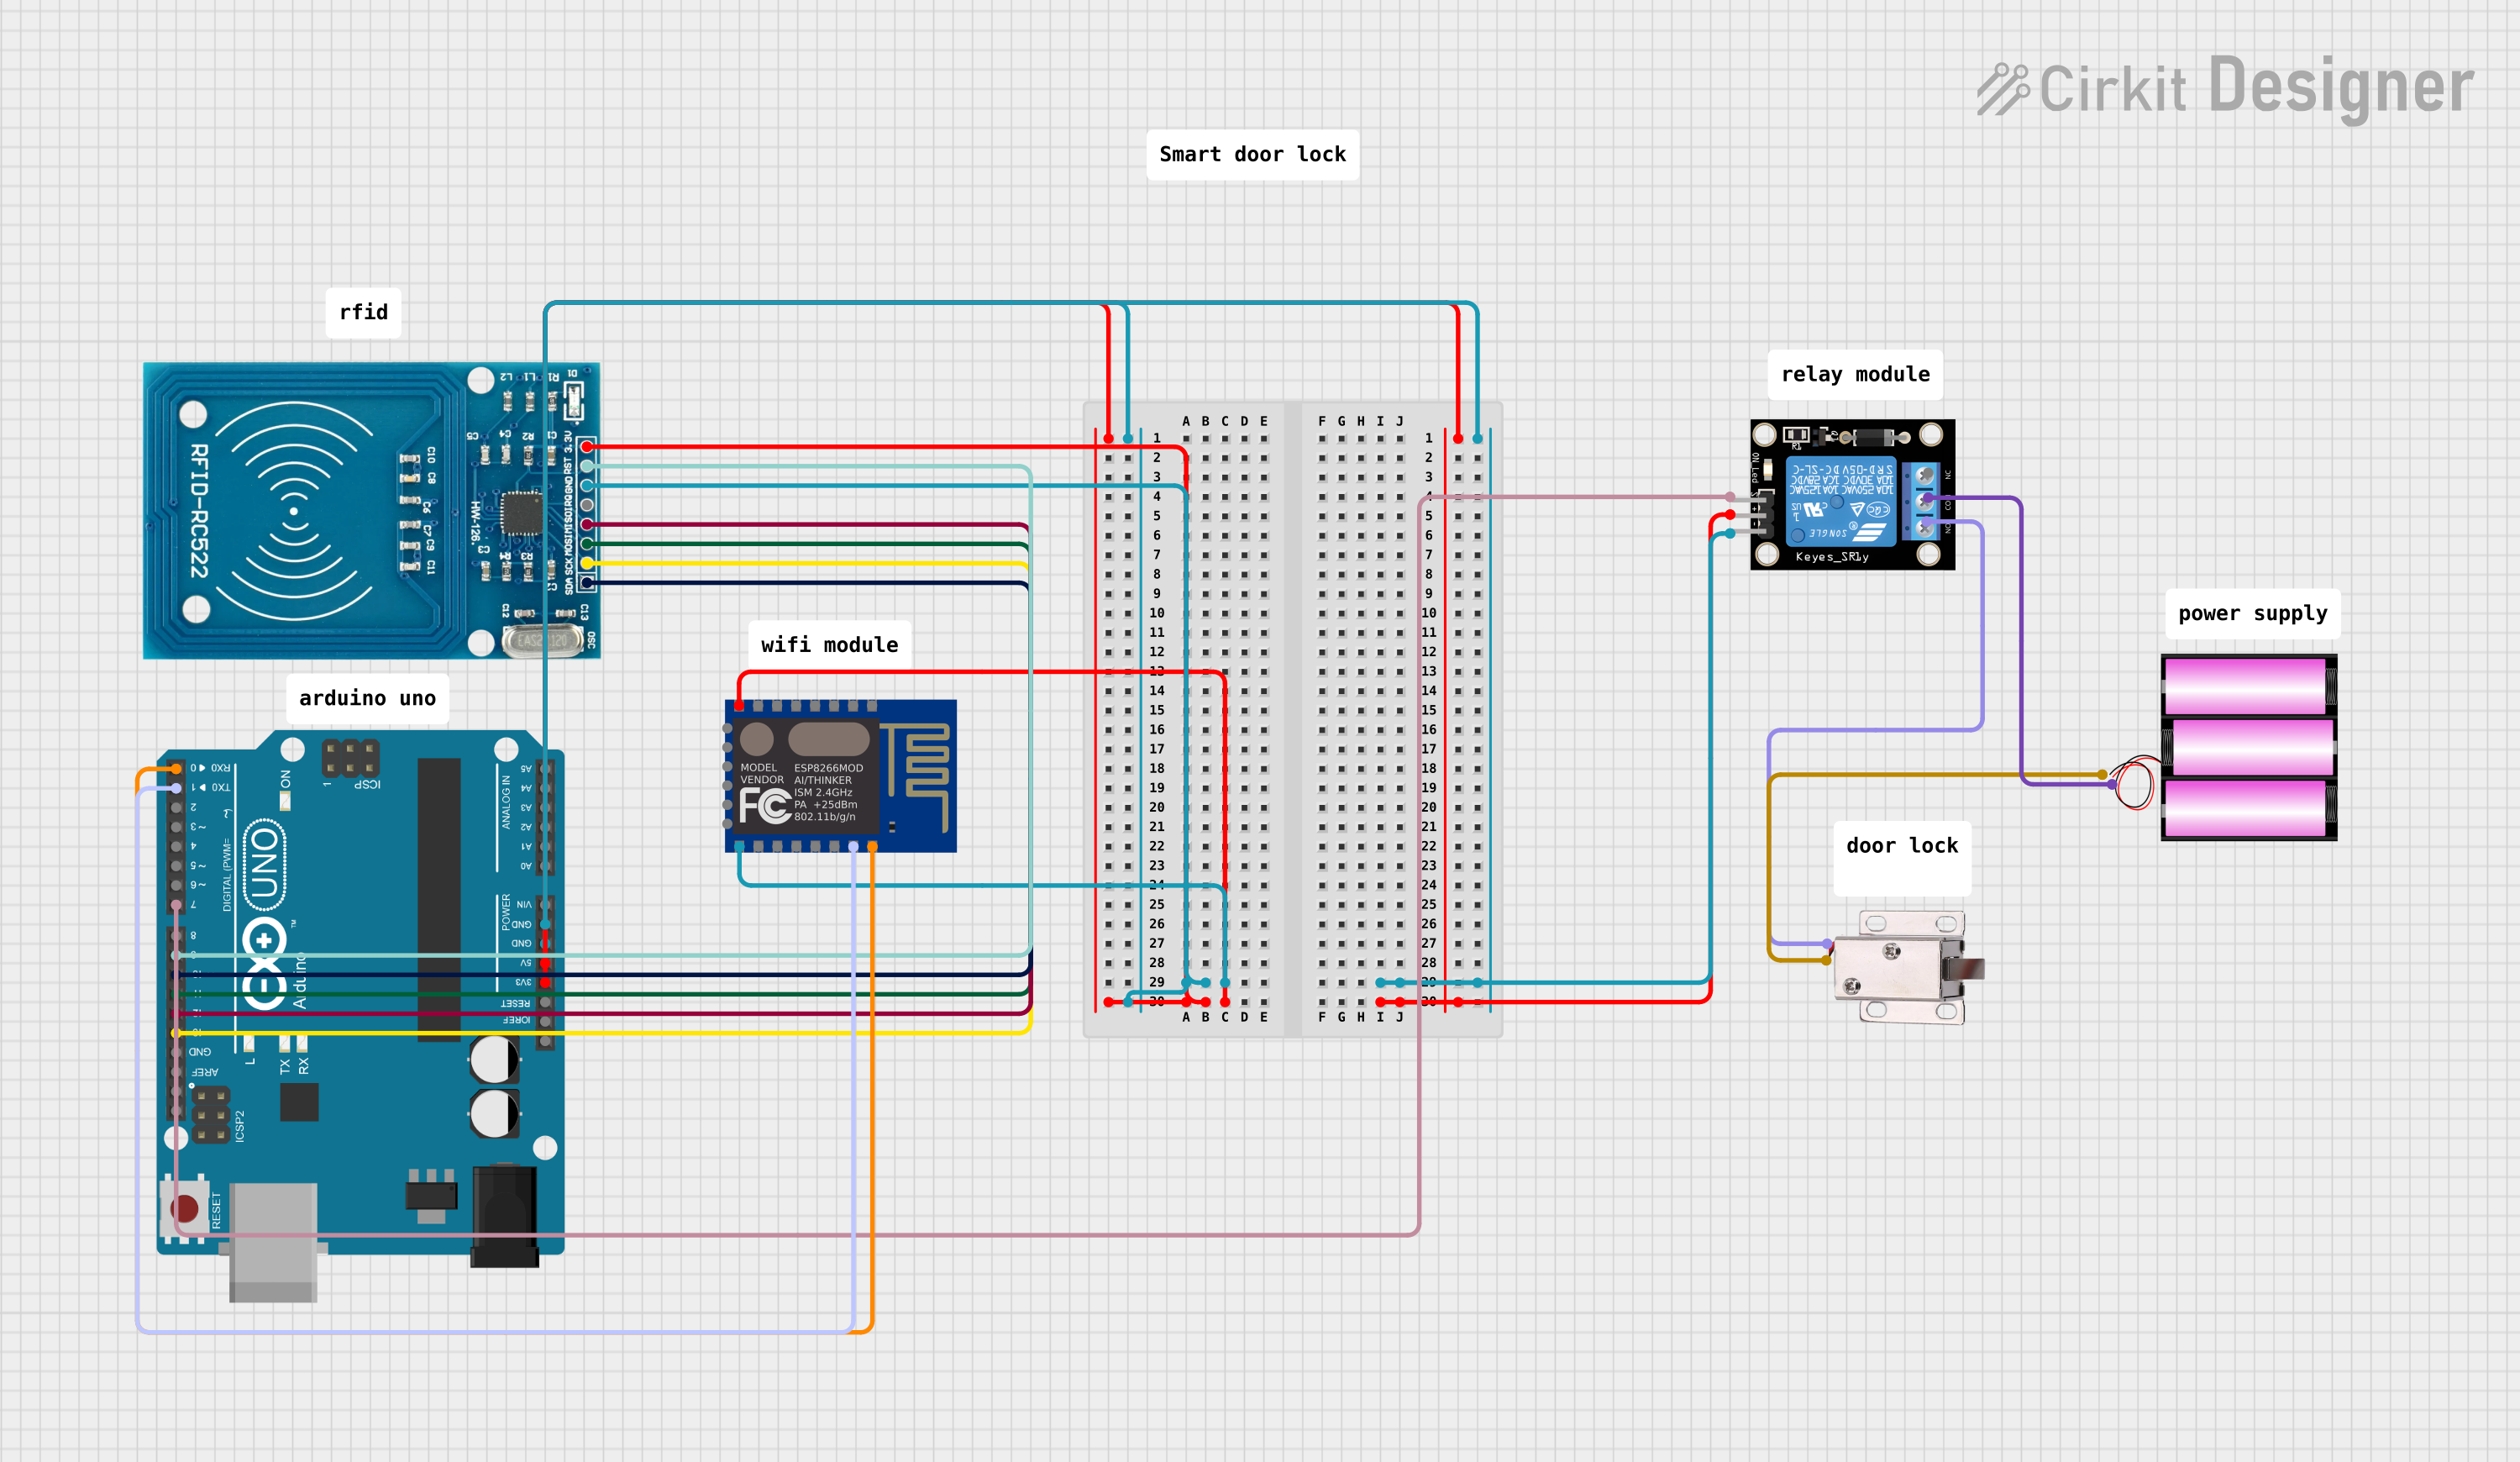
This circuit features an Arduino UNO connected to an RFID-RC522 module for RFID scanning and an ESP8266 ESP-12E WiFi module for wireless communication. The Arduino controls a KY-019 Relay module, which in turn drives a 12V solenoid lock, allowing the lock to be actuated based on RFID card detection or potentially remote commands via WiFi. The Arduino's embedded code is set up to initialize the RFID reader and output the UID of scanned cards to the serial monitor.
Arduino UNO Based RFID Access Control with 433MHz RF Communication
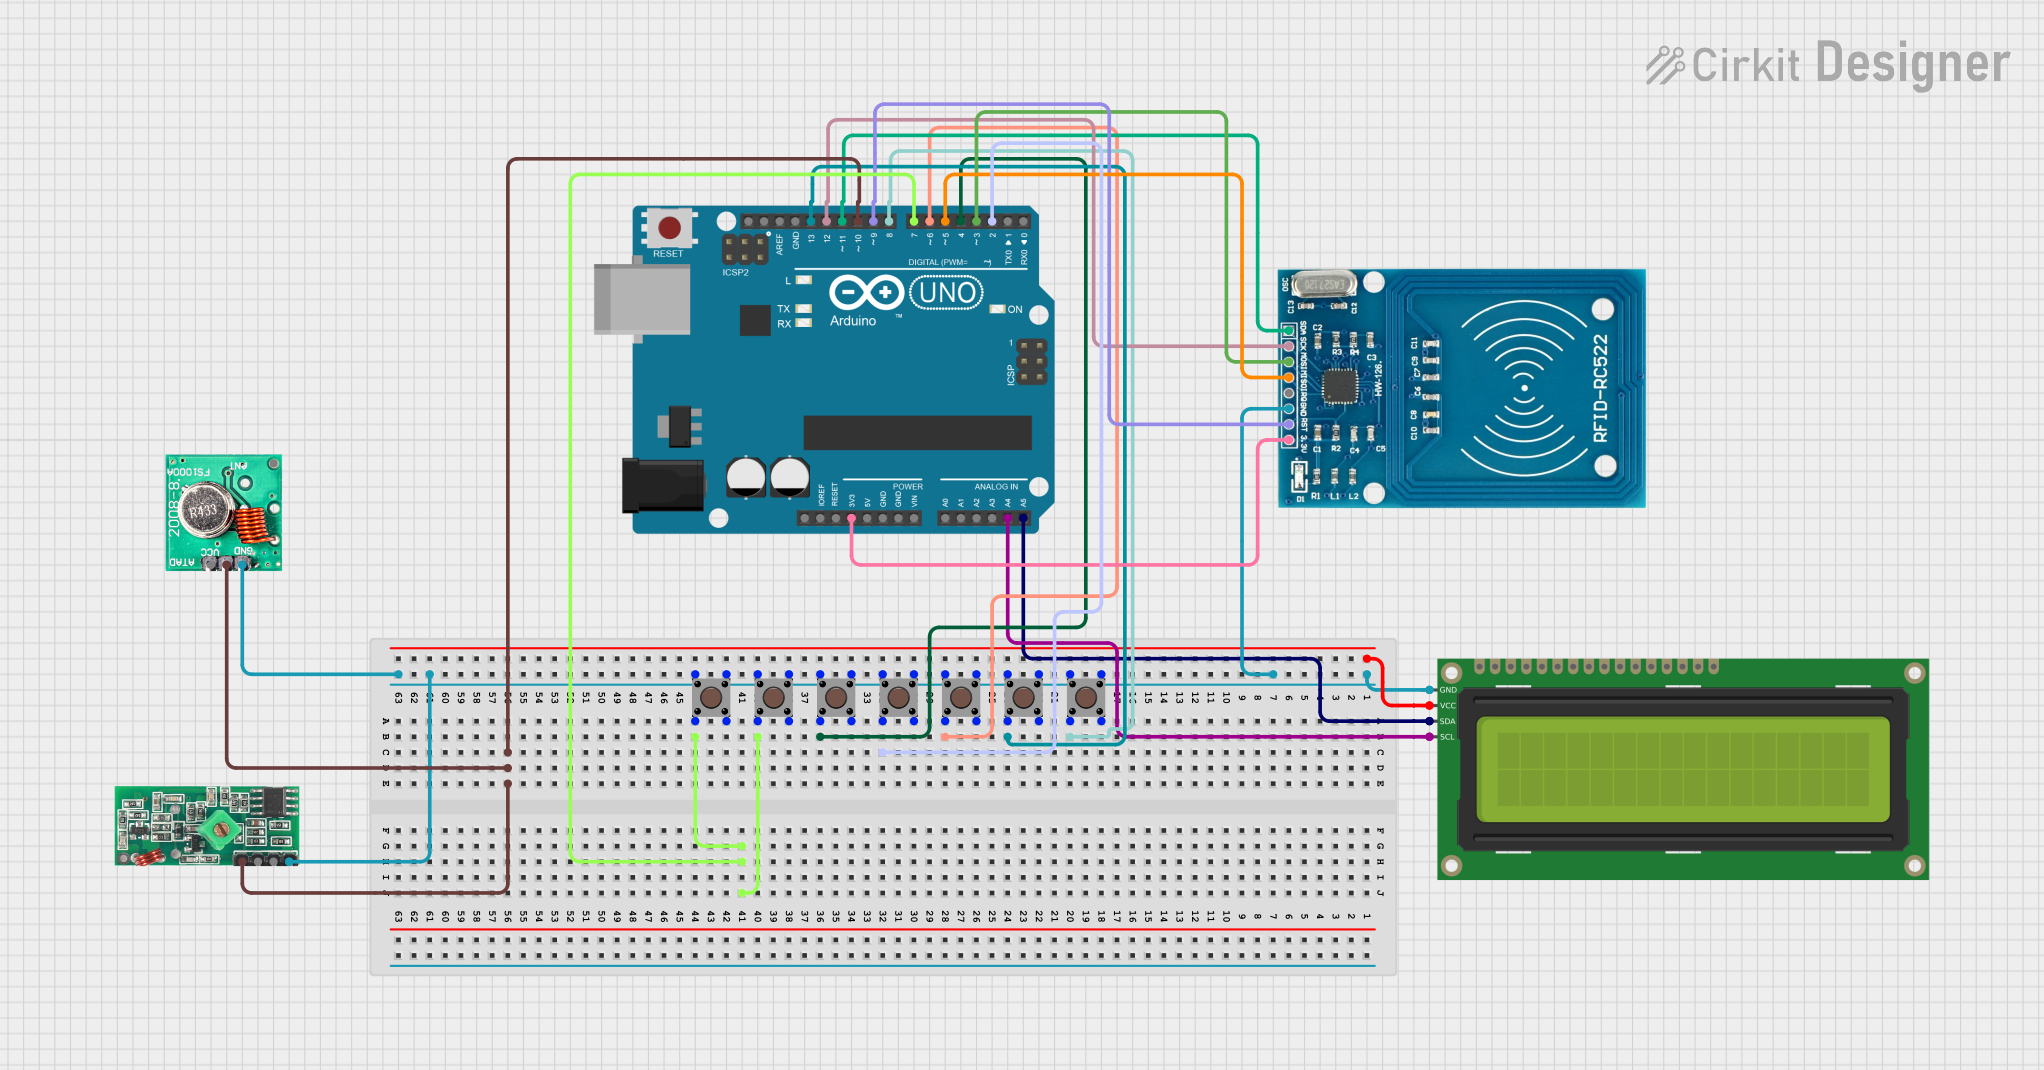
This circuit is designed to read RFID tags, display information on an LCD, and communicate wirelessly using 433MHz RF modules. It is controlled by an Arduino UNO, which processes inputs from multiple pushbuttons and manages the RFID reader and RF communication.
Explore Projects Built with UHF RFID
Arduino Mega 2560 and UHF RFID-Based Animal Tag Detection System with GPS
This circuit integrates an Arduino Mega 2560 with a UHF RFID module and a GPS antenna. The Arduino reads RFID tag data from the UHF RFID module and processes it to detect specific tags, while the GPS antenna is powered but not actively used in the provided code.
ESP32-Based Battery-Powered RFID Reader with OLED Display and Distance Sensor
This circuit features an ESP32 microcontroller interfaced with a UHF RFID module, an Adafruit VL6180X Time of Flight Distance Sensor, an OLED display, and a pushbutton. The ESP32 reads distance data from the VL6180X sensor and displays it on the OLED, while also monitoring the state of the pushbutton and communicating with the RFID module via UART.
Arduino and ESP8266 RFID Door Lock System with WiFi Connectivity
This circuit features an Arduino UNO connected to an RFID-RC522 module for RFID scanning and an ESP8266 ESP-12E WiFi module for wireless communication. The Arduino controls a KY-019 Relay module, which in turn drives a 12V solenoid lock, allowing the lock to be actuated based on RFID card detection or potentially remote commands via WiFi. The Arduino's embedded code is set up to initialize the RFID reader and output the UID of scanned cards to the serial monitor.
Arduino UNO Based RFID Access Control with 433MHz RF Communication
This circuit is designed to read RFID tags, display information on an LCD, and communicate wirelessly using 433MHz RF modules. It is controlled by an Arduino UNO, which processes inputs from multiple pushbuttons and manages the RFID reader and RF communication.
Technical Specifications
Key Technical Details
| Parameter | Value |
|---|---|
| Frequency Range | 300 MHz to 3 GHz |
| Typical Operating Frequency | 860 MHz to 960 MHz |
| Read Range | Up to 12 meters (40 feet) |
| Data Transfer Rate | Up to 640 kbps |
| Power Supply Voltage | 3.3V to 5V |
| Communication Interface | UART, SPI, I2C |
| Antenna Type | Integrated or External |
Pin Configuration and Descriptions
| Pin Number | Pin Name | Description |
|---|---|---|
| 1 | VCC | Power Supply (3.3V to 5V) |
| 2 | GND | Ground |
| 3 | TX | UART Transmit |
| 4 | RX | UART Receive |
| 5 | MOSI | SPI Master Out Slave In |
| 6 | MISO | SPI Master In Slave Out |
| 7 | SCK | SPI Clock |
| 8 | SDA | I2C Data |
| 9 | SCL | I2C Clock |
| 10 | ANT | Antenna Connection |
Usage Instructions
How to Use the Component in a Circuit
- Power Supply: Connect the VCC pin to a 3.3V or 5V power supply and the GND pin to the ground.
- Communication Interface: Choose the appropriate communication interface (UART, SPI, or I2C) based on your microcontroller or development board.
- For UART: Connect the TX pin to the RX pin of the microcontroller and the RX pin to the TX pin of the microcontroller.
- For SPI: Connect the MOSI, MISO, and SCK pins to the corresponding pins on the microcontroller.
- For I2C: Connect the SDA and SCL pins to the corresponding pins on the microcontroller.
- Antenna: Connect an external antenna to the ANT pin if required.
Important Considerations and Best Practices
- Antenna Placement: Ensure the antenna is placed away from metal objects and other sources of interference to maximize read range and performance.
- Power Supply: Use a stable power supply to avoid fluctuations that could affect the performance of the UHF RFID module.
- Tag Orientation: The orientation of the RFID tags relative to the antenna can affect read range and reliability. Experiment with different orientations for optimal performance.
- Environmental Factors: Be aware of environmental factors such as temperature, humidity, and physical obstructions that can impact the performance of the UHF RFID system.
Example Code for Arduino UNO
Below is an example code to interface a UHF RFID module with an Arduino UNO using the UART interface.
#include <SoftwareSerial.h>

// Define the pins for the SoftwareSerial interface
#define RX_PIN 2
#define TX_PIN 3

// Create a SoftwareSerial object
SoftwareSerial rfidSerial(RX_PIN, TX_PIN);

void setup() {
  // Initialize the hardware serial port
  Serial.begin(9600);
  // Initialize the software serial port
  rfidSerial.begin(9600);
  Serial.println("UHF RFID Reader Initialized");
}

void loop() {
  // Check if data is available from the RFID reader
  if (rfidSerial.available()) {
    // Read the data from the RFID reader
    String rfidData = rfidSerial.readStringUntil('\n');
    // Print the RFID data to the serial monitor
    Serial.println("RFID Tag Detected: " + rfidData);
  }
}
Troubleshooting and FAQs
Common Issues Users Might Face
- No Data from RFID Reader: Ensure the connections are correct and the power supply is stable. Check the communication interface settings.
- Short Read Range: Verify the antenna placement and orientation. Ensure there are no obstructions or sources of interference nearby.
- Intermittent Data: Check for loose connections and ensure the power supply is stable. Verify the environmental conditions.
Solutions and Tips for Troubleshooting
- Check Connections: Double-check all connections to ensure they are secure and correctly wired.
- Stable Power Supply: Use a regulated power supply to avoid voltage fluctuations.
- Antenna Placement: Experiment with different antenna placements and orientations to find the optimal setup.
- Environmental Factors: Consider the impact of environmental factors and make adjustments as needed.
By following this documentation, users can effectively integrate and utilize UHF RFID technology in their projects, ensuring reliable performance and successful implementation.