How to Use W5500 Mini: Examples, Pinouts, and Specs
Introduction
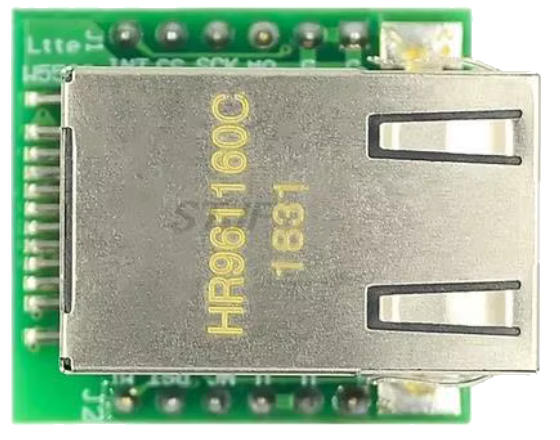
The W5500 Mini is a compact Ethernet controller designed to simplify the process of connecting microcontrollers to the internet. It features an integrated TCP/IP stack, which offloads the complexities of network communication from the microcontroller. This makes it an ideal choice for Internet of Things (IoT) applications, home automation, industrial control systems, and other projects requiring reliable Ethernet connectivity.
The W5500 Mini supports high-speed SPI communication, enabling seamless integration with a wide range of microcontrollers, including popular platforms like Arduino, ESP32, and STM32. Its small form factor makes it suitable for space-constrained designs.
Explore Projects Built with W5500 Mini


Explore Projects Built with W5500 Mini
Common Applications
- IoT devices and smart home systems
- Industrial automation and monitoring
- Network-enabled sensors and actuators
- Remote data logging and control
- Educational and prototyping projects
Technical Specifications
Key Technical Details
| Parameter | Value |
|---|---|
| Ethernet Standard | IEEE 802.3 10/100 Mbps |
| Communication Interface | SPI (Serial Peripheral Interface) |
| Operating Voltage | 3.3V |
| Logic Level Compatibility | 3.3V |
| Power Consumption | ~132 mA (typical) |
| Integrated Features | TCP/IP stack, 8 independent sockets |
| Buffer Size | 32 KB (shared across sockets) |
| Dimensions | 28mm x 20mm x 5mm |
Pin Configuration and Descriptions
The W5500 Mini has a standard 8-pin header for SPI communication and power connections. Below is the pinout:
| Pin Number | Pin Name | Description |
|---|---|---|
| 1 | GND | Ground connection |
| 2 | 3.3V | Power supply (3.3V input) |
| 3 | SCK | SPI Clock: Synchronizes data transfer between the microcontroller and W5500 |
| 4 | MISO | SPI Master-In-Slave-Out: Data sent from W5500 to the microcontroller |
| 5 | MOSI | SPI Master-Out-Slave-In: Data sent from the microcontroller to W5500 |
| 6 | CS | Chip Select: Activates the W5500 for SPI communication |
| 7 | INT | Interrupt: Signals events like data reception or transmission completion |
| 8 | RST | Reset: Resets the W5500 to its initial state |
Usage Instructions
How to Use the W5500 Mini in a Circuit
- Power Supply: Connect the
3.3Vpin to a regulated 3.3V power source and theGNDpin to ground. - SPI Connections: Connect the
SCK,MISO,MOSI, andCSpins to the corresponding SPI pins on your microcontroller. - Interrupt Pin (Optional): Use the
INTpin to handle events like incoming data or socket status changes. This is optional but can improve efficiency. - Reset Pin (Optional): Connect the
RSTpin to a GPIO pin on your microcontroller or a manual reset button for resetting the W5500.
Important Considerations
- Voltage Levels: Ensure that the microcontroller's SPI pins operate at 3.3V logic levels. If your microcontroller uses 5V logic, use a level shifter to avoid damaging the W5500.
- SPI Speed: The W5500 supports SPI clock speeds up to 80 MHz. However, for reliable communication, start with a lower speed (e.g., 1 MHz) and increase as needed.
- Pull-Up Resistors: Some designs may require pull-up resistors on the
CSandRSTpins for stable operation.
Example: Using W5500 Mini with Arduino UNO
Below is an example of how to use the W5500 Mini with an Arduino UNO to establish a basic Ethernet connection.
Circuit Connections
| W5500 Mini Pin | Arduino UNO Pin |
|---|---|
| GND | GND |
| 3.3V | 3.3V |
| SCK | D13 |
| MISO | D12 |
| MOSI | D11 |
| CS | D10 |
| INT | Not connected |
| RST | Not connected |
Arduino Code Example
#include <SPI.h>
#include <Ethernet.h>

// MAC address for the Ethernet shield
byte mac[] = { 0xDE, 0xAD, 0xBE, 0xEF, 0xFE, 0xED };

// IP address for the device (adjust as needed)
IPAddress ip(192, 168, 1, 177);

// Initialize the Ethernet server on port 80
EthernetServer server(80);

void setup() {
  // Start serial communication for debugging
  Serial.begin(9600);
  while (!Serial) {
    ; // Wait for the serial port to connect (for Leonardo boards)
  }

  // Start the Ethernet connection
  if (Ethernet.begin(mac) == 0) {
    Serial.println("Failed to configure Ethernet using DHCP");
    // Use static IP if DHCP fails
    Ethernet.begin(mac, ip);
  }

  // Print the assigned IP address
  Serial.print("IP Address: ");
  Serial.println(Ethernet.localIP());

  // Start the server
  server.begin();
  Serial.println("Server is ready");
}

void loop() {
  // Listen for incoming clients
  EthernetClient client = server.available();
  if (client) {
    Serial.println("New client connected");
    // Send a basic HTTP response
    client.println("HTTP/1.1 200 OK");
    client.println("Content-Type: text/html");
    client.println("Connection: close");
    client.println();
    client.println("<!DOCTYPE HTML>");
    client.println("<html>");
    client.println("<h1>Hello from W5500 Mini!</h1>");
    client.println("</html>");
    delay(1); // Give the client time to receive the data
    client.stop(); // Close the connection
    Serial.println("Client disconnected");
  }
}
Troubleshooting and FAQs
Common Issues
No Ethernet Connection:
- Cause: Incorrect wiring or power supply issues.
- Solution: Double-check all connections and ensure the W5500 is powered with 3.3V.
Failed to Obtain IP Address:
- Cause: DHCP server not available or misconfigured.
- Solution: Verify the network setup and try using a static IP address.
Unstable Communication:
- Cause: SPI clock speed too high or noisy connections.
- Solution: Reduce the SPI clock speed and ensure proper grounding.
Interrupt Pin Not Working:
- Cause: Interrupt pin not configured or connected.
- Solution: Verify the interrupt pin connection and configure it in your code.
FAQs
Q: Can I use the W5500 Mini with a 5V microcontroller?
A: Yes, but you must use level shifters for the SPI pins to avoid damaging the W5500, as it operates at 3.3V logic levels.
Q: Does the W5500 Mini support UDP communication?
A: Yes, the W5500 supports both TCP and UDP protocols.
Q: How many simultaneous connections can the W5500 handle?
A: The W5500 supports up to 8 independent sockets for simultaneous connections.
Q: Can I use the W5500 Mini with a Wi-Fi router?
A: Yes, the W5500 Mini can connect to any standard Ethernet network, including those provided by Wi-Fi routers with Ethernet ports.
This concludes the documentation for the W5500 Mini.