Cirkit Designer Logo
Cirkit Designer
Your all-in-one circuit design IDE
Home / 
Component Documentation

How to Use oled: Examples, Pinouts, and Specs

Image of oled
Cirkit Designer LogoDesign with oled in Cirkit Designer

Introduction

An Organic Light Emitting Diode (OLED) is a display technology that uses organic compounds to emit light when an electric current is applied. Unlike traditional LCDs, OLEDs do not require a backlight, allowing for thinner, more energy-efficient displays with superior image quality. OLEDs are known for their high contrast ratios, vibrant colors, and ability to produce deep blacks, making them ideal for applications requiring high visual fidelity.

Explore Projects Built with oled

Use Cirkit Designer to design, explore, and prototype these projects online. Some projects support real-time simulation. Click "Open Project" to start designing instantly!
Arduino and ESP32-CAM Based Autonomous Robot with Ultrasonic Obstacle Detection and Battery Power
Image of Fire Detection MK3: A project utilizing oled in a practical application
This circuit is a robotic vehicle controlled by an Arduino UNO, featuring an ultrasonic sensor for obstacle detection, multiple DC gear motors for movement, and servomotors for precise control. The system uses an L293D driver shield to interface the motors and sensors, and includes an ESP32-CAM for potential video streaming or image capture capabilities.
Cirkit Designer LogoOpen Project in Cirkit Designer
Arduino Mega 2560-Based Multi-Functional Vehicle with GPS and GSM
Image of alcohol_detector: A project utilizing oled in a practical application
This is a sensor-rich embedded system with communication and display capabilities, designed for monitoring environmental parameters and controlling motors. It integrates alcohol and temperature sensors, vibration detection, GPS tracking, GSM communication, and an LCD for output, all managed by an Arduino Mega 2560.
Cirkit Designer LogoOpen Project in Cirkit Designer
Interactive Touch and Motion Sensor System with Bela Board and OLED Display
Image of GIZMO Teaset: A project utilizing oled in a practical application
This circuit integrates a Bela Board with various sensors and actuators, including a TRILL CRAFT touch sensor, an ADXXL335 accelerometer, a vibration motor, and a loudspeaker. The Bela Board processes input from the touch sensor and accelerometer, and controls the vibration motor and loudspeaker, while an OLED display provides visual feedback.
Cirkit Designer LogoOpen Project in Cirkit Designer
Arduino UNO Controlled Touch Interface with OLED Display and Servo Feedback
Image of Candy Dispenser: A project utilizing oled in a practical application
This circuit features an Arduino UNO microcontroller connected to a touch sensor, an OLED display, a servomotor, and a buzzer. The touch sensor's output is connected to a digital pin on the Arduino for touch input detection. The OLED display communicates with the Arduino via I2C (SDA and SCL lines connected to A4 and A5), the servomotor is controlled by a digital PWM output (D9), and the buzzer is connected to another digital pin (D8) for audio feedback.
Cirkit Designer LogoOpen Project in Cirkit Designer

Explore Projects Built with oled

Use Cirkit Designer to design, explore, and prototype these projects online. Some projects support real-time simulation. Click "Open Project" to start designing instantly!
Image of Fire Detection MK3: A project utilizing oled in a practical application
Arduino and ESP32-CAM Based Autonomous Robot with Ultrasonic Obstacle Detection and Battery Power
This circuit is a robotic vehicle controlled by an Arduino UNO, featuring an ultrasonic sensor for obstacle detection, multiple DC gear motors for movement, and servomotors for precise control. The system uses an L293D driver shield to interface the motors and sensors, and includes an ESP32-CAM for potential video streaming or image capture capabilities.
Cirkit Designer LogoOpen Project in Cirkit Designer
Image of alcohol_detector: A project utilizing oled in a practical application
Arduino Mega 2560-Based Multi-Functional Vehicle with GPS and GSM
This is a sensor-rich embedded system with communication and display capabilities, designed for monitoring environmental parameters and controlling motors. It integrates alcohol and temperature sensors, vibration detection, GPS tracking, GSM communication, and an LCD for output, all managed by an Arduino Mega 2560.
Cirkit Designer LogoOpen Project in Cirkit Designer
Image of GIZMO Teaset: A project utilizing oled in a practical application
Interactive Touch and Motion Sensor System with Bela Board and OLED Display
This circuit integrates a Bela Board with various sensors and actuators, including a TRILL CRAFT touch sensor, an ADXXL335 accelerometer, a vibration motor, and a loudspeaker. The Bela Board processes input from the touch sensor and accelerometer, and controls the vibration motor and loudspeaker, while an OLED display provides visual feedback.
Cirkit Designer LogoOpen Project in Cirkit Designer
Image of Candy Dispenser: A project utilizing oled in a practical application
Arduino UNO Controlled Touch Interface with OLED Display and Servo Feedback
This circuit features an Arduino UNO microcontroller connected to a touch sensor, an OLED display, a servomotor, and a buzzer. The touch sensor's output is connected to a digital pin on the Arduino for touch input detection. The OLED display communicates with the Arduino via I2C (SDA and SCL lines connected to A4 and A5), the servomotor is controlled by a digital PWM output (D9), and the buzzer is connected to another digital pin (D8) for audio feedback.
Cirkit Designer LogoOpen Project in Cirkit Designer

Common Applications and Use Cases

  • Wearable devices (e.g., smartwatches, fitness trackers)
  • Consumer electronics (e.g., smartphones, tablets, televisions)
  • Industrial displays and control panels
  • IoT devices with graphical interfaces
  • Compact displays for microcontroller-based projects (e.g., Arduino, ESP32)

Technical Specifications

Below are the general technical specifications for an OLED display module compatible with the ESP32 microcontroller:

Parameter Value
Manufacturer ESP32
Part ID ESP32
Display Type OLED
Resolution 128x64 pixels (common)
Interface I2C or SPI
Operating Voltage 3.3V
Current Consumption ~20mA (varies with brightness)
Viewing Angle ~160°
Pixel Color Monochrome (white, blue, or yellow) or RGB
Dimensions Varies (e.g., 0.96", 1.3", etc.)

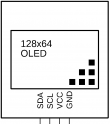
Pin Configuration and Descriptions

The pinout for a typical I2C-based OLED module is as follows:

Pin Name Description
VCC Power supply (3.3V for ESP32 compatibility)
GND Ground
SCL I2C Clock Line
SDA I2C Data Line

For SPI-based OLED modules, the pinout may include additional pins such as CS (Chip Select), DC (Data/Command), and RST (Reset).

Usage Instructions

How to Use the OLED in a Circuit

  1. Power Connection: Connect the VCC pin to the 3.3V output of the ESP32 and the GND pin to the ground.
  2. I2C Communication: Connect the SCL pin to the ESP32's GPIO22 (default I2C clock) and the SDA pin to GPIO21 (default I2C data).
  3. Install Required Libraries: Use the Arduino IDE and install the Adafruit_GFX and Adafruit_SSD1306 libraries for OLED control.
  4. Upload Code: Write and upload code to initialize and display content on the OLED.

Important Considerations and Best Practices

  • Voltage Compatibility: Ensure the OLED module operates at 3.3V to match the ESP32's logic levels.
  • I2C Address: Most OLED modules have a default I2C address of 0x3C. Verify this in the datasheet or by scanning I2C devices.
  • Pull-Up Resistors: Some OLED modules include pull-up resistors for I2C lines. If not, add external resistors (4.7kΩ recommended).
  • Brightness Control: Reduce brightness to save power and extend the OLED's lifespan.

Example Code for ESP32

Below is an example code snippet to display "Hello, World!" on a 128x64 OLED using I2C:

#include <Wire.h>
#include <Adafruit_GFX.h>
#include <Adafruit_SSD1306.h>

// Define OLED display width and height
#define SCREEN_WIDTH 128
#define SCREEN_HEIGHT 64

// Create an SSD1306 display object connected via I2C
Adafruit_SSD1306 display(SCREEN_WIDTH, SCREEN_HEIGHT, &Wire, -1);

void setup() {
  // Initialize serial communication for debugging
  Serial.begin(115200);

  // Initialize the OLED display
  if (!display.begin(SSD1306_I2C_ADDRESS, 0x3C)) {
    Serial.println(F("SSD1306 allocation failed"));
    for (;;); // Halt execution if initialization fails
  }

  // Clear the display buffer
  display.clearDisplay();

  // Set text size and color
  display.setTextSize(1); // Text size multiplier
  display.setTextColor(SSD1306_WHITE);

  // Display "Hello, World!" on the screen
  display.setCursor(0, 0); // Set cursor position
  display.println(F("Hello, World!"));
  display.display(); // Render the text on the screen
}

void loop() {
  // No actions in the loop for this example
}

Troubleshooting and FAQs

Common Issues and Solutions

  1. OLED Not Displaying Anything

    • Cause: Incorrect wiring or power supply.
    • Solution: Double-check connections, ensure the VCC pin is connected to 3.3V, and verify the I2C pins.
  2. I2C Address Not Detected

    • Cause: Incorrect I2C address or faulty module.
    • Solution: Use an I2C scanner sketch to detect the address. Replace the module if necessary.
  3. Flickering or Unstable Display

    • Cause: Insufficient power or loose connections.
    • Solution: Ensure a stable 3.3V power supply and secure all connections.
  4. Text or Graphics Not Rendering Properly

    • Cause: Incorrect library configuration or display dimensions.
    • Solution: Verify the display resolution in the code matches the module's specifications.

FAQs

  • Q: Can I use a 5V OLED module with the ESP32?

    • A: Yes, but you will need a level shifter to convert the ESP32's 3.3V logic to 5V.
  • Q: How do I display custom graphics on the OLED?

    • A: Use the Adafruit_GFX library to draw shapes or load bitmaps for custom graphics.
  • Q: Can I use multiple OLEDs with the ESP32?

    • A: Yes, you can use multiple OLEDs by assigning unique I2C addresses or using an SPI interface.

This documentation provides a comprehensive guide to using an OLED display with the ESP32, ensuring a smooth integration process for your projects.