How to Use WS2815 LED: Examples, Pinouts, and Specs

Introduction
The WS2815 LED is a smart RGB LED with individually addressable pixels, enabling precise control over color and brightness for each LED in a strip or matrix. Unlike its predecessors, the WS2815 operates at a 12V power supply, which reduces voltage drop over long runs and ensures consistent brightness across the strip. This makes it ideal for applications requiring vibrant, dynamic lighting effects over extended distances.
Explore Projects Built with WS2815 LED


Explore Projects Built with WS2815 LED
Common Applications
- Decorative lighting for homes, events, and commercial spaces
- LED displays and signage
- Ambiance lighting for gaming setups and entertainment systems
- Architectural lighting
- Wearable technology and art installations
Technical Specifications
The WS2815 LED is designed for high performance and reliability. Below are its key technical details:
| Parameter | Value |
|---|---|
| Operating Voltage | 12V DC |
| Data Signal Voltage | 5V TTL |
| Power Consumption | ~0.3W per LED (at full brightness) |
| LED Type | RGB (Red, Green, Blue) |
| Communication Protocol | Single-wire serial |
| Refresh Rate | Up to 2 kHz |
| Number of LEDs | Varies (based on strip length) |
| Operating Temperature | -25°C to +80°C |
| Waterproof Rating | IP30, IP65, or IP67 (varies by model) |
Pin Configuration
The WS2815 LED strip typically has three main wires for connection. Below is the pin configuration:
| Pin Name | Wire Color | Description |
|---|---|---|
| +12V | Red | Power supply (12V DC) |
| GND | Black/White | Ground connection |
| DI | Green/Blue | Data input for control signals |
| BI (Backup) | Yellow | Backup data input (ensures reliability) |
Note: The backup data line (BI) ensures that if one LED fails, the rest of the strip will continue to function.
Usage Instructions
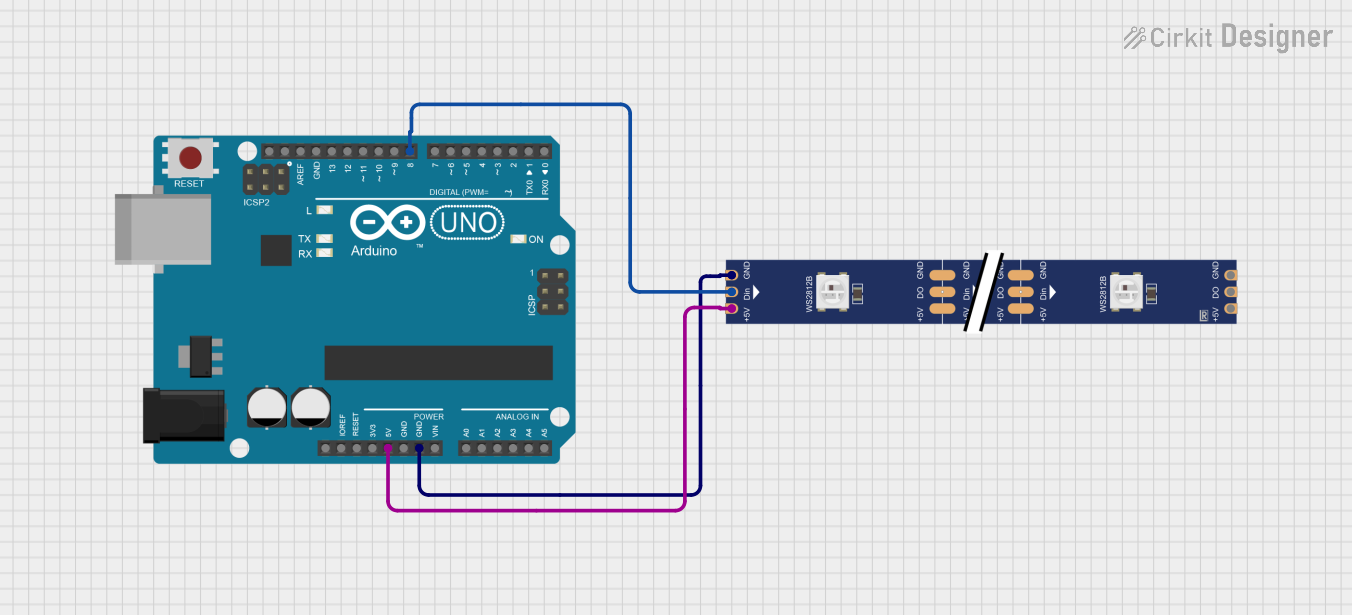
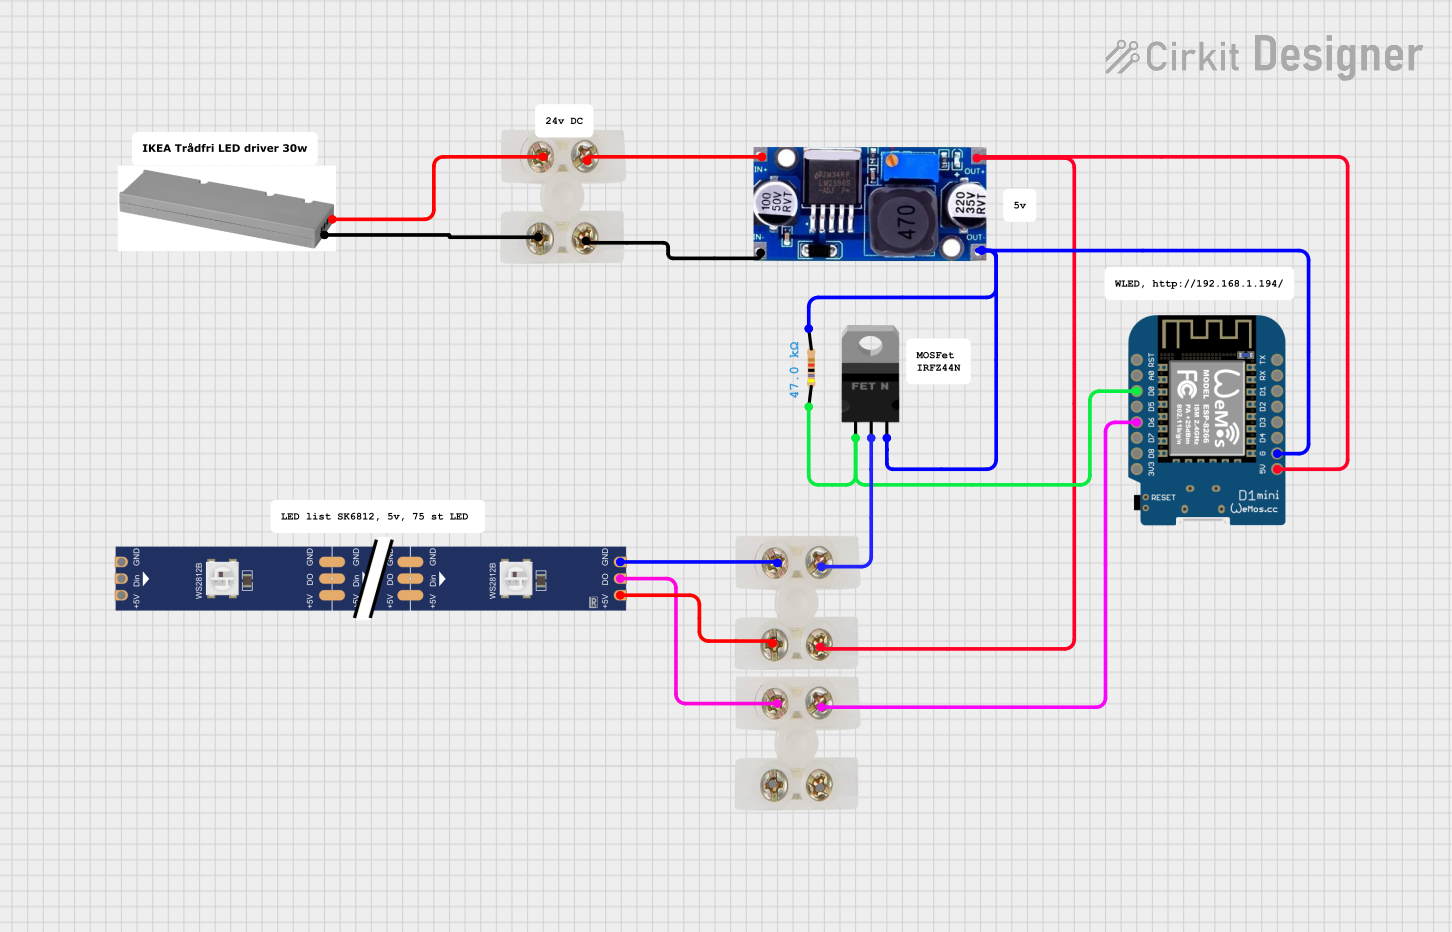
Connecting the WS2815 LED
- Power Supply: Connect the red wire (+12V) to a 12V DC power source and the black/white wire (GND) to the ground of the power source.
- Data Input: Connect the green/blue wire (DI) to the data output pin of your microcontroller (e.g., Arduino).
- Backup Line: Optionally, connect the yellow wire (BI) to the same data output pin for redundancy.
- Termination: Ensure the end of the strip is properly terminated with a resistor (typically 330Ω) to prevent signal reflection.
Important Considerations
- Use a power supply with sufficient current capacity. Each LED consumes approximately 20mA per color channel at full brightness.
- Add a capacitor (e.g., 1000µF, 16V) across the power supply terminals to stabilize voltage.
- Use a level shifter to convert the microcontroller's 3.3V or 5V data signal to the required 5V TTL level for the WS2815.
- Avoid bending the strip excessively to prevent damage to the circuit.
Example Code for Arduino UNO
Below is an example of how to control a WS2815 LED strip using the FastLED library:
#include <FastLED.h>

// Define the number of LEDs in the strip
#define NUM_LEDS 30

// Define the data pin connected to the DI pin of the WS2815
#define DATA_PIN 6

// Create an array to hold the LED data
CRGB leds[NUM_LEDS];

void setup() {
  // Initialize the LED strip
  FastLED.addLeds<WS2812B, DATA_PIN, GRB>(leds, NUM_LEDS);
  // Note: WS2815 uses the same protocol as WS2812B
}

void loop() {
  // Set all LEDs to red
  for (int i = 0; i < NUM_LEDS; i++) {
    leds[i] = CRGB::Red;
  }
  FastLED.show(); // Update the LED strip
  delay(1000);    // Wait for 1 second

  // Set all LEDs to green
  for (int i = 0; i < NUM_LEDS; i++) {
    leds[i] = CRGB::Green;
  }
  FastLED.show(); // Update the LED strip
  delay(1000);    // Wait for 1 second

  // Set all LEDs to blue
  for (int i = 0; i < NUM_LEDS; i++) {
    leds[i] = CRGB::Blue;
  }
  FastLED.show(); // Update the LED strip
  delay(1000);    // Wait for 1 second
}
Note: The WS2815 uses the same communication protocol as the WS2812B, so the FastLED library can be used without modification.
Troubleshooting and FAQs
Common Issues
LEDs not lighting up:
- Check the power supply voltage and ensure it is 12V DC.
- Verify all connections, especially the data and ground wires.
- Ensure the microcontroller is sending data at the correct voltage level (5V TTL).
Flickering or inconsistent colors:
- Add a capacitor (1000µF, 16V) across the power supply terminals.
- Use a resistor (330Ω) in series with the data line to reduce noise.
- Ensure the data line is not too long; use a level shifter if necessary.
One LED fails, and the rest stop working:
- The WS2815 has a backup data line (BI). Ensure it is properly connected to the data output pin.
FAQs
Q: Can I cut the WS2815 LED strip?
A: Yes, the strip can be cut at designated points (usually marked with a scissor icon). Ensure you reconnect the power, ground, and data lines properly.
Q: How many LEDs can I control with one microcontroller?
A: The number of LEDs is limited by the microcontroller's memory and the refresh rate. For example, an Arduino UNO can typically handle up to 500 LEDs.
Q: Can I power the strip from the Arduino?
A: No, the Arduino cannot supply the required current. Use an external 12V DC power supply.
Q: Is the WS2815 compatible with 3.3V microcontrollers?
A: Yes, but you will need a level shifter to convert the 3.3V data signal to 5V TTL.
By following this documentation, you can effectively use the WS2815 LED in your projects to create stunning lighting effects!