Cirkit Designer Logo
Cirkit Designer
Your all-in-one circuit design IDE
Home / 
Component Documentation

How to Use SparkFun 7-Segment Serial Display-Red: Examples, Pinouts, and Specs

Image of SparkFun 7-Segment Serial Display-Red
Cirkit Designer LogoDesign with SparkFun 7-Segment Serial Display-Red in Cirkit Designer

Introduction

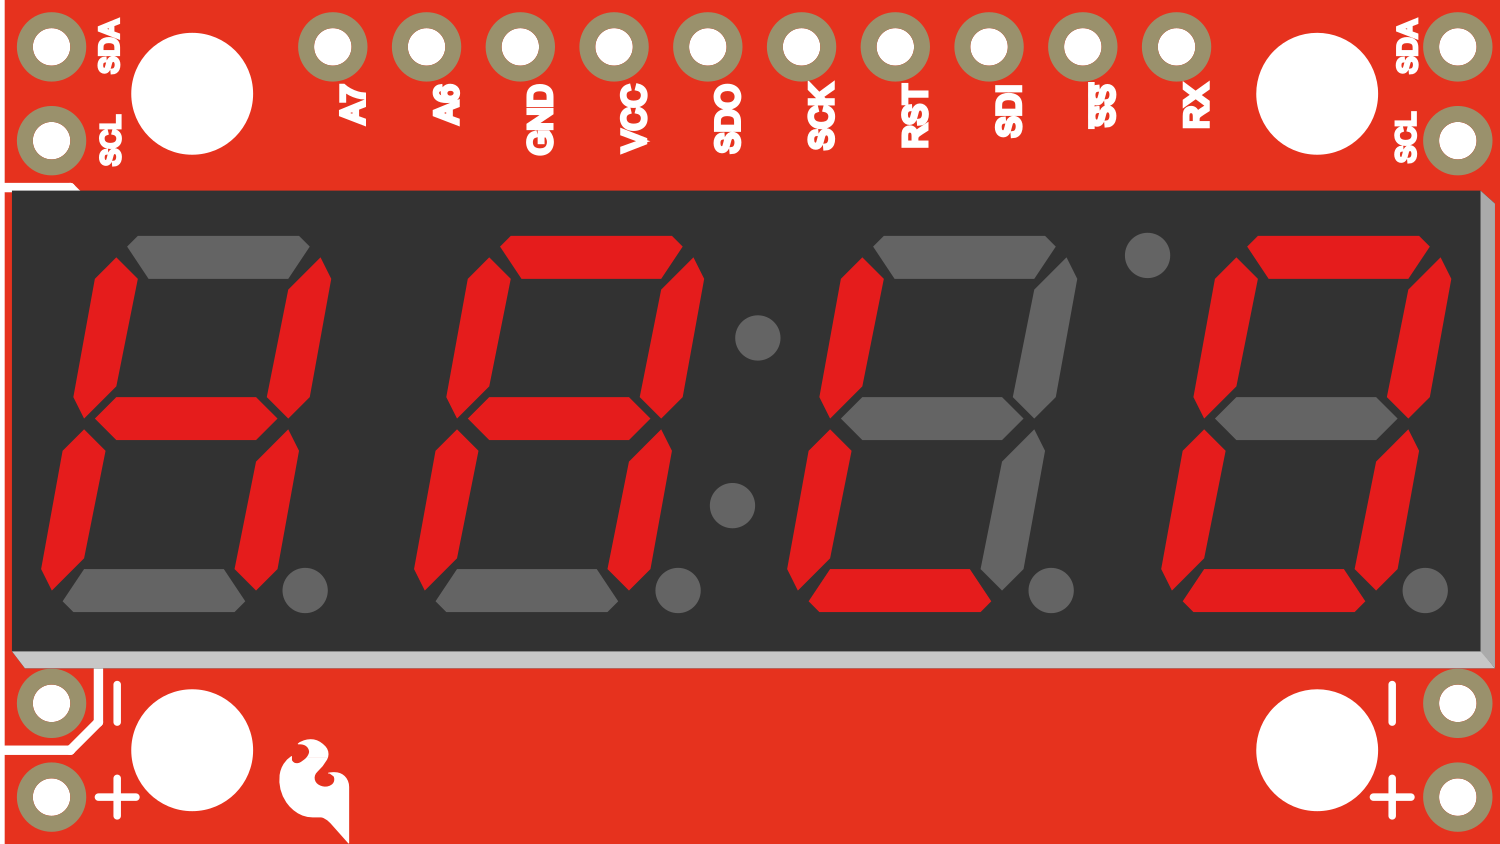
The SparkFun 7-Segment Serial Display - Red is a user-friendly LED display module that provides a simple way to add a 4-digit numeric display to your projects. It can be controlled via a serial interface, making it compatible with microcontrollers like the Arduino UNO. This display is commonly used in digital clocks, counters, timers, and as a numerical output for various sensors.

Explore Projects Built with SparkFun 7-Segment Serial Display-Red

Use Cirkit Designer to design, explore, and prototype these projects online. Some projects support real-time simulation. Click "Open Project" to start designing instantly!
Arduino UNO Controlled Seven-Segment Display Counter
Image of Arduino Uno - Seven Segment Display (Sim-C): A project utilizing SparkFun 7-Segment Serial Display-Red in a practical application
This circuit uses an Arduino UNO to control a seven-segment display, displaying digits from 0 to 9 with a one-second delay between each digit. The Arduino drives the segments of the common anode display by setting the corresponding pins to LOW, as defined in the provided sketch code.
Cirkit Designer LogoOpen Project in Cirkit Designer
Arduino UNO Controlled LED and 7-Segment Display Circuit
Image of Beunen aan water: A project utilizing SparkFun 7-Segment Serial Display-Red in a practical application
This circuit features an Arduino UNO controlling multiple blue LEDs and a 4-digit 7-segment display. The LEDs are configured with current-limiting resistors, and the display is interfaced with the Arduino for potential numeric or character output. The provided code for the Arduino is a template without specific functionality.
Cirkit Designer LogoOpen Project in Cirkit Designer
Arduino UNO Controlled Seven Segment Display with Pushbutton Interaction
Image of ghghghghgh: A project utilizing SparkFun 7-Segment Serial Display-Red in a practical application
This is a user-interactive circuit where an Arduino UNO microcontroller drives a seven-segment display and reads input from two pushbuttons. The display's segments are individually controlled by the Arduino, and the pushbuttons are set up to provide user input, potentially to change the displayed digit or trigger other actions.
Cirkit Designer LogoOpen Project in Cirkit Designer
Arduino UNO 4-Digit 7-Segment Display Counter
Image of arduino: A project utilizing SparkFun 7-Segment Serial Display-Red in a practical application
This circuit uses an Arduino UNO to control a 4-digit 7-segment display. The Arduino is programmed to sequentially display the numbers 1, 2, 3, and 4 on the display by driving the appropriate segments and digits.
Cirkit Designer LogoOpen Project in Cirkit Designer

Explore Projects Built with SparkFun 7-Segment Serial Display-Red

Use Cirkit Designer to design, explore, and prototype these projects online. Some projects support real-time simulation. Click "Open Project" to start designing instantly!
Image of Arduino Uno - Seven Segment Display (Sim-C): A project utilizing SparkFun 7-Segment Serial Display-Red in a practical application
Arduino UNO Controlled Seven-Segment Display Counter
This circuit uses an Arduino UNO to control a seven-segment display, displaying digits from 0 to 9 with a one-second delay between each digit. The Arduino drives the segments of the common anode display by setting the corresponding pins to LOW, as defined in the provided sketch code.
Cirkit Designer LogoOpen Project in Cirkit Designer
Image of Beunen aan water: A project utilizing SparkFun 7-Segment Serial Display-Red in a practical application
Arduino UNO Controlled LED and 7-Segment Display Circuit
This circuit features an Arduino UNO controlling multiple blue LEDs and a 4-digit 7-segment display. The LEDs are configured with current-limiting resistors, and the display is interfaced with the Arduino for potential numeric or character output. The provided code for the Arduino is a template without specific functionality.
Cirkit Designer LogoOpen Project in Cirkit Designer
Image of ghghghghgh: A project utilizing SparkFun 7-Segment Serial Display-Red in a practical application
Arduino UNO Controlled Seven Segment Display with Pushbutton Interaction
This is a user-interactive circuit where an Arduino UNO microcontroller drives a seven-segment display and reads input from two pushbuttons. The display's segments are individually controlled by the Arduino, and the pushbuttons are set up to provide user input, potentially to change the displayed digit or trigger other actions.
Cirkit Designer LogoOpen Project in Cirkit Designer
Image of arduino: A project utilizing SparkFun 7-Segment Serial Display-Red in a practical application
Arduino UNO 4-Digit 7-Segment Display Counter
This circuit uses an Arduino UNO to control a 4-digit 7-segment display. The Arduino is programmed to sequentially display the numbers 1, 2, 3, and 4 on the display by driving the appropriate segments and digits.
Cirkit Designer LogoOpen Project in Cirkit Designer

Common Applications and Use Cases

  • Digital clocks and timers
  • Counter displays (e.g., people counters, product counters)
  • Temperature or other sensor value displays
  • Simple user interfaces for devices

Technical Specifications

Key Technical Details

  • Display Color: Red
  • Operating Voltage: 3.3V to 7V
  • Current Consumption: 20-40mA (normal operation)
  • Communication: Serial (9600 bps by default)
  • Display Type: 4-Digit, 7-Segment LED

Pin Configuration and Descriptions

Pin Number Name Description
1 VCC Power supply (3.3V to 7V)
2 GND Ground connection
3 RX Serial data input (TTL level)
4 TX Serial data output (not used in one-way communication)

Usage Instructions

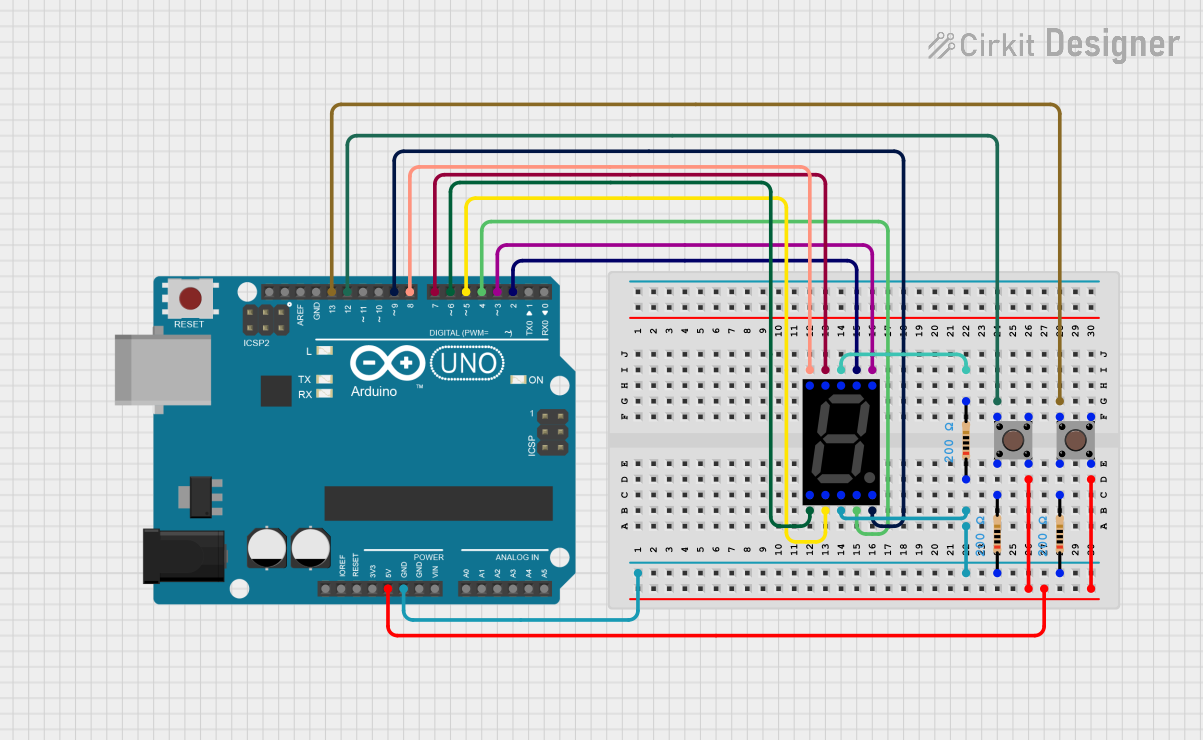
How to Use the Component in a Circuit

  1. Powering the Display: Connect the VCC pin to a 3.3V to 7V power supply and the GND pin to the ground.
  2. Connecting to a Microcontroller: Connect the RX pin of the display to a TX pin of your microcontroller.
  3. Programming the Microcontroller: Write a program to send serial data to the display to control the digits and segments.

Important Considerations and Best Practices

  • Ensure that the power supply voltage does not exceed the maximum rating of 7V.
  • Use a current-limiting resistor if connecting to a power supply greater than the operating voltage.
  • Avoid sending data at a baud rate higher than the default 9600 bps unless you have reconfigured the display to accept a higher rate.
  • When sending serial commands, follow the protocol specified by SparkFun for this display.

Example Code for Arduino UNO

#include <SoftwareSerial.h>

// Create a software serial port on pins 10 (RX) and 11 (TX)
SoftwareSerial sevenSegSerial(10, 11); // RX, TX

void setup() {
  // Set the baud rate for the software serial port
  sevenSegSerial.begin(9600);
}

void loop() {
  // Clear the display
  sevenSegSerial.write(0x76); // Clear command for the 7-segment display
  
  // Display the number "1234"
  sevenSegSerial.print("1234");
  
  delay(1000); // Wait for 1 second
  
  // Display the number "5678"
  sevenSegSerial.print("5678");
  
  delay(1000); // Wait for 1 second
}

Troubleshooting and FAQs

Common Issues Users Might Face

  • Display Not Lighting Up: Ensure that the power supply is connected correctly and within the specified voltage range.
  • Garbled or Incorrect Display: Check if the baud rate of the microcontroller's serial port matches the display's default baud rate.
  • Partial Display: Make sure all segments are functioning by sending the test command (if available) or cycling through all digits and segments.

Solutions and Tips for Troubleshooting

  • Double-check wiring connections, especially the RX and GND pins.
  • Verify that the serial data is being sent in the correct format as per the display's datasheet.
  • If using a new baud rate, ensure that both the display and the microcontroller are configured to use the same rate.

FAQs

Q: Can I change the brightness of the display? A: Yes, the SparkFun 7-Segment Serial Display typically supports brightness control via a serial command. Refer to the datasheet for the specific command.

Q: How do I display letters or special characters? A: The display supports a limited set of characters and symbols. Refer to the datasheet for the character map and corresponding serial commands.

Q: Can I chain multiple displays together? A: Some 7-segment serial displays support daisy-chaining. Check the SparkFun documentation for your specific model to see if this feature is supported and for instructions on how to implement it.

Remember to consult the SparkFun 7-Segment Serial Display's datasheet for detailed information on commands, additional features, and technical specifications.