Cirkit Designer Logo
Cirkit Designer
Your all-in-one circuit design IDE
Home / 
Component Documentation

How to Use Adafruit BQ24074 Solar-DC-USB Lipo Charger: Examples, Pinouts, and Specs

Image of Adafruit BQ24074 Solar-DC-USB Lipo Charger
Cirkit Designer LogoDesign with Adafruit BQ24074 Solar-DC-USB Lipo Charger in Cirkit Designer

Introduction

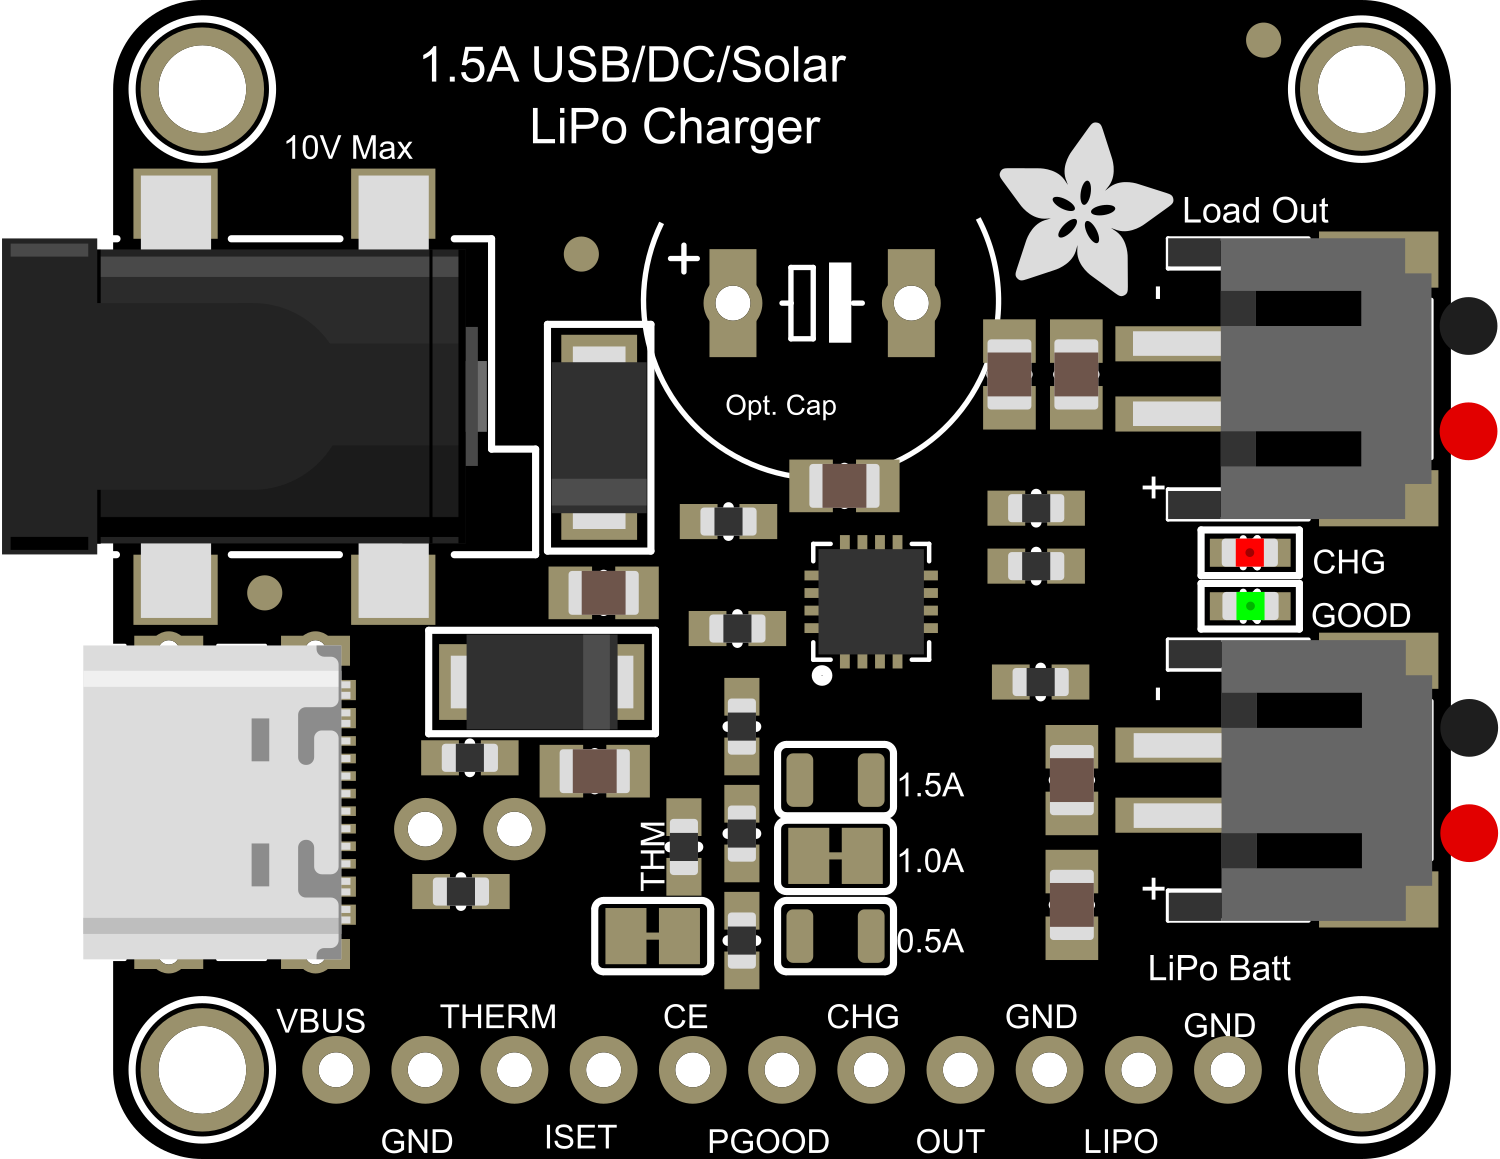
The Adafruit BQ24074 Solar-DC-USB LiPo Charger is a versatile and efficient charging solution for single-cell lithium-ion (LiPo) batteries. It integrates a linear charger with dynamic power path management, allowing for simultaneous battery charging and load powering from multiple input sources, including solar panels, DC power, and USB ports. This component is ideal for portable projects, solar-powered applications, and any system requiring reliable battery management.

Explore Projects Built with Adafruit BQ24074 Solar-DC-USB Lipo Charger

Use Cirkit Designer to design, explore, and prototype these projects online. Some projects support real-time simulation. Click "Open Project" to start designing instantly!
Solar-Powered Battery Charger with USB Output
Image of fuente de alimentacion: A project utilizing Adafruit BQ24074 Solar-DC-USB Lipo Charger in a practical application
This circuit is a solar-powered battery charging system. It uses a solar panel to provide input power to a TP4056 charging module, which charges a 18650 battery. The output from the TP4056 is regulated by an XL6009 voltage regulator to provide a stable voltage to a connected device via a Micro USB cable.
Cirkit Designer LogoOpen Project in Cirkit Designer
Solar-Powered Battery Monitoring System with Arduino Nano and OLED Display
Image of Charger: A project utilizing Adafruit BQ24074 Solar-DC-USB Lipo Charger in a practical application
This circuit is a solar-powered battery charging and monitoring system. It uses a solar cell to charge a Li-ion battery through a lipo battery charger module, and a PowerBoost module to provide a stable 5V output. An Arduino Nano, along with an INA219 sensor, monitors the battery voltage and current, displaying the battery status and charging rate on an OLED display.
Cirkit Designer LogoOpen Project in Cirkit Designer
Solar-Powered Battery Charger with Arduino-Controlled Display and Relay
Image of Smart Lighting and charging battery: A project utilizing Adafruit BQ24074 Solar-DC-USB Lipo Charger in a practical application
This circuit is a solar-powered battery charging and monitoring system. It uses a solar cell to charge two 18650 Li-ion batteries through a TP4056 charge controller, with an MT3608 boost converter to power an Arduino UNO. The Arduino monitors the battery voltage using an INA219 sensor and controls a relay module and an LED indicator, displaying information on a 16x2 I2C LCD.
Cirkit Designer LogoOpen Project in Cirkit Designer
Solar-Powered Arduino UNO with Li-ion Battery Management and Voltage Step-Up
Image of solar_cell: A project utilizing Adafruit BQ24074 Solar-DC-USB Lipo Charger in a practical application
This circuit is designed for charging a Li-ion 18650 battery using a solar panel, with the TP4056 module managing the charging process. The XL6009 step-up buck converter boosts the voltage to power an Arduino UNO, which is programmed to perform user-defined tasks. The circuit is likely intended for solar-powered Arduino projects that require a rechargeable battery backup.
Cirkit Designer LogoOpen Project in Cirkit Designer

Explore Projects Built with Adafruit BQ24074 Solar-DC-USB Lipo Charger

Use Cirkit Designer to design, explore, and prototype these projects online. Some projects support real-time simulation. Click "Open Project" to start designing instantly!
Image of fuente de alimentacion: A project utilizing Adafruit BQ24074 Solar-DC-USB Lipo Charger in a practical application
Solar-Powered Battery Charger with USB Output
This circuit is a solar-powered battery charging system. It uses a solar panel to provide input power to a TP4056 charging module, which charges a 18650 battery. The output from the TP4056 is regulated by an XL6009 voltage regulator to provide a stable voltage to a connected device via a Micro USB cable.
Cirkit Designer LogoOpen Project in Cirkit Designer
Image of Charger: A project utilizing Adafruit BQ24074 Solar-DC-USB Lipo Charger in a practical application
Solar-Powered Battery Monitoring System with Arduino Nano and OLED Display
This circuit is a solar-powered battery charging and monitoring system. It uses a solar cell to charge a Li-ion battery through a lipo battery charger module, and a PowerBoost module to provide a stable 5V output. An Arduino Nano, along with an INA219 sensor, monitors the battery voltage and current, displaying the battery status and charging rate on an OLED display.
Cirkit Designer LogoOpen Project in Cirkit Designer
Image of Smart Lighting and charging battery: A project utilizing Adafruit BQ24074 Solar-DC-USB Lipo Charger in a practical application
Solar-Powered Battery Charger with Arduino-Controlled Display and Relay
This circuit is a solar-powered battery charging and monitoring system. It uses a solar cell to charge two 18650 Li-ion batteries through a TP4056 charge controller, with an MT3608 boost converter to power an Arduino UNO. The Arduino monitors the battery voltage using an INA219 sensor and controls a relay module and an LED indicator, displaying information on a 16x2 I2C LCD.
Cirkit Designer LogoOpen Project in Cirkit Designer
Image of solar_cell: A project utilizing Adafruit BQ24074 Solar-DC-USB Lipo Charger in a practical application
Solar-Powered Arduino UNO with Li-ion Battery Management and Voltage Step-Up
This circuit is designed for charging a Li-ion 18650 battery using a solar panel, with the TP4056 module managing the charging process. The XL6009 step-up buck converter boosts the voltage to power an Arduino UNO, which is programmed to perform user-defined tasks. The circuit is likely intended for solar-powered Arduino projects that require a rechargeable battery backup.
Cirkit Designer LogoOpen Project in Cirkit Designer

Common Applications and Use Cases

  • Solar-powered devices
  • Portable electronics
  • USB-powered gadgets
  • Energy harvesting projects
  • Backup power supplies

Technical Specifications

Key Technical Details

  • Battery Chemistry: Lithium-Ion/Polymer
  • Input Voltage (V_IN): 4.4V to 10V
  • Charge Current: Programmable from 15mA to 1.5A
  • Operating Temperature Range: -40°C to 85°C
  • Integrated Power Path Management: Allows load to be powered while charging the battery

Pin Configuration and Descriptions

Pin Number Name Description
1 BAT Battery connection pin. Connect to the positive terminal of the LiPo battery.
2 GND Ground connection. Connect to the negative terminal of the LiPo battery and system ground.
3 CE Charge Enable pin. Drive low to enable charging, high to disable.
4 STAT Charge Status pin. Open-drain output to indicate charge status.
5 TS Temperature Sense pin. Connect to an NTC thermistor for temperature monitoring.
6 IN Input power connection. Connect to solar panel, USB, or DC power source.
7 ILIM Input Current Limit pin. Set the input current limit by connecting a resistor to GND.
8 SYS System Load connection. Powers the system load while charging the battery.

Usage Instructions

How to Use the Component in a Circuit

  1. Connect the Battery:

    • Connect the positive terminal of the LiPo battery to the BAT pin.
    • Connect the negative terminal of the LiPo battery to the GND pin.
  2. Power Source Connection:

    • For solar charging, connect the positive output of the solar panel to the IN pin.
    • For USB or DC charging, connect the power source to the IN pin.
  3. Load Connection:

    • Connect the system load to the SYS pin.
  4. Charge Enable:

    • Connect the CE pin to GND to enable charging.
    • Leave the CE pin floating or drive it high to disable charging.
  5. Charge Status Monitoring:

    • Connect a pull-up resistor to the STAT pin and monitor the voltage to determine the charge status.
  6. Temperature Sensing (Optional):

    • Connect an NTC thermistor to the TS pin for temperature monitoring during charging.

Important Considerations and Best Practices

  • Ensure that the input voltage does not exceed the maximum rating of 10V.
  • Set the charge current according to the battery's specifications to prevent overcharging.
  • Use a proper heat sink if necessary, as the charger can generate heat during operation.
  • Always monitor the charge status to prevent overcharging the battery.
  • Implement proper safety measures when working with lithium-ion batteries.

Troubleshooting and FAQs

Common Issues

  • Battery Not Charging:

    • Check the connections to the BAT and GND pins.
    • Ensure the CE pin is driven low to enable charging.
    • Verify that the input power source is within the specified voltage range.
  • Charge Status LED Not Indicating:

    • Confirm that the STAT pin is connected correctly with a pull-up resistor.
    • Check if the battery is already fully charged.
  • Excessive Heat During Charging:

    • Reduce the charge current if it exceeds the battery's recommended rate.
    • Ensure adequate ventilation and consider adding a heat sink.

Solutions and Tips for Troubleshooting

  • Double-check all connections and ensure they are secure and correct.
  • Use a multimeter to measure voltages at the IN, BAT, and SYS pins.
  • If the charger is not functioning, replace it with a new one to rule out a faulty component.

FAQs

Q: Can I charge multiple batteries with this charger? A: No, the BQ24074 is designed for single-cell LiPo batteries.

Q: What should I do if the battery is getting too hot during charging? A: Immediately disconnect the charger and battery. Check the charge current settings and ensure they match the battery's specifications.

Q: Can I leave the charger connected to the power source indefinitely? A: Yes, the charger has built-in overcharge protection, but it's always good practice to monitor your charging system periodically.

Example Code for Arduino UNO

// This example assumes you are using the Arduino to monitor the charge status.

const int STATpin = 2; // Connect STAT pin to digital pin 2 on Arduino

void setup() {
  pinMode(STATpin, INPUT_PULLUP); // Set the STAT pin as an input with internal pull-up
  Serial.begin(9600); // Start serial communication at 9600 baud
}

void loop() {
  int chargeStatus = digitalRead(STATpin); // Read the charge status pin

  if (chargeStatus == LOW) {
    Serial.println("Battery is charging...");
  } else {
    Serial.println("Battery is not charging or is fully charged.");
  }

  delay(1000); // Wait for 1 second before reading the status again
}

Remember to adjust the STATpin variable to match the actual connection on your Arduino board. This code snippet simply reads the charge status and outputs a message to the serial monitor.