How to Use 4x4 Capacitive Touch Keyboard: Examples, Pinouts, and Specs
Introduction
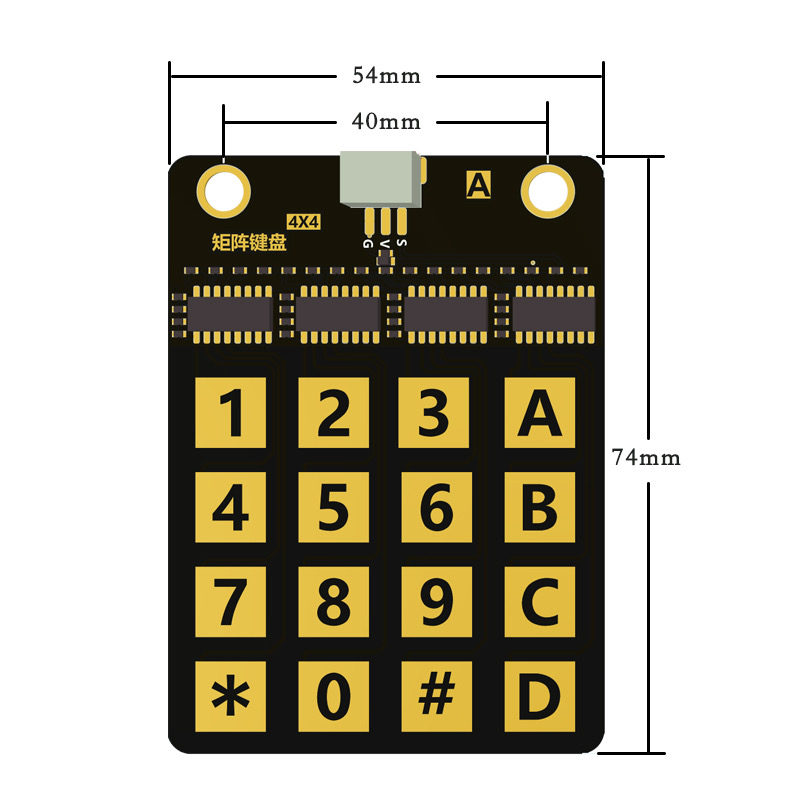
The 4x4 Capacitive Touch Keyboard (Manufacturer: CCO16524K, Part ID: Arduino micro:bit) is a touch-sensitive input device designed to detect finger touches on a grid of 16 capacitive sensors arranged in a 4x4 layout. This component provides a modern, sleek, and reliable alternative to traditional mechanical keypads, making it ideal for applications requiring user interaction.
Explore Projects Built with 4x4 Capacitive Touch Keyboard


Explore Projects Built with 4x4 Capacitive Touch Keyboard
Common Applications and Use Cases
- Home automation systems (e.g., touch-based control panels)
- Interactive kiosks and vending machines
- Embedded systems requiring compact input devices
- Educational projects with Arduino or micro:bit
- Touch-based musical instruments or gaming interfaces
Technical Specifications
The following table outlines the key technical details of the 4x4 Capacitive Touch Keyboard:
| Parameter | Value |
|---|---|
| Operating Voltage | 2.0V to 5.5V |
| Operating Current | < 10mA |
| Communication Protocol | I2C |
| Touch Sensitivity | Adjustable via onboard settings |
| Number of Keys | 16 (4x4 grid) |
| Dimensions | 70mm x 70mm x 5mm |
| Operating Temperature | -20°C to 70°C |
Pin Configuration and Descriptions
The 4x4 Capacitive Touch Keyboard has a standard pinout for easy integration with microcontrollers. The pin configuration is as follows:
| Pin | Name | Description |
|---|---|---|
| 1 | VCC | Power supply input (2.0V to 5.5V) |
| 2 | GND | Ground connection |
| 3 | SDA | I2C data line for communication |
| 4 | SCL | I2C clock line for communication |
| 5 | INT | Interrupt pin (active low, signals touch detection) |
Usage Instructions
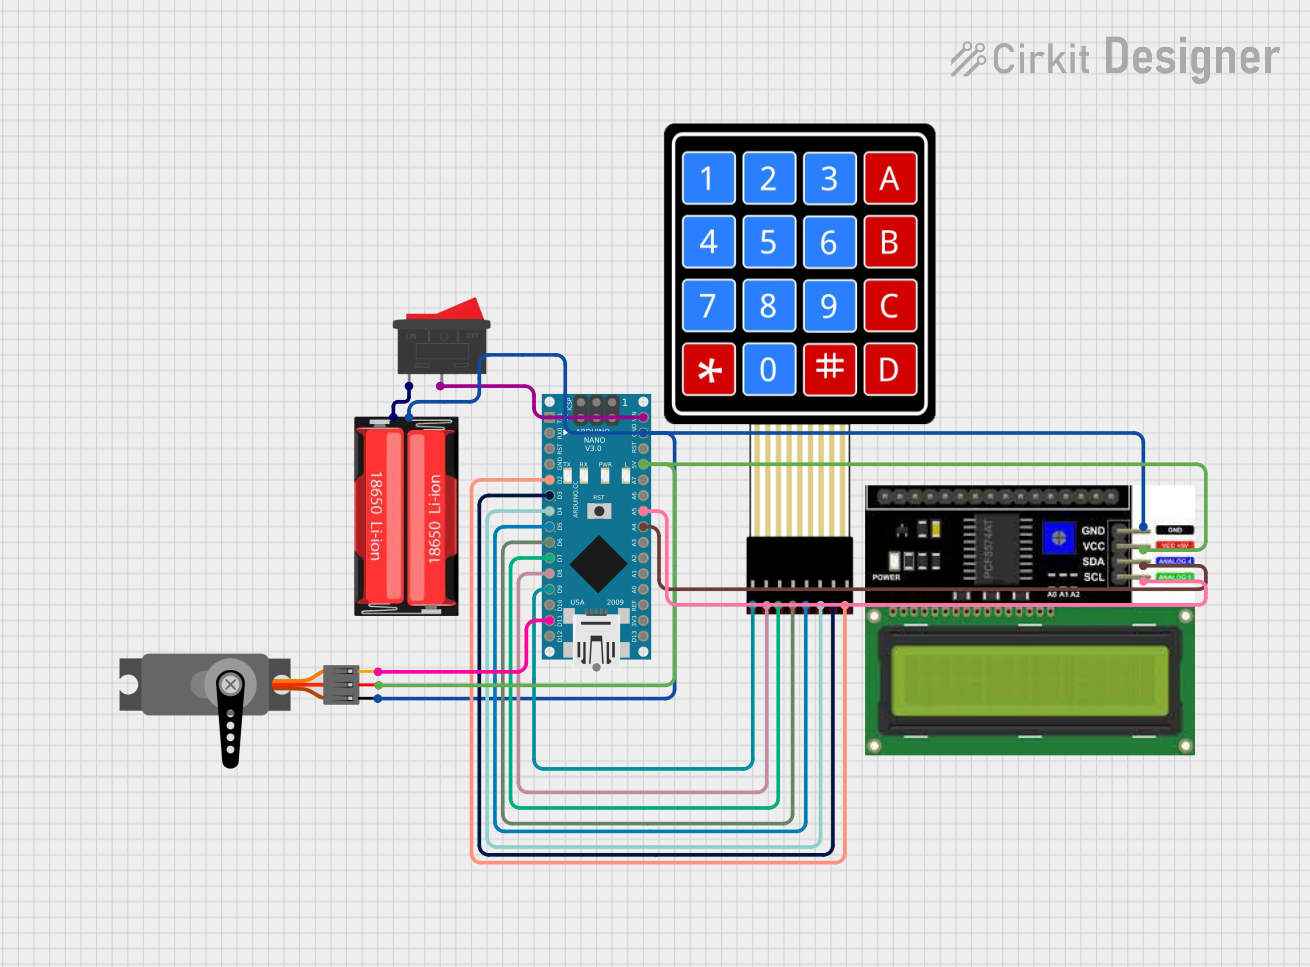
How to Use the Component in a Circuit
- Power the Keyboard: Connect the
VCCpin to a 3.3V or 5V power source and theGNDpin to ground. - I2C Communication: Connect the
SDAandSCLpins to the corresponding I2C pins on your microcontroller (e.g., Arduino or micro:bit). - Interrupt Pin: Optionally, connect the
INTpin to a digital input pin on your microcontroller to detect touch events without polling. - Pull-Up Resistors: Ensure that the I2C lines (SDA and SCL) have pull-up resistors (typically 4.7kΩ to 10kΩ) if not already provided on the microcontroller.
Important Considerations and Best Practices
- Touch Sensitivity: Adjust the sensitivity using the onboard settings (refer to the manufacturer's datasheet for details).
- Debouncing: Implement software debouncing to avoid false triggers caused by rapid touch events.
- I2C Address: The default I2C address is typically
0x1B, but verify this in the datasheet or by scanning the I2C bus. - Avoid Noise: Place the keyboard away from high-frequency noise sources to ensure reliable touch detection.
Example Code for Arduino UNO
Below is an example of how to interface the 4x4 Capacitive Touch Keyboard with an Arduino UNO using the Wire library:
#include <Wire.h> // Include the Wire library for I2C communication

#define TOUCH_I2C_ADDRESS 0x1B // Default I2C address of the touch keyboard

void setup() {
  Wire.begin(); // Initialize I2C communication
  Serial.begin(9600); // Start serial communication for debugging

  Serial.println("4x4 Capacitive Touch Keyboard Initialized");
}

void loop() {
  Wire.requestFrom(TOUCH_I2C_ADDRESS, 1); // Request 1 byte from the keyboard

  if (Wire.available()) {
    byte key = Wire.read(); // Read the key value
    if (key != 0) {
      Serial.print("Key Pressed: ");
      Serial.println(key); // Print the key value to the Serial Monitor
    }
  }

  delay(100); // Small delay to avoid flooding the Serial Monitor
}
Notes:
- Replace
TOUCH_I2C_ADDRESSwith the actual I2C address if it differs. - The
keyvariable will hold the value of the pressed key, which can be mapped to specific keys in your application.
Troubleshooting and FAQs
Common Issues and Solutions
No Response from the Keyboard
- Solution: Verify the power connections (VCC and GND) and ensure the correct operating voltage is supplied.
- Solution: Check the I2C connections (SDA and SCL) and ensure pull-up resistors are in place.
Incorrect or No Key Detection
- Solution: Ensure the keyboard is not placed near high-frequency noise sources.
- Solution: Adjust the touch sensitivity using the onboard settings.
I2C Address Not Detected
- Solution: Use an I2C scanner sketch to confirm the keyboard's address.
- Solution: Verify that the SDA and SCL lines are correctly connected and not swapped.
Multiple Keys Detected Simultaneously
- Solution: Implement software debouncing in your code to filter out false triggers.
FAQs
Q: Can this keyboard be used with a Raspberry Pi?
A: Yes, the 4x4 Capacitive Touch Keyboard can be used with a Raspberry Pi via the I2C interface. Ensure the I2C pins are correctly connected and configured.
Q: How do I change the I2C address?
A: Refer to the manufacturer's datasheet for instructions on changing the I2C address, typically done via solder jumpers or configuration commands.
Q: Is the keyboard waterproof?
A: No, the keyboard is not waterproof. Avoid exposing it to moisture or liquids.
Q: Can I use this keyboard with a 12V power supply?
A: No, the keyboard operates within a voltage range of 2.0V to 5.5V. Using a 12V supply may damage the component.
This concludes the documentation for the 4x4 Capacitive Touch Keyboard. For further details, refer to the manufacturer's datasheet or contact technical support.