How to Use ESP 8266 : Examples, Pinouts, and Specs
Introduction
The ESP8266 is a low-cost Wi-Fi microchip with a full TCP/IP stack and microcontroller capability. It is widely used in Internet of Things (IoT) applications due to its affordability, ease of use, and robust feature set. The ESP8266 can operate as both a standalone microcontroller or as a Wi-Fi module for other microcontrollers, making it a versatile choice for a variety of projects.
Explore Projects Built with ESP 8266


Explore Projects Built with ESP 8266
Common Applications and Use Cases
- Home automation systems
- Smart appliances
- Wireless sensor networks
- IoT prototyping and development
- Remote data logging and monitoring
- Wi-Fi-enabled robotics
Technical Specifications
The ESP8266 is available in various module formats, with the ESP-01 being one of the most popular. Below are the key technical specifications for the ESP8266:
General Specifications
- Microcontroller: 32-bit Tensilica L106 running at 80 MHz (can be overclocked to 160 MHz)
- Operating Voltage: 3.0V to 3.6V
- Wi-Fi Standards: 802.11 b/g/n
- Flash Memory: 512 KB to 4 MB (depending on the module)
- GPIO Pins: Up to 17 (varies by module)
- Communication Protocols: UART, SPI, I2C, PWM, ADC
- Power Consumption:
- Deep Sleep: ~10 µA
- Idle: ~70 mA
- Active: ~200 mA (transmitting)
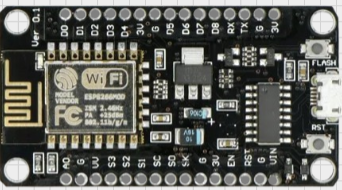
Pin Configuration (ESP-01 Module)
The ESP-01 module has 8 pins. Below is the pinout and description:
| Pin | Name | Description |
|---|---|---|
| 1 | GND | Ground pin. Connect to the ground of the power supply. |
| 2 | GPIO2 | General-purpose I/O pin. Can be used for digital input/output. |
| 3 | GPIO0 | General-purpose I/O pin. Used for boot mode selection during programming. |
| 4 | RX | UART Receive pin. Used for serial communication. |
| 5 | TX | UART Transmit pin. Used for serial communication. |
| 6 | CH_PD | Chip enable pin. Must be pulled high (3.3V) to enable the chip. |
| 7 | VCC | Power supply pin. Connect to 3.3V. |
| 8 | RST | Reset pin. Pull low to reset the module. |
Usage Instructions
How to Use the ESP8266 in a Circuit
- Power Supply: The ESP8266 operates at 3.3V. Ensure that your power supply provides a stable 3.3V and can handle the current requirements (up to 200 mA during transmission).
- Connections:
- Connect the VCC pin to a 3.3V power source.
- Connect the GND pin to the ground of your circuit.
- Use the TX and RX pins for serial communication with a microcontroller or USB-to-serial adapter.
- Pull the CH_PD pin high (connect to 3.3V) to enable the chip.
- Programming: To program the ESP8266, connect GPIO0 to GND before powering the module. This puts the module into programming mode. Use a USB-to-serial adapter and software like the Arduino IDE or esptool.py to upload firmware.
Important Considerations and Best Practices
- Voltage Levels: The ESP8266 is not 5V tolerant. Use a level shifter or voltage divider if interfacing with 5V logic.
- Decoupling Capacitors: Place a 10 µF and a 0.1 µF capacitor near the VCC pin to stabilize the power supply.
- Antenna Placement: Ensure the onboard antenna is not obstructed by metal or other conductive materials to maintain good Wi-Fi signal strength.
- Heat Management: The ESP8266 can get warm during operation. Ensure proper ventilation in your design.
Example: Connecting ESP8266 to Arduino UNO
Below is an example of how to use the ESP8266 with an Arduino UNO to connect to a Wi-Fi network and send data to a server.
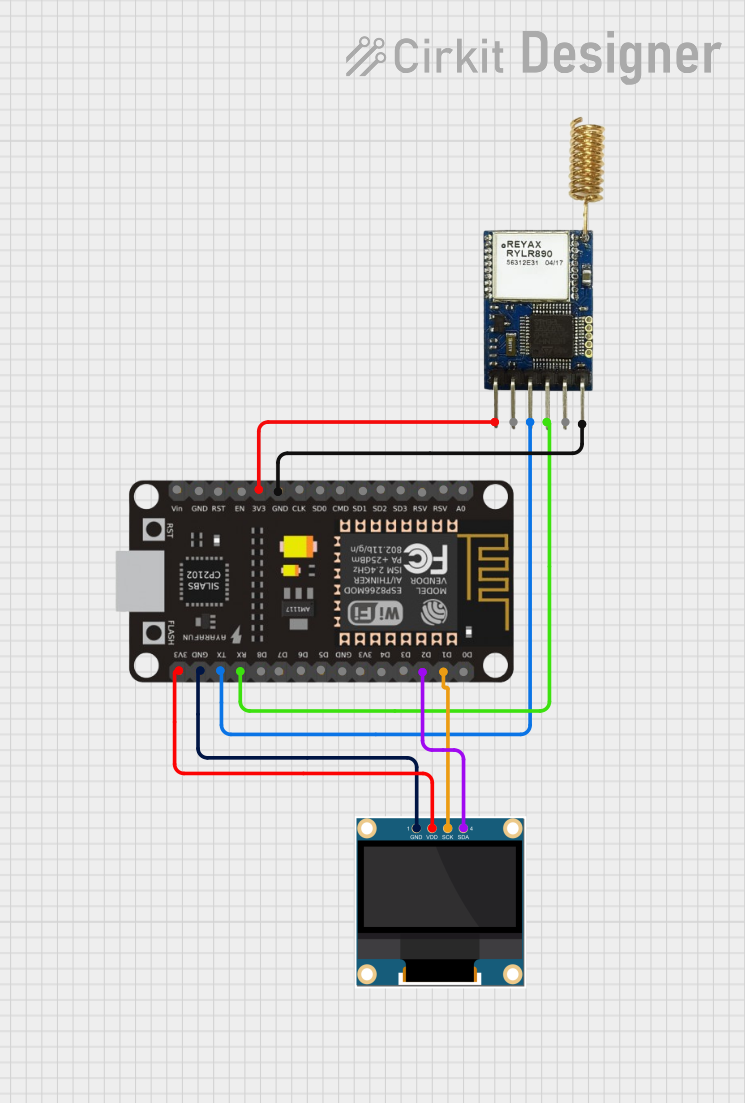
Circuit Diagram
- Connect ESP8266 VCC to a 3.3V power source.
- Connect ESP8266 GND to Arduino GND.
- Connect ESP8266 TX to Arduino RX (via a voltage divider to step down 5V to 3.3V).
- Connect ESP8266 RX to Arduino TX.
Arduino Code
#include <SoftwareSerial.h>

// Define RX and TX pins for SoftwareSerial
SoftwareSerial esp8266(2, 3); // RX, TX

void setup() {
  Serial.begin(9600); // Start serial communication with PC
  esp8266.begin(9600); // Start serial communication with ESP8266

  // Connect to Wi-Fi
  sendCommand("AT+RST", 2000); // Reset the module
  sendCommand("AT+CWMODE=1", 1000); // Set Wi-Fi mode to Station
  sendCommand("AT+CWJAP=\"YourSSID\",\"YourPassword\"", 5000); // Connect to Wi-Fi
}

void loop() {
  // Example: Send data to a server
  sendCommand("AT+CIPSTART=\"TCP\",\"example.com\",80", 2000); // Start TCP connection
  sendCommand("AT+CIPSEND=18", 1000); // Send 18 bytes of data
  esp8266.println("GET / HTTP/1.1\r\n\r\n"); // HTTP GET request
  delay(2000);
}

void sendCommand(String command, int timeout) {
  esp8266.println(command); // Send command to ESP8266
  long int time = millis();
  while ((time + timeout) > millis()) {
    while (esp8266.available()) {
      char c = esp8266.read(); // Read response from ESP8266
      Serial.write(c); // Print response to Serial Monitor
    }
  }
}
Troubleshooting and FAQs
Common Issues
ESP8266 Not Responding:
- Ensure the CH_PD pin is pulled high.
- Verify the power supply provides a stable 3.3V.
- Check the serial communication baud rate (default is 9600 or 115200).
Wi-Fi Connection Fails:
- Double-check the SSID and password in the
AT+CWJAPcommand. - Ensure the Wi-Fi network is within range and not using unsupported security protocols.
- Double-check the SSID and password in the
Module Overheating:
- Verify that the power supply is not exceeding 3.6V.
- Ensure proper ventilation around the module.
Tips for Troubleshooting
- Use an external USB-to-serial adapter to test the ESP8266 independently of your microcontroller.
- Check the ESP8266 firmware version using the
AT+GMRcommand and update if necessary. - Use a multimeter to verify voltage levels at the module's pins.
By following this documentation, you can effectively integrate the ESP8266 into your projects and troubleshoot common issues.