How to Use heatbed 214x214: Examples, Pinouts, and Specs
Introduction
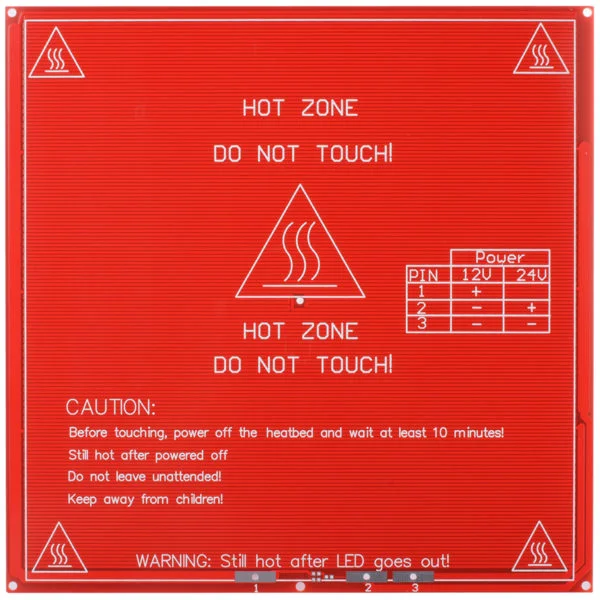
The Heatbed 214x214 by Robotzade is a heated bed designed for use in 3D printers. With dimensions of 214x214 mm, it provides a stable and warm surface to improve the adhesion of printed materials during the printing process. This component is essential for achieving high-quality prints, especially when working with materials like ABS, PETG, and other filaments that require a heated surface to prevent warping and ensure proper layer bonding.
Explore Projects Built with heatbed 214x214

Explore Projects Built with heatbed 214x214
Common Applications and Use Cases
- 3D printing with materials that require a heated surface (e.g., ABS, PETG, Nylon).
- Preventing warping and improving first-layer adhesion.
- Maintaining consistent print quality across the entire print bed.
- Retrofitting or upgrading 3D printers with a heated bed.
Technical Specifications
Below are the key technical details for the Heatbed 214x214:
| Specification | Details |
|---|---|
| Manufacturer | Robotzade |
| Part ID | Heatbed 214x214 |
| Dimensions | 214 mm x 214 mm |
| Operating Voltage | 12V or 24V (depending on wiring) |
| Power Rating | 120W (12V) / 240W (24V) |
| Heating Element Type | PCB-integrated resistive heater |
| Surface Material | Aluminum or glass (optional) |
| Temperature Range | Up to 120°C (recommended max) |
| Connector Type | Solder pads or terminal block |
| Mounting Holes | 4 holes (one at each corner) |
Pin Configuration and Descriptions
The heatbed has solder pads or a terminal block for electrical connections. Below is the pin configuration:
| Pin/Pad | Description |
|---|---|
| + (Positive) | Connect to the positive terminal of the power supply. |
| - (Negative) | Connect to the negative terminal of the power supply. |
| Thermistor | Connects to the 3D printer's control board for temperature monitoring. |
Usage Instructions
How to Use the Heatbed in a Circuit
Power Supply Connection:
- Ensure your power supply matches the heatbed's voltage rating (12V or 24V).
- Connect the positive (+) and negative (-) terminals of the heatbed to the corresponding outputs of the power supply or the 3D printer's control board.
Thermistor Connection:
- Locate the thermistor wires on the heatbed.
- Connect the thermistor to the appropriate input on the 3D printer's control board. This allows the printer to monitor and regulate the heatbed's temperature.
Mounting:
- Secure the heatbed to the printer's frame using the four mounting holes.
- Ensure the surface is level and free of debris before starting a print.
Temperature Settings:
- Set the desired heatbed temperature in your 3D printer's slicer software. Common settings:
- PLA: 50-60°C
- ABS: 90-110°C
- PETG: 70-90°C
- Set the desired heatbed temperature in your 3D printer's slicer software. Common settings:
Insulation (Optional):
- For improved efficiency, consider adding an insulating layer (e.g., cork or silicone) beneath the heatbed.
Important Considerations and Best Practices
- Voltage Selection: Verify whether your heatbed is configured for 12V or 24V operation. Incorrect voltage can damage the heatbed or power supply.
- Thermistor Calibration: Ensure the thermistor is properly calibrated in your 3D printer's firmware for accurate temperature readings.
- Avoid Overheating: Do not exceed the recommended maximum temperature of 120°C to prevent damage to the heatbed.
- Leveling: Regularly check and adjust the bed leveling to ensure consistent print quality.
- Surface Preparation: Clean the heatbed surface before each print to remove dust, oils, or residue.
Example: Connecting to an Arduino UNO
If you are using an Arduino UNO to control the heatbed, you can use a MOSFET module to handle the high current. Below is an example code snippet for controlling the heatbed:
// Define the pin connected to the MOSFET gate
const int heatbedPin = 9;

// Setup function to initialize the pin
void setup() {
  pinMode(heatbedPin, OUTPUT); // Set the heatbed pin as an output
}

// Loop function to control the heatbed
void loop() {
  digitalWrite(heatbedPin, HIGH); // Turn on the heatbed
  delay(10000); // Keep the heatbed on for 10 seconds
  digitalWrite(heatbedPin, LOW); // Turn off the heatbed
  delay(10000); // Keep the heatbed off for 10 seconds
}
Note: Use a suitable MOSFET module to handle the high current required by the heatbed. The Arduino UNO cannot directly drive the heatbed.
Troubleshooting and FAQs
Common Issues and Solutions
| Issue | Possible Cause | Solution |
|---|---|---|
| Heatbed not heating up | Incorrect wiring or power supply issue | Verify connections and ensure correct voltage. |
| Uneven heating across the bed | Faulty heating element or poor insulation | Check for damage and consider adding insulation. |
| Printer not detecting the thermistor | Loose or incorrect thermistor connection | Reconnect the thermistor securely to the control board. |
| Warping or poor adhesion of prints | Incorrect temperature or dirty surface | Adjust temperature settings and clean the surface. |
| Heatbed takes too long to heat up | Insufficient power supply or no insulation | Use a higher-rated power supply or add insulation. |
FAQs
Can I use this heatbed with a 3D printer that only supports 12V?
- Yes, the heatbed is compatible with 12V systems. Ensure it is wired correctly for 12V operation.
What is the recommended cleaning method for the heatbed surface?
- Use isopropyl alcohol and a lint-free cloth to clean the surface before each print.
Can I use this heatbed with materials like PLA?
- Yes, the heatbed works well with PLA. Set the temperature to 50-60°C for optimal results.
How do I know if the thermistor is working correctly?
- Check the temperature readings on your 3D printer's display. If the readings are erratic or show "0°C," inspect the thermistor connection.
By following this documentation, you can effectively integrate and maintain the Heatbed 214x214 in your 3D printing setup for optimal performance.