Cirkit Designer Logo
Cirkit Designer
Your all-in-one circuit design IDE
Home / 
Component Documentation

How to Use KY-008 Laser Emitter: Examples, Pinouts, and Specs

Image of KY-008 Laser Emitter
Cirkit Designer LogoDesign with KY-008 Laser Emitter in Cirkit Designer

Introduction

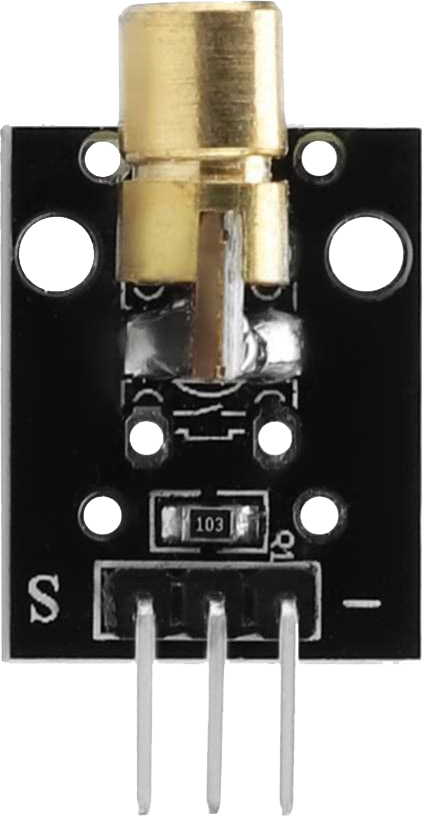
The KY-008 Laser Emitter is a compact laser module designed to emit a coherent beam of red light. Manufactured by KY-008, this module is widely used in applications such as laser pointers, optical experiments, DIY electronics projects, and alignment tools. Its small size and ease of integration make it a popular choice for hobbyists and professionals alike.

The KY-008 Laser Emitter is compatible with microcontrollers like the Arduino UNO, making it an excellent component for educational and prototyping purposes. It operates at a low voltage and is simple to use, requiring minimal external components.

Explore Projects Built with KY-008 Laser Emitter

Use Cirkit Designer to design, explore, and prototype these projects online. Some projects support real-time simulation. Click "Open Project" to start designing instantly!
Arduino Laser Emitter Control Circuit
Image of : A project utilizing KY-008 Laser Emitter in a practical application
This circuit consists of an Arduino UNO microcontroller connected to a KY-008 Laser Emitter. The Arduino controls the laser emitter by providing power and a signal through designated pins, allowing for potential applications such as laser-based projects or interactive installations.
Cirkit Designer LogoOpen Project in Cirkit Designer
Arduino Uno R3-Based Security System with Laser Tripwire, GSM Notification, and Motion Detection
Image of SECURITY SYSTEM: A project utilizing KY-008 Laser Emitter in a practical application
This circuit features an Arduino Uno R3 as the central controller, interfaced with a KY-008 Laser Emitter, an LDR module, a buzzer, a Sim800l GSM module, and an MPU-6050 accelerometer/gyroscope. The Arduino controls the laser emitter and buzzer, reads analog values from the LDR, communicates with the Sim800l via serial (RX/TX), and interfaces with the MPU-6050 over I2C (SCL/SDA). The circuit is likely designed for sensing light intensity, motion detection, and communication via GSM, with the capability to emit laser light and sound alerts.
Cirkit Designer LogoOpen Project in Cirkit Designer
ESP32-Based Security System with RFID and Laser Tripwire
Image of CPE doorlock system: A project utilizing KY-008 Laser Emitter in a practical application
This circuit is designed for a comprehensive security and access control system with motion detection, access via RFID, and a break-beam sensor. It includes a solenoid lock controlled by a relay, visual and audible alerts, and a robust power management system with solar and battery backup to ensure uninterrupted operation.
Cirkit Designer LogoOpen Project in Cirkit Designer
Solar-Powered ESP32 Security System with RFID and Laser Detection
Image of CPE doorlock: A project utilizing KY-008 Laser Emitter in a practical application
This circuit appears to be a complex system with multiple sensors and actuators controlled by an ESP32 microcontroller. It includes a laser emitter and receiver for detection purposes, a PIR sensor for motion detection, an RFID reader for identification tasks, and a keypad for user input. The system also features a relay-controlled solenoid lock, visual indicators (LEDs), a buzzer for audio feedback, and an LCD for display, all interfaced through an IO expander. Power management is handled by a solar panel with a charge controller, an AC source with an automatic transfer switch (ATS), and a voltage regulator (buck converter).
Cirkit Designer LogoOpen Project in Cirkit Designer

Explore Projects Built with KY-008 Laser Emitter

Use Cirkit Designer to design, explore, and prototype these projects online. Some projects support real-time simulation. Click "Open Project" to start designing instantly!
Image of : A project utilizing KY-008 Laser Emitter in a practical application
Arduino Laser Emitter Control Circuit
This circuit consists of an Arduino UNO microcontroller connected to a KY-008 Laser Emitter. The Arduino controls the laser emitter by providing power and a signal through designated pins, allowing for potential applications such as laser-based projects or interactive installations.
Cirkit Designer LogoOpen Project in Cirkit Designer
Image of SECURITY SYSTEM: A project utilizing KY-008 Laser Emitter in a practical application
Arduino Uno R3-Based Security System with Laser Tripwire, GSM Notification, and Motion Detection
This circuit features an Arduino Uno R3 as the central controller, interfaced with a KY-008 Laser Emitter, an LDR module, a buzzer, a Sim800l GSM module, and an MPU-6050 accelerometer/gyroscope. The Arduino controls the laser emitter and buzzer, reads analog values from the LDR, communicates with the Sim800l via serial (RX/TX), and interfaces with the MPU-6050 over I2C (SCL/SDA). The circuit is likely designed for sensing light intensity, motion detection, and communication via GSM, with the capability to emit laser light and sound alerts.
Cirkit Designer LogoOpen Project in Cirkit Designer
Image of CPE doorlock system: A project utilizing KY-008 Laser Emitter in a practical application
ESP32-Based Security System with RFID and Laser Tripwire
This circuit is designed for a comprehensive security and access control system with motion detection, access via RFID, and a break-beam sensor. It includes a solenoid lock controlled by a relay, visual and audible alerts, and a robust power management system with solar and battery backup to ensure uninterrupted operation.
Cirkit Designer LogoOpen Project in Cirkit Designer
Image of CPE doorlock: A project utilizing KY-008 Laser Emitter in a practical application
Solar-Powered ESP32 Security System with RFID and Laser Detection
This circuit appears to be a complex system with multiple sensors and actuators controlled by an ESP32 microcontroller. It includes a laser emitter and receiver for detection purposes, a PIR sensor for motion detection, an RFID reader for identification tasks, and a keypad for user input. The system also features a relay-controlled solenoid lock, visual indicators (LEDs), a buzzer for audio feedback, and an LCD for display, all interfaced through an IO expander. Power management is handled by a solar panel with a charge controller, an AC source with an automatic transfer switch (ATS), and a voltage regulator (buck converter).
Cirkit Designer LogoOpen Project in Cirkit Designer

Technical Specifications

Below are the key technical details of the KY-008 Laser Emitter:

Parameter Value
Manufacturer KY-008
Part ID Laser Emitter
Operating Voltage 5V DC
Operating Current ≤ 40mA
Wavelength 650nm (red light)
Output Power < 5mW
Beam Diameter ~6mm at 10 meters
Operating Temperature -10°C to +40°C
Dimensions 18mm x 6mm x 6mm

Pin Configuration and Descriptions

The KY-008 Laser Emitter has three pins, as described in the table below:

Pin Name Description
1 VCC Connect to a 5V DC power supply.
2 GND Connect to the ground of the power supply or circuit.
3 S (Signal) Control pin for turning the laser on or off.

Note: Some KY-008 modules may have only two pins (VCC and GND). In such cases, the laser is always on when powered.

Usage Instructions

How to Use the KY-008 Laser Emitter in a Circuit

  1. Power Supply: Connect the VCC pin to a 5V DC power source and the GND pin to the ground.
  2. Control Signal: If the module has a signal pin (S), connect it to a digital output pin of a microcontroller (e.g., Arduino UNO) to control the laser.
  3. Resistor (Optional): Although the module has an internal resistor, you may add an external resistor for additional current limiting if needed.
  4. Mounting: Secure the module in place to ensure the laser beam is stable and aligned.

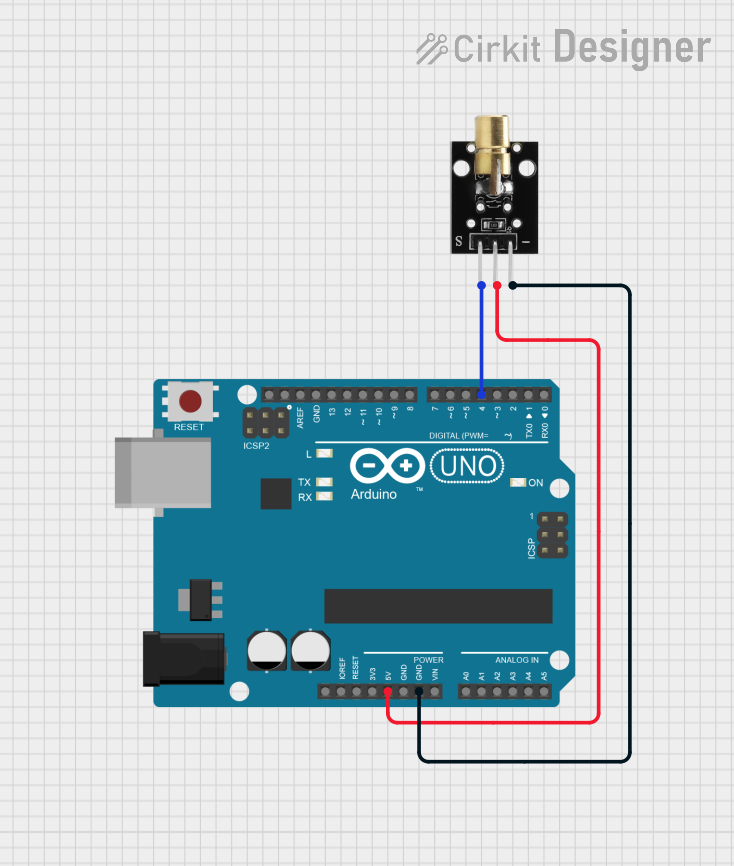
Example Circuit with Arduino UNO

Below is an example of how to connect the KY-008 Laser Emitter to an Arduino UNO:

KY-008 Pin Arduino UNO Pin
VCC 5V
GND GND
S (Signal) Digital Pin 7

Example Arduino Code

// KY-008 Laser Emitter Example Code
// This code turns the laser on and off at 1-second intervals.

#define LASER_PIN 7  // Define the digital pin connected to the laser module

void setup() {
  pinMode(LASER_PIN, OUTPUT); // Set the laser pin as an output
}

void loop() {
  digitalWrite(LASER_PIN, HIGH); // Turn the laser on
  delay(1000);                   // Wait for 1 second
  digitalWrite(LASER_PIN, LOW);  // Turn the laser off
  delay(1000);                   // Wait for 1 second
}

Important Considerations and Best Practices

  • Eye Safety: The KY-008 Laser Emitter emits a focused beam of light that can cause eye damage. Avoid direct eye exposure and use appropriate safety precautions.
  • Power Supply: Ensure the power supply provides a stable 5V DC to avoid damaging the module.
  • Heat Dissipation: Prolonged use may cause the module to heat up. Allow it to cool periodically to prevent overheating.
  • Alignment: Use a stable mounting mechanism to ensure the laser beam is properly aligned for your application.

Troubleshooting and FAQs

Common Issues and Solutions

Issue Possible Cause Solution
Laser does not turn on Incorrect wiring or insufficient power Verify connections and ensure a stable 5V supply.
Laser is dim or flickering Insufficient current or loose connections Check the power source and secure all connections.
Laser overheats during operation Prolonged use without cooling Allow the module to cool periodically.
Signal pin does not control laser Incorrect pin configuration or code issue Verify the signal pin connection and code logic.

FAQs

  1. Can I power the KY-008 Laser Emitter with a 3.3V supply?

    • No, the module is designed to operate at 5V DC. Using a lower voltage may result in dim or non-functional output.
  2. Is the KY-008 Laser Emitter safe for use in educational projects?

    • Yes, but proper safety precautions must be taken to avoid direct eye exposure to the laser beam.
  3. Can I use the KY-008 Laser Emitter outdoors?

    • The module is not weatherproof. If used outdoors, ensure it is protected from moisture and extreme temperatures.
  4. What is the maximum range of the laser beam?

    • The beam can travel several meters, but its visibility depends on ambient lighting conditions and the surface it is projected onto.

By following this documentation, you can effectively integrate the KY-008 Laser Emitter into your projects while ensuring safe and optimal performance.