Cirkit Designer Logo
Cirkit Designer
Your all-in-one circuit design IDE
Home / 
Component Documentation

How to Use SparkFun Haptic Motor Driver - DRV2605L: Examples, Pinouts, and Specs

Image of SparkFun Haptic Motor Driver - DRV2605L
Cirkit Designer LogoDesign with SparkFun Haptic Motor Driver - DRV2605L in Cirkit Designer

Introduction

The SparkFun Haptic Motor Driver is an advanced motor driver IC designed specifically for driving haptic feedback motors, also known as vibration motors. This component utilizes the DRV2605L chip from Texas Instruments, which is capable of providing a wide array of haptic feedback functionalities. It is commonly used in applications where tactile feedback is desired, such as in wearable devices, gaming controllers, smartphones, and touch-enabled devices.

Explore Projects Built with SparkFun Haptic Motor Driver - DRV2605L

Use Cirkit Designer to design, explore, and prototype these projects online. Some projects support real-time simulation. Click "Open Project" to start designing instantly!
Battery-Powered Vibration Motor Control with ESP32 and DRV2605L
Image of Guante Háptico 2: A project utilizing SparkFun Haptic Motor Driver - DRV2605L in a practical application
This circuit is a haptic feedback system powered by a 2000mAh battery, controlled by an Adafruit HUZZAH32 ESP32 Feather microcontroller, and utilizing an Adafruit DRV2605L haptic driver to drive two vibration motors. The system includes a flex resistor for input sensing, and the microcontroller communicates with the haptic driver via I2C.
Cirkit Designer LogoOpen Project in Cirkit Designer
Arduino Mega 2560-Based Bluetooth-Controlled Robotic Car with MPU6050 and L298N Motor Driver
Image of selfbalancing: A project utilizing SparkFun Haptic Motor Driver - DRV2605L in a practical application
This circuit is a motor control system using an Arduino Mega 2560, an L298N motor driver, and an MPU6050 accelerometer and gyroscope. The Arduino controls two DC motors via the L298N driver and communicates with the MPU6050 for motion sensing and the HC-05 Bluetooth module for wireless communication. Power is supplied by a 3S LiPo battery.
Cirkit Designer LogoOpen Project in Cirkit Designer
Bluetooth-Controlled Robotic Vehicle with Ultrasonic Obstacle Detection and Motion Sensing
Image of 아두이노 드론: A project utilizing SparkFun Haptic Motor Driver - DRV2605L in a practical application
This circuit features a SparkFun Pro Micro microcontroller interfaced with an L298N DC motor driver to control two DC motors, an HC-SR04 ultrasonic sensor for distance measurement, a Bluetooth module HM-10 for wireless communication, and an MPU-6050 for motion tracking. The Pro Micro is responsible for processing sensor data and managing motor speeds and directions via the motor driver. Power is supplied by a 5V battery connected to the Pro Micro and a separate battery case providing 12V to the motor driver.
Cirkit Designer LogoOpen Project in Cirkit Designer
Seeeduino and DRV2605L-Based Vibration Motor Controller with I2C Multiplexer
Image of project: A project utilizing SparkFun Haptic Motor Driver - DRV2605L in a practical application
This circuit is designed to control two vibration motors using a Seeeduino microcontroller. The Seeeduino communicates with two Adafruit DRV2605L motor drivers via a PCA multiplexer over I2C, allowing for independent control of each motor.
Cirkit Designer LogoOpen Project in Cirkit Designer

Explore Projects Built with SparkFun Haptic Motor Driver - DRV2605L

Use Cirkit Designer to design, explore, and prototype these projects online. Some projects support real-time simulation. Click "Open Project" to start designing instantly!
Image of Guante Háptico 2: A project utilizing SparkFun Haptic Motor Driver - DRV2605L in a practical application
Battery-Powered Vibration Motor Control with ESP32 and DRV2605L
This circuit is a haptic feedback system powered by a 2000mAh battery, controlled by an Adafruit HUZZAH32 ESP32 Feather microcontroller, and utilizing an Adafruit DRV2605L haptic driver to drive two vibration motors. The system includes a flex resistor for input sensing, and the microcontroller communicates with the haptic driver via I2C.
Cirkit Designer LogoOpen Project in Cirkit Designer
Image of selfbalancing: A project utilizing SparkFun Haptic Motor Driver - DRV2605L in a practical application
Arduino Mega 2560-Based Bluetooth-Controlled Robotic Car with MPU6050 and L298N Motor Driver
This circuit is a motor control system using an Arduino Mega 2560, an L298N motor driver, and an MPU6050 accelerometer and gyroscope. The Arduino controls two DC motors via the L298N driver and communicates with the MPU6050 for motion sensing and the HC-05 Bluetooth module for wireless communication. Power is supplied by a 3S LiPo battery.
Cirkit Designer LogoOpen Project in Cirkit Designer
Image of 아두이노 드론: A project utilizing SparkFun Haptic Motor Driver - DRV2605L in a practical application
Bluetooth-Controlled Robotic Vehicle with Ultrasonic Obstacle Detection and Motion Sensing
This circuit features a SparkFun Pro Micro microcontroller interfaced with an L298N DC motor driver to control two DC motors, an HC-SR04 ultrasonic sensor for distance measurement, a Bluetooth module HM-10 for wireless communication, and an MPU-6050 for motion tracking. The Pro Micro is responsible for processing sensor data and managing motor speeds and directions via the motor driver. Power is supplied by a 5V battery connected to the Pro Micro and a separate battery case providing 12V to the motor driver.
Cirkit Designer LogoOpen Project in Cirkit Designer
Image of project: A project utilizing SparkFun Haptic Motor Driver - DRV2605L in a practical application
Seeeduino and DRV2605L-Based Vibration Motor Controller with I2C Multiplexer
This circuit is designed to control two vibration motors using a Seeeduino microcontroller. The Seeeduino communicates with two Adafruit DRV2605L motor drivers via a PCA multiplexer over I2C, allowing for independent control of each motor.
Cirkit Designer LogoOpen Project in Cirkit Designer

Technical Specifications

Key Technical Details

  • Supply Voltage (VCC): 2V - 5.2V
  • Operating Current: 10mA (typical), 150mA (max)
  • Haptic Motor Voltage: 2V - 3.6V
  • Output Drive Capability: LRA (Linear Resonant Actuator) and ERM (Eccentric Rotating Mass) motors
  • I2C Address: 0x5A (default)

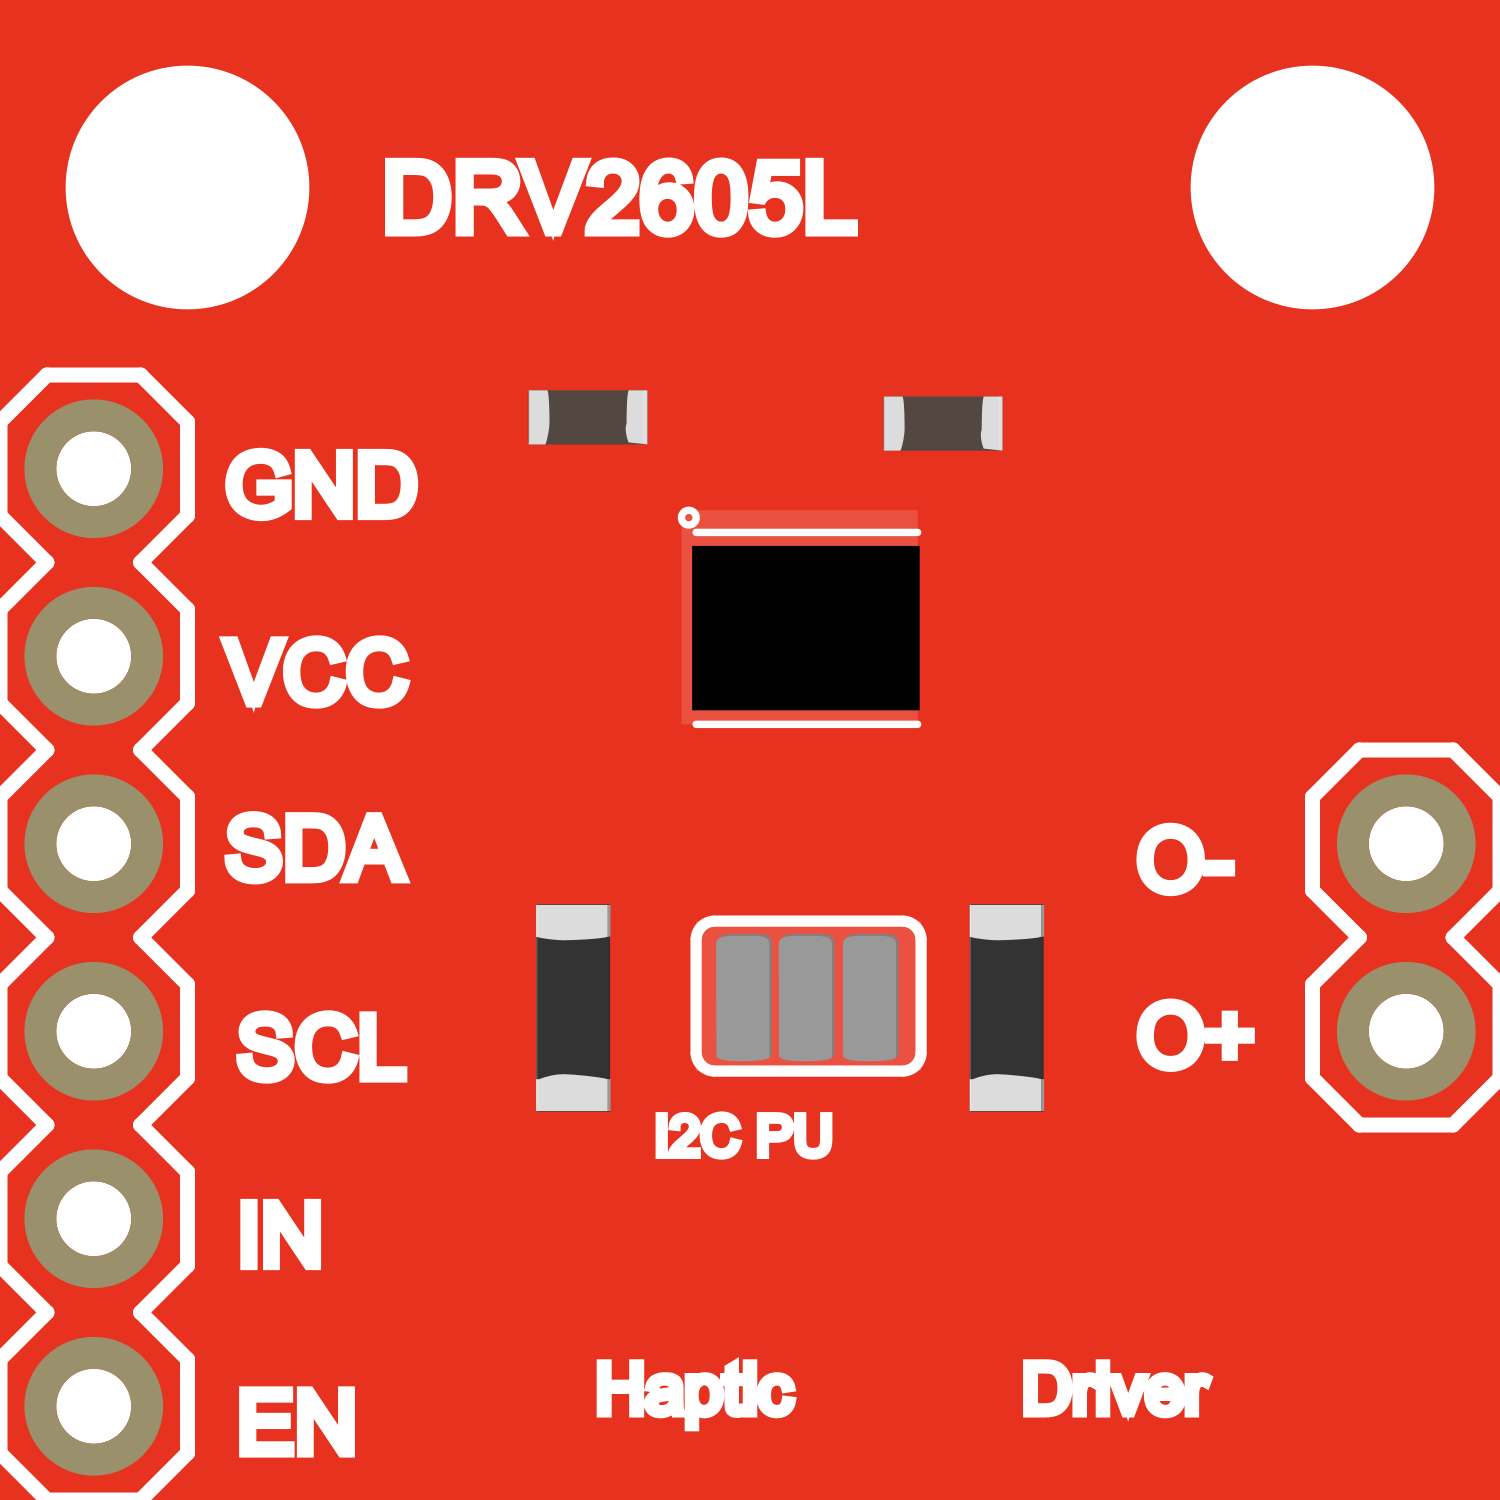
Pin Configuration and Descriptions

Pin Number Name Description
1 SCL I2C clock line
2 SDA I2C data line
3 VDD Power supply (2V - 5.2V)
4 GND Ground connection
5 EN Enable pin (active high)
6 IN/TRIG Trigger input for driving the actuator
7 OUT+ Positive output for the haptic motor
8 OUT- Negative output for the haptic motor

Usage Instructions

How to Use the Component in a Circuit

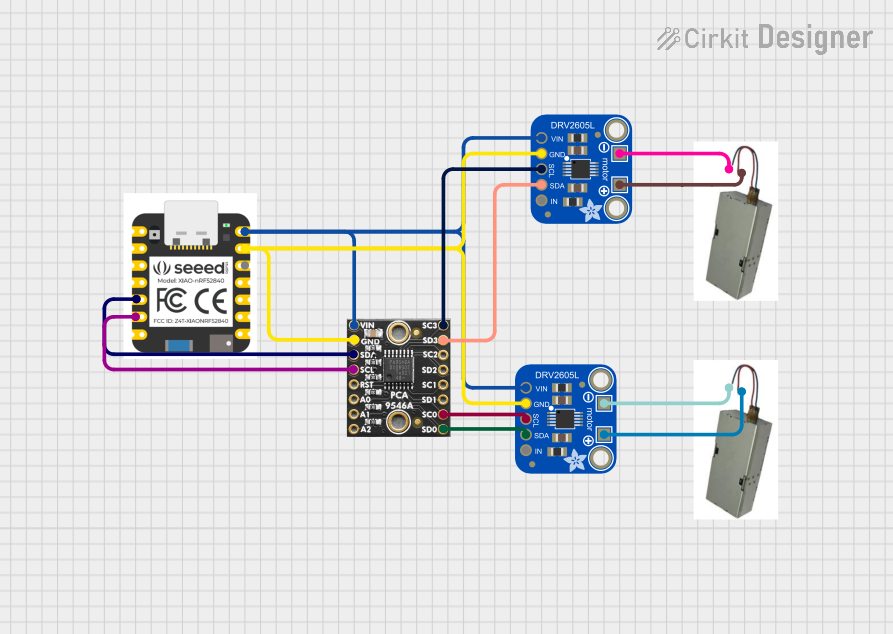
  1. Power Supply: Connect the VDD pin to a 2V - 5.2V power supply and the GND pin to the ground.
  2. I2C Communication: Connect the SCL and SDA pins to the corresponding I2C clock and data lines on your microcontroller.
  3. Enable Pin: The EN pin can be connected to a digital output on your microcontroller to enable or disable the driver.
  4. Motor Connection: Connect your haptic motor to the OUT+ and OUT- pins.
  5. Triggering Feedback: Use the IN/TRIG pin to trigger pre-defined haptic effects.

Important Considerations and Best Practices

  • Ensure that the power supply voltage does not exceed the maximum rating of 5.2V.
  • Use pull-up resistors on the I2C lines if they are not already present on the microcontroller board.
  • Avoid long wires for the haptic motor connections to minimize voltage drops and potential interference.
  • When using the EN pin, ensure that it is driven high to enable the device and low to disable it.

Example Code for Arduino UNO

#include <Wire.h>
#include "SparkFun_DRV2605L.h"

// Create an instance of the DRV2605L library
SparkFun_DRV2605L haptic;

void setup() {
  Wire.begin(); // Initialize I2C
  Serial.begin(9600); // Start serial for output

  if (haptic.begin() == false) {
    Serial.println("DRV2605L not detected. Please check wiring.");
    while (1); // Halt if device is not detected
  }

  haptic.setMode(DRV2605L_MODE_INTTRIG); // Set to internal trigger mode
}

void loop() {
  haptic.setWaveform(0, 1); // Strong click, 100% amplitude
  haptic.setWaveform(1, 0); // End waveform sequence with a zero
  haptic.go(); // Play the effect

  delay(1000); // Wait for a second
}

Troubleshooting and FAQs

Common Issues

  • Motor not vibrating: Ensure that the motor is properly connected to the OUT+ and OUT- pins and that the power supply is within the specified range.
  • No communication with the IC: Check the I2C connections, including pull-up resistors, and verify that the correct I2C address is being used in the code.
  • Weak vibration: Make sure that the motor is within the voltage and current specifications. Also, check for any loose connections.

Solutions and Tips for Troubleshooting

  • Double-check all connections, especially the power supply and motor connections.
  • Use a multimeter to verify that the voltage levels on the VDD and motor pins are correct.
  • Ensure that the I2C lines are not being shared with other devices that might cause conflicts.
  • If using the EN pin, verify that it is being driven to the correct logic level for enabling the device.

FAQs

Q: Can the DRV2605L drive multiple motors? A: No, the DRV2605L is designed to drive a single haptic motor.

Q: Is it possible to customize the haptic patterns? A: Yes, the DRV2605L allows for custom waveforms to be loaded into the device for a variety of haptic patterns.

Q: What types of motors can be driven by the DRV2605L? A: The DRV2605L can drive both LRA and ERM type haptic motors.

Q: How do I know if the DRV2605L is functioning properly? A: You can use the diagnostic mode of the DRV2605L to check the functionality of the connected motor and the driver IC itself.

For further assistance, consult the datasheet of the DRV2605L or contact SparkFun's technical support.