How to Use Embedded Thermal Printer: Examples, Pinouts, and Specs
Introduction
The Embedded Thermal Printer (Manufacturer Part ID: SKU: DFR0503-EN) by DFRobot is a compact and efficient printing device designed for applications requiring quick and reliable printing. This printer uses thermal technology to transfer ink onto specially coated thermal paper, eliminating the need for ink cartridges or ribbons. Its small size and ease of integration make it ideal for point-of-sale (POS) systems, kiosks, mobile applications, and receipt or label printing.
Explore Projects Built with Embedded Thermal Printer

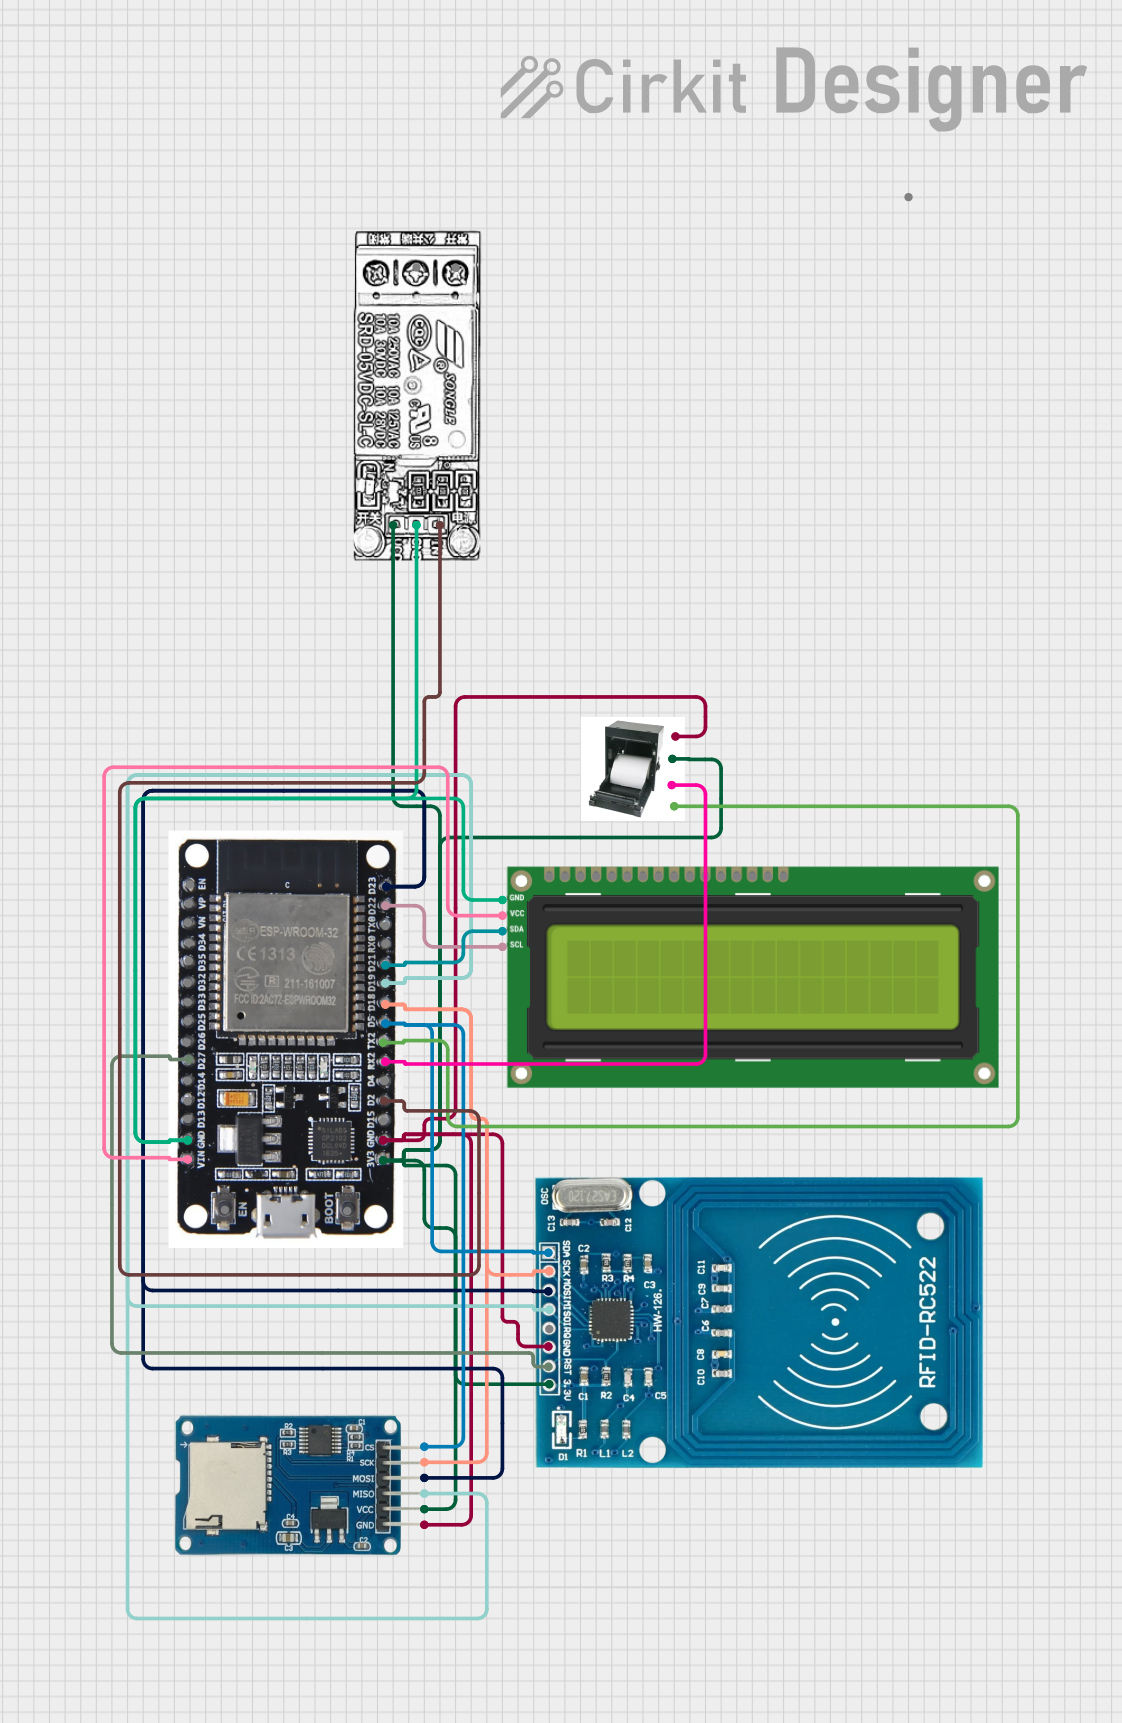
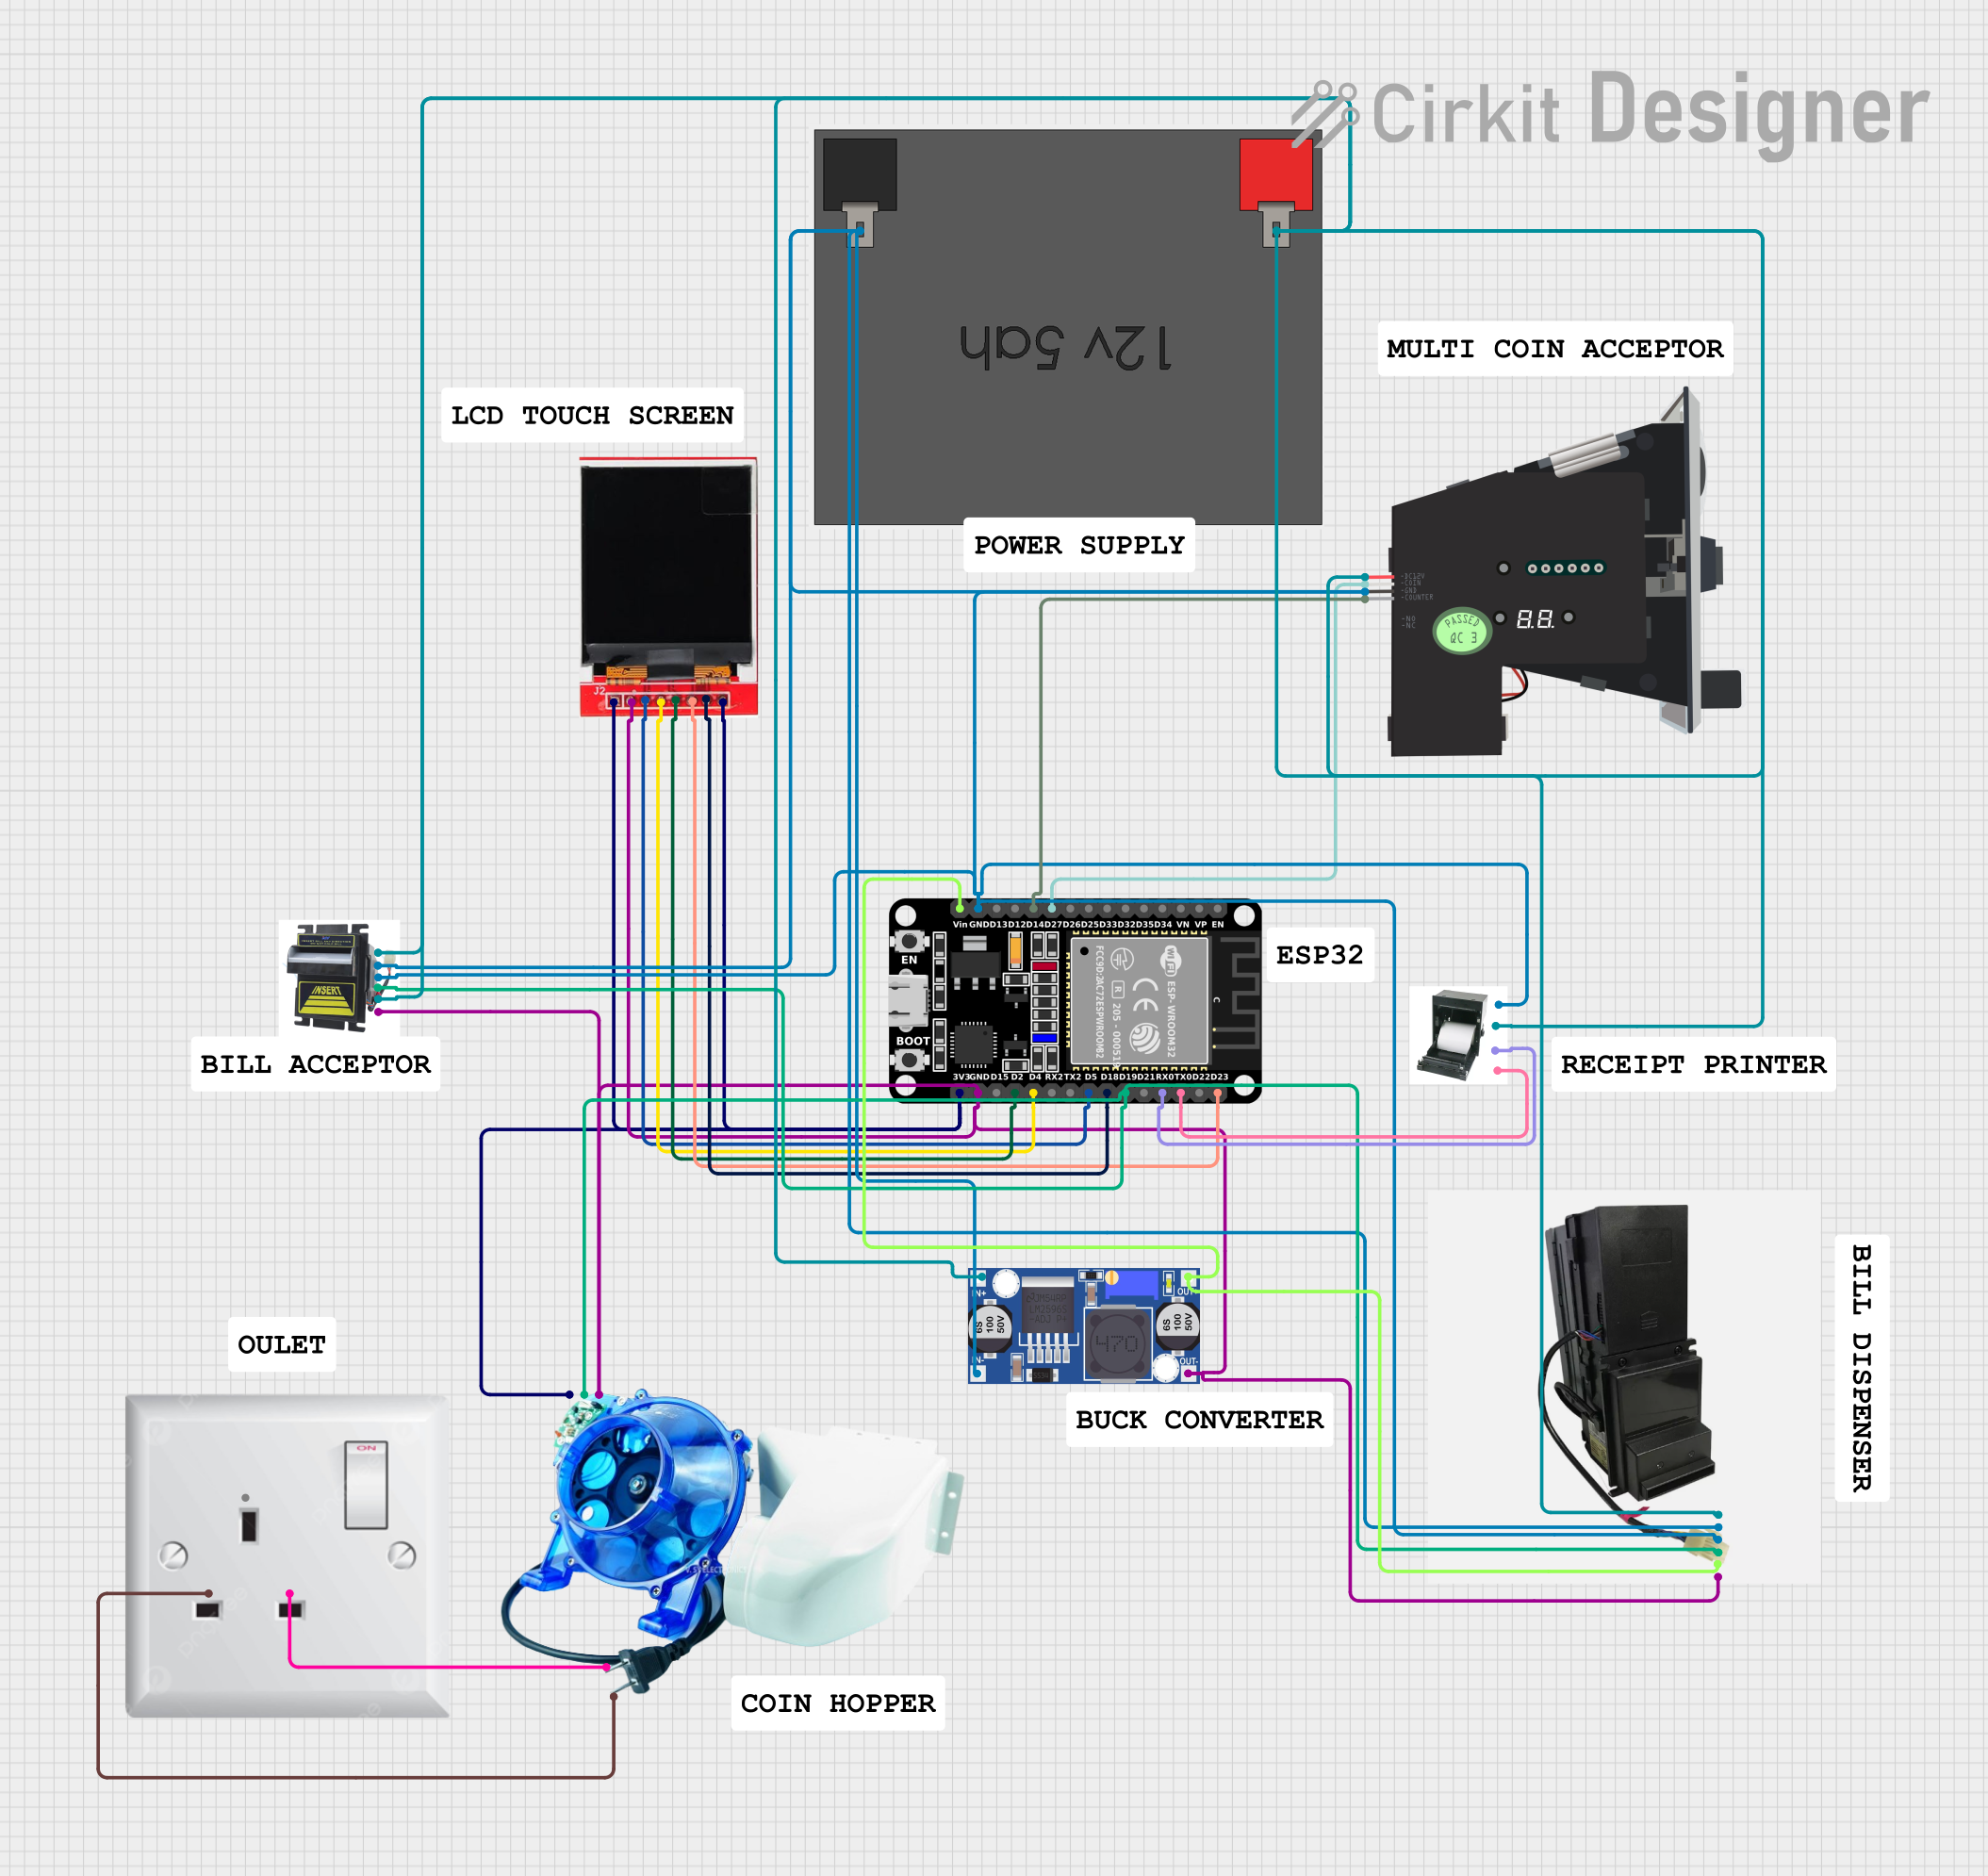

Explore Projects Built with Embedded Thermal Printer
Common Applications
- Point-of-sale (POS) systems for printing receipts
- Mobile and portable printing devices
- Kiosks and vending machines
- Label printing for inventory management
- Ticket printing for events or transportation
Technical Specifications
The following table outlines the key technical details of the Embedded Thermal Printer:
| Parameter | Specification |
|---|---|
| Printing Method | Thermal Line Printing |
| Paper Width | 57.5 ± 0.5 mm |
| Paper Thickness | 0.06 - 0.08 mm |
| Printing Speed | Up to 50 mm/s |
| Resolution | 8 dots/mm (384 dots/line) |
| Input Voltage | 5V DC |
| Operating Current | 1.5A (maximum) |
| Communication Interface | UART (TTL) |
| Baud Rate | 9600 bps (default) |
| Operating Temperature | -10°C to 50°C |
| Storage Temperature | -20°C to 60°C |
| Dimensions | 56 x 50 x 30 mm |
| Weight | 60 g |
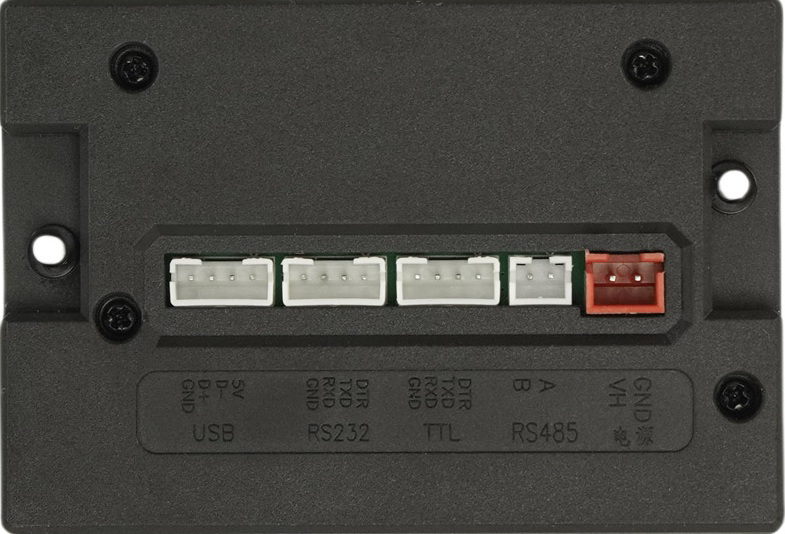
Pin Configuration and Descriptions
The printer has a 7-pin interface for power and communication. The pin configuration is as follows:
| Pin Number | Pin Name | Description |
|---|---|---|
| 1 | VCC | Power supply input (5V DC) |
| 2 | GND | Ground |
| 3 | RX | UART Receive (connect to TX of microcontroller) |
| 4 | TX | UART Transmit (connect to RX of microcontroller) |
| 5 | NC | Not connected |
| 6 | Paper Out | Paper status signal (low when paper is present) |
| 7 | Reset | Reset signal (active low) |
Usage Instructions
How to Use the Component in a Circuit
- Power Supply: Connect the VCC pin to a stable 5V DC power source and the GND pin to ground. Ensure the power supply can provide at least 1.5A to handle peak current requirements.
- Communication: Use the RX and TX pins to establish UART communication with a microcontroller (e.g., Arduino UNO). Set the baud rate to 9600 bps by default.
- Paper Loading: Insert a roll of thermal paper (57.5 mm width) into the printer. Ensure the paper is properly aligned to avoid jamming.
- Reset: Optionally, connect the Reset pin to a GPIO pin on the microcontroller for manual or software-controlled resets.
Important Considerations and Best Practices
- Use high-quality thermal paper to ensure clear and durable prints.
- Avoid exposing the printer to high humidity or direct sunlight, as this may affect print quality.
- Monitor the Paper Out pin to detect when the paper roll is empty.
- Allow sufficient ventilation around the printer to prevent overheating during continuous operation.
- Use a decoupling capacitor (e.g., 100 µF) near the VCC pin to stabilize the power supply.
Example Code for Arduino UNO
Below is an example of how to interface the Embedded Thermal Printer with an Arduino UNO:
#include <SoftwareSerial.h>

// Define RX and TX pins for SoftwareSerial
SoftwareSerial thermalPrinter(10, 11); // RX = 10, TX = 11

void setup() {
  // Initialize serial communication with the printer
  thermalPrinter.begin(9600); // Set baud rate to 9600 bps
  Serial.begin(9600);         // For debugging via Serial Monitor

  // Print a test message
  thermalPrinter.println("Hello, World!"); // Send text to the printer
  thermalPrinter.println("DFRobot Thermal Printer");
  thermalPrinter.println("-----------------------");
  delay(1000); // Wait for the printer to finish
}

void loop() {
  // Example: Print user input from Serial Monitor
  if (Serial.available()) {
    String input = Serial.readString(); // Read input from Serial Monitor
    thermalPrinter.println(input);     // Print input to the thermal printer
    thermalPrinter.println("-----------------------");
  }
}
Notes on the Code
- The
SoftwareSeriallibrary is used to create a UART interface on pins 10 (RX) and 11 (TX). - Ensure the RX and TX pins of the printer are correctly connected to the TX and RX pins of the Arduino, respectively.
- Use the Serial Monitor to send text to the printer in real time.
Troubleshooting and FAQs
Common Issues and Solutions
Printer Not Responding
- Cause: Incorrect wiring or insufficient power supply.
- Solution: Double-check the connections and ensure the power supply provides at least 1.5A.
Paper Jams
- Cause: Misaligned or low-quality paper.
- Solution: Use high-quality thermal paper and ensure it is properly loaded.
Faint or Incomplete Prints
- Cause: Low-quality paper or overheating.
- Solution: Use recommended thermal paper and allow the printer to cool down if used continuously.
No Output
- Cause: Incorrect baud rate or communication settings.
- Solution: Verify that the baud rate is set to 9600 bps and the RX/TX connections are correct.
FAQs
Can I change the baud rate of the printer?
- Yes, the baud rate can be changed by sending specific configuration commands to the printer. Refer to the manufacturer's datasheet for details.
What type of paper should I use?
- Use 57.5 mm wide thermal paper with a thickness of 0.06 to 0.08 mm for optimal performance.
How do I detect when the paper roll is empty?
- Monitor the Paper Out pin. It will go low when paper is present and high when the paper roll is empty.
Can I use this printer with a Raspberry Pi?
- Yes, the printer can be connected to a Raspberry Pi using the UART interface. Ensure the voltage levels are compatible or use a level shifter if necessary.
By following this documentation, you can effectively integrate and operate the DFRobot Embedded Thermal Printer in your projects.