Cirkit Designer Logo
Cirkit Designer
Your all-in-one circuit design IDE
Home / 
Component Documentation

How to Use LD06AJSA: Examples, Pinouts, and Specs

Image of LD06AJSA
Cirkit Designer LogoDesign with LD06AJSA in Cirkit Designer

Introduction

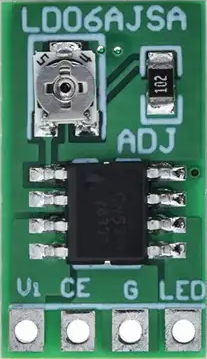
The LD06AJSA is a high-performance, low-dropout linear voltage regulator designed for applications requiring a regulated output voltage from a variable input source. This component is commonly used in battery-powered devices, portable electronics, and power supply circuits due to its ability to maintain a stable output voltage over a wide range of input voltages and load conditions.

Explore Projects Built with LD06AJSA

Use Cirkit Designer to design, explore, and prototype these projects online. Some projects support real-time simulation. Click "Open Project" to start designing instantly!
Battery-Powered Emergency Alert System with NUCLEO-F072RB, SIM800L, and GPS NEO 6M
Image of women safety: A project utilizing LD06AJSA in a practical application
This circuit is an emergency alert system that uses a NUCLEO-F072RB microcontroller to send SMS alerts and make calls via a SIM800L GSM module, while obtaining location data from a GPS NEO 6M module. The system is powered by a Li-ion battery and includes a TP4056 module for battery charging and protection, with a rocker switch to control power to the microcontroller.
Cirkit Designer LogoOpen Project in Cirkit Designer
Lilygo 7670e-Based Smart Interface with LCD Display and Keypad
Image of Paower: A project utilizing LD06AJSA in a practical application
This circuit features a Lilygo 7670e microcontroller interfaced with a 16x2 I2C LCD for display, a 4X4 membrane matrix keypad for input, and an arcade button for additional control. It also includes a 4G antenna and a GPS antenna for communication and location tracking capabilities.
Cirkit Designer LogoOpen Project in Cirkit Designer
Arduino UNO Bluetooth-Controlled Servo with LDR Feedback
Image of gogo: A project utilizing LD06AJSA in a practical application
This circuit features an Arduino UNO microcontroller interfaced with a Bluetooth HC-06 module for wireless communication, a Tower Pro SG90 servo motor for actuation, and a Module LDR for light intensity sensing. The Arduino controls the servo based on the data received from the LDR or Bluetooth module. The Bluetooth module enables remote control or data exchange, while the LDR provides environmental feedback to the Arduino.
Cirkit Designer LogoOpen Project in Cirkit Designer
ESP32-Based Automated Landing Gear System with Ultrasonic Sensor and LCD Display
Image of LANDING GEAR MECHANISMS: A project utilizing LD06AJSA in a practical application
This circuit is an automated landing gear system for a model aircraft, utilizing an ESP32 microcontroller to control two servos based on input from an ultrasonic sensor and a toggle switch. The system displays distance measurements and gear status on a 16x2 LCD screen via an I2C interface.
Cirkit Designer LogoOpen Project in Cirkit Designer

Explore Projects Built with LD06AJSA

Use Cirkit Designer to design, explore, and prototype these projects online. Some projects support real-time simulation. Click "Open Project" to start designing instantly!
Image of women safety: A project utilizing LD06AJSA in a practical application
Battery-Powered Emergency Alert System with NUCLEO-F072RB, SIM800L, and GPS NEO 6M
This circuit is an emergency alert system that uses a NUCLEO-F072RB microcontroller to send SMS alerts and make calls via a SIM800L GSM module, while obtaining location data from a GPS NEO 6M module. The system is powered by a Li-ion battery and includes a TP4056 module for battery charging and protection, with a rocker switch to control power to the microcontroller.
Cirkit Designer LogoOpen Project in Cirkit Designer
Image of Paower: A project utilizing LD06AJSA in a practical application
Lilygo 7670e-Based Smart Interface with LCD Display and Keypad
This circuit features a Lilygo 7670e microcontroller interfaced with a 16x2 I2C LCD for display, a 4X4 membrane matrix keypad for input, and an arcade button for additional control. It also includes a 4G antenna and a GPS antenna for communication and location tracking capabilities.
Cirkit Designer LogoOpen Project in Cirkit Designer
Image of gogo: A project utilizing LD06AJSA in a practical application
Arduino UNO Bluetooth-Controlled Servo with LDR Feedback
This circuit features an Arduino UNO microcontroller interfaced with a Bluetooth HC-06 module for wireless communication, a Tower Pro SG90 servo motor for actuation, and a Module LDR for light intensity sensing. The Arduino controls the servo based on the data received from the LDR or Bluetooth module. The Bluetooth module enables remote control or data exchange, while the LDR provides environmental feedback to the Arduino.
Cirkit Designer LogoOpen Project in Cirkit Designer
Image of LANDING GEAR MECHANISMS: A project utilizing LD06AJSA in a practical application
ESP32-Based Automated Landing Gear System with Ultrasonic Sensor and LCD Display
This circuit is an automated landing gear system for a model aircraft, utilizing an ESP32 microcontroller to control two servos based on input from an ultrasonic sensor and a toggle switch. The system displays distance measurements and gear status on a 16x2 LCD screen via an I2C interface.
Cirkit Designer LogoOpen Project in Cirkit Designer

Common Applications and Use Cases

  • Battery-powered devices
  • Portable electronics
  • Power management in microcontroller systems
  • Low-power radio frequency (RF) devices

Technical Specifications

Key Technical Details

  • Output Voltage: 3.3V
  • Maximum Input Voltage: 5.5V
  • Dropout Voltage: Typically 0.1V at 150mA load
  • Output Current: Up to 150mA
  • Quiescent Current: Typically 50µA
  • Package: SOT-23

Pin Configuration and Descriptions

Pin Number Name Description
1 VIN Input voltage. Connect to the power source.
2 GND Ground. Connect to the system ground.
3 VOUT Regulated output voltage.

Usage Instructions

How to Use the Component in a Circuit

  1. Connect the VIN pin to the positive terminal of your power source, ensuring it does not exceed the maximum input voltage rating.
  2. Connect the GND pin to the ground of your circuit.
  3. The VOUT pin will provide a regulated 3.3V output. Connect this to the power input of your device or circuit that requires a 3.3V supply.
  4. Optionally, add a bypass capacitor (typically 1µF to 10µF) between VIN and GND close to the regulator to improve transient response and noise performance.

Important Considerations and Best Practices

  • Always ensure the input voltage does not exceed the maximum rating to prevent damage.
  • The maximum output current should not surpass 150mA. Consider heat dissipation and current limiting if operating close to this limit.
  • Place the voltage regulator as close as possible to the power input of the load to minimize voltage drops along the traces.
  • Use appropriate decoupling capacitors to ensure stability and reduce noise.

Troubleshooting and FAQs

Common Issues Users Might Face

  • Output voltage is lower than expected: Check if the input voltage is within the specified range and that the load does not exceed the maximum current rating.
  • Regulator is overheating: Ensure that the power dissipation is within the safe operating area. Consider adding a heatsink if necessary.

Solutions and Tips for Troubleshooting

  • Verify connections and solder joints for any shorts or opens.
  • Measure the input voltage to ensure it is within the specified range.
  • Check the load current to ensure it does not exceed 150mA.
  • Inspect the bypass and decoupling capacitors for proper value and placement.

FAQs

Q: Can I use the LD06AJSA to regulate a 5V input to 3.3V? A: Yes, the LD06AJSA can regulate a 5V input to a stable 3.3V output as long as the input voltage does not exceed 5.5V.

Q: What is the purpose of the bypass capacitor? A: The bypass capacitor helps to filter out noise from the input supply and provides instantaneous current to the regulator during transient load changes.

Q: How can I improve the thermal performance of the LD06AJSA? A: To improve thermal performance, use a larger copper area for heat dissipation, and consider using a heatsink if the regulator is operating at high loads for extended periods.

Example Code for Arduino UNO

// Define the output voltage pin of the LD06AJSA
const int voltageOutPin = A0; // Analog pin A0 to read the voltage

void setup() {
  // Initialize the serial communication at 9600 baud rate
  Serial.begin(9600);
}

void loop() {
  // Read the voltage from the LD06AJSA output
  int sensorValue = analogRead(voltageOutPin);
  // Convert the analog reading to voltage (3.3V reference)
  float voltage = sensorValue * (3.3 / 1023.0);
  
  // Print the voltage to the Serial Monitor
  Serial.print("Output Voltage: ");
  Serial.print(voltage);
  Serial.println(" V");
  
  // Wait for a second before reading again
  delay(1000);
}

Note: The above code assumes that the LD06AJSA output is connected to the A0 pin of the Arduino UNO and that the Arduino is configured to use a 3.3V reference voltage for analog inputs. If the Arduino uses a 5V reference, the calculation in the code should be adjusted accordingly.