How to Use ISD1820 Audio Module: Examples, Pinouts, and Specs
Introduction
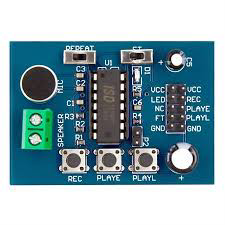
The ISD1820 Audio Module is a versatile voice recording and playback device designed for easy integration into electronic projects. It allows users to record short audio messages (up to 10 seconds) and play them back with minimal effort. The module features a built-in microphone for recording, a speaker output for playback, and simple control pins for interfacing with microcontrollers or other circuits.
Explore Projects Built with ISD1820 Audio Module

Explore Projects Built with ISD1820 Audio Module
Common Applications and Use Cases
- Voice-based notifications or alerts in embedded systems
- Interactive toys and DIY projects
- Voice reminders or message storage
- Educational projects for learning about audio processing
- Simple audio playback in robotics or automation systems
Technical Specifications
The ISD1820 Audio Module is designed for simplicity and ease of use. Below are its key technical details:
Key Technical Details
- Operating Voltage: 3.3V to 5V DC
- Recording Duration: Up to 10 seconds
- Playback Modes: Edge-triggered or level-triggered
- Microphone: Built-in electret microphone
- Speaker Output: Supports 8Ω speakers (recommended power: 0.5W to 1W)
- Control Pins: PLAYE, PLAYL, REC, FT (Feed Through)
- Dimensions: Approximately 38mm x 42mm
Pin Configuration and Descriptions
The ISD1820 module has a simple pinout for easy interfacing. Below is the pin configuration:
| Pin Name | Type | Description |
|---|---|---|
| VCC | Power Input | Connect to a 3.3V to 5V DC power supply. |
| GND | Ground | Connect to the ground of the power supply. |
| REC | Input | Active HIGH pin to start recording. Hold HIGH to record audio. |
| PLAYE | Input | Edge-triggered playback. A HIGH pulse plays the recorded audio once. |
| PLAYL | Input | Level-triggered playback. Hold HIGH to continuously play the recorded audio. |
| FT | Input | Feed Through mode. When HIGH, the microphone input is directly sent to output. |
| SP+ | Output | Positive terminal for connecting an external speaker. |
| SP- | Output | Negative terminal for connecting an external speaker. |
Usage Instructions
The ISD1820 Audio Module is straightforward to use. Follow the steps below to integrate it into your project:
Recording Audio
- Connect the module to a 3.3V to 5V DC power supply.
- Press and hold the REC button (or set the REC pin HIGH) to start recording.
- Speak into the built-in microphone while holding the REC button or keeping the REC pin HIGH.
- Release the REC button (or set the REC pin LOW) to stop recording.
Playing Back Audio
- Edge-Triggered Playback: Send a HIGH pulse to the PLAYE pin to play the recorded audio once.
- Level-Triggered Playback: Set the PLAYL pin HIGH to continuously play the recorded audio. Set it LOW to stop playback.
Feed Through Mode
- Set the FT pin HIGH to enable Feed Through mode. In this mode, the microphone input is directly sent to the speaker output, allowing real-time audio monitoring.
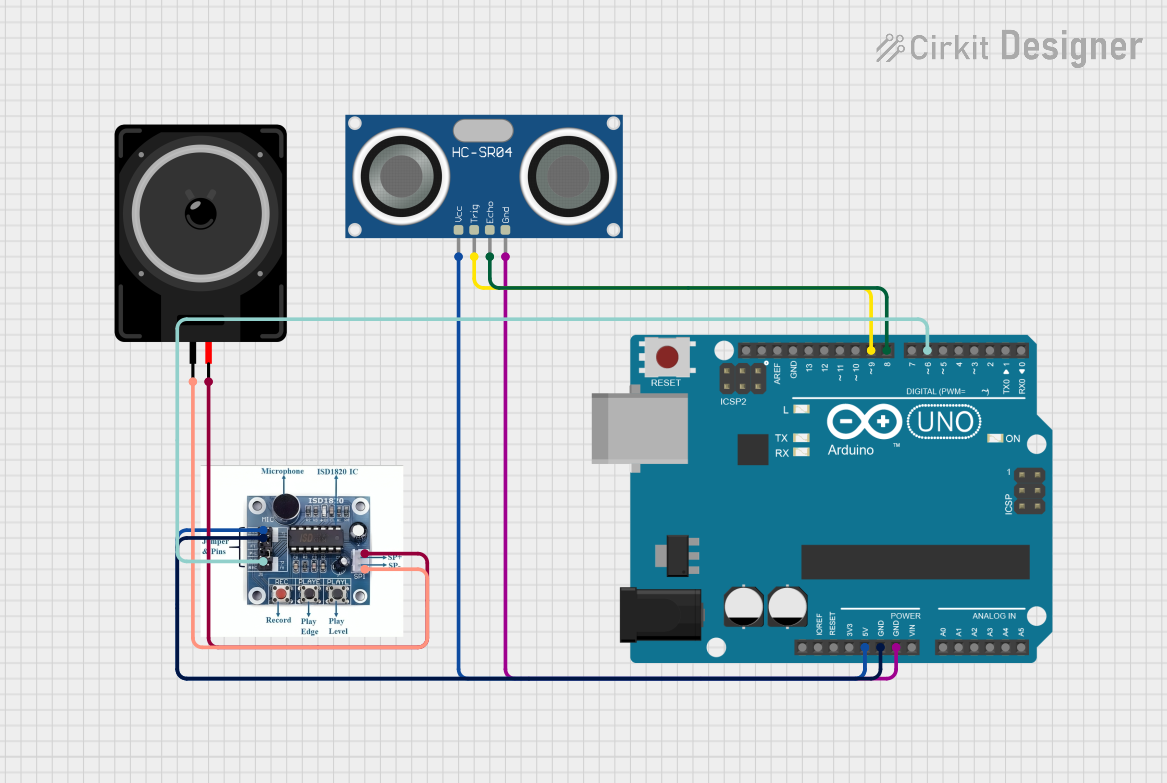
Connecting to an Arduino UNO
The ISD1820 module can be easily controlled using an Arduino UNO. Below is an example code snippet to control recording and playback:
// Pin definitions for ISD1820 module
const int REC_PIN = 7;    // Connect to REC pin on ISD1820
const int PLAYE_PIN = 8;  // Connect to PLAYE pin on ISD1820
const int PLAYL_PIN = 9;  // Connect to PLAYL pin on ISD1820

void setup() {
  // Set pin modes
  pinMode(REC_PIN, OUTPUT);
  pinMode(PLAYE_PIN, OUTPUT);
  pinMode(PLAYL_PIN, OUTPUT);

  // Initialize all pins to LOW
  digitalWrite(REC_PIN, LOW);
  digitalWrite(PLAYE_PIN, LOW);
  digitalWrite(PLAYL_PIN, LOW);
}

void loop() {
  // Example: Record audio for 5 seconds
  digitalWrite(REC_PIN, HIGH);  // Start recording
  delay(5000);                  // Record for 5 seconds
  digitalWrite(REC_PIN, LOW);   // Stop recording
  delay(2000);                  // Wait for 2 seconds

  // Example: Play audio once using edge-triggered mode
  digitalWrite(PLAYE_PIN, HIGH);  // Trigger playback
  delay(100);                     // Short delay for pulse
  digitalWrite(PLAYE_PIN, LOW);   // End pulse
  delay(5000);                    // Wait for playback to finish

  // Example: Play audio continuously for 5 seconds
  digitalWrite(PLAYL_PIN, HIGH);  // Start continuous playback
  delay(5000);                    // Play for 5 seconds
  digitalWrite(PLAYL_PIN, LOW);   // Stop playback
  delay(2000);                    // Wait before next loop
}
Important Considerations and Best Practices
- Use a power supply within the specified voltage range (3.3V to 5V) to avoid damaging the module.
- For better audio quality, use an 8Ω speaker with a power rating of 0.5W to 1W.
- Avoid recording in noisy environments to ensure clear playback.
- If using the module with a microcontroller, ensure proper grounding between the module and the microcontroller.
Troubleshooting and FAQs
Common Issues and Solutions
No audio playback:
- Ensure the module is powered correctly (3.3V to 5V).
- Check the speaker connections (SP+ and SP-).
- Verify that audio was recorded successfully.
Distorted or low-quality audio:
- Use a higher-quality 8Ω speaker.
- Record in a quieter environment.
- Ensure the microphone is not obstructed.
Module not responding to control pins:
- Check the wiring between the module and the microcontroller.
- Ensure the control pins are receiving the correct HIGH/LOW signals.
Playback stops unexpectedly:
- Verify the playback mode (edge-triggered or level-triggered).
- Ensure the PLAYL pin is held HIGH for continuous playback.
FAQs
Q: Can I extend the recording duration beyond 10 seconds?
A: No, the ISD1820 module has a fixed recording duration of up to 10 seconds due to its internal memory limitations.
Q: Can I use an external microphone with the module?
A: The module is designed for its built-in microphone. Using an external microphone may require additional circuitry.
Q: Can I control the module without a microcontroller?
A: Yes, you can use physical buttons or switches to control the REC, PLAYE, and PLAYL pins directly.
Q: Is it possible to store multiple audio messages?
A: No, the ISD1820 module can store only one audio message at a time. Recording a new message will overwrite the previous one.