Cirkit Designer Logo
Cirkit Designer
Your all-in-one circuit design IDE
Home / 
Component Documentation

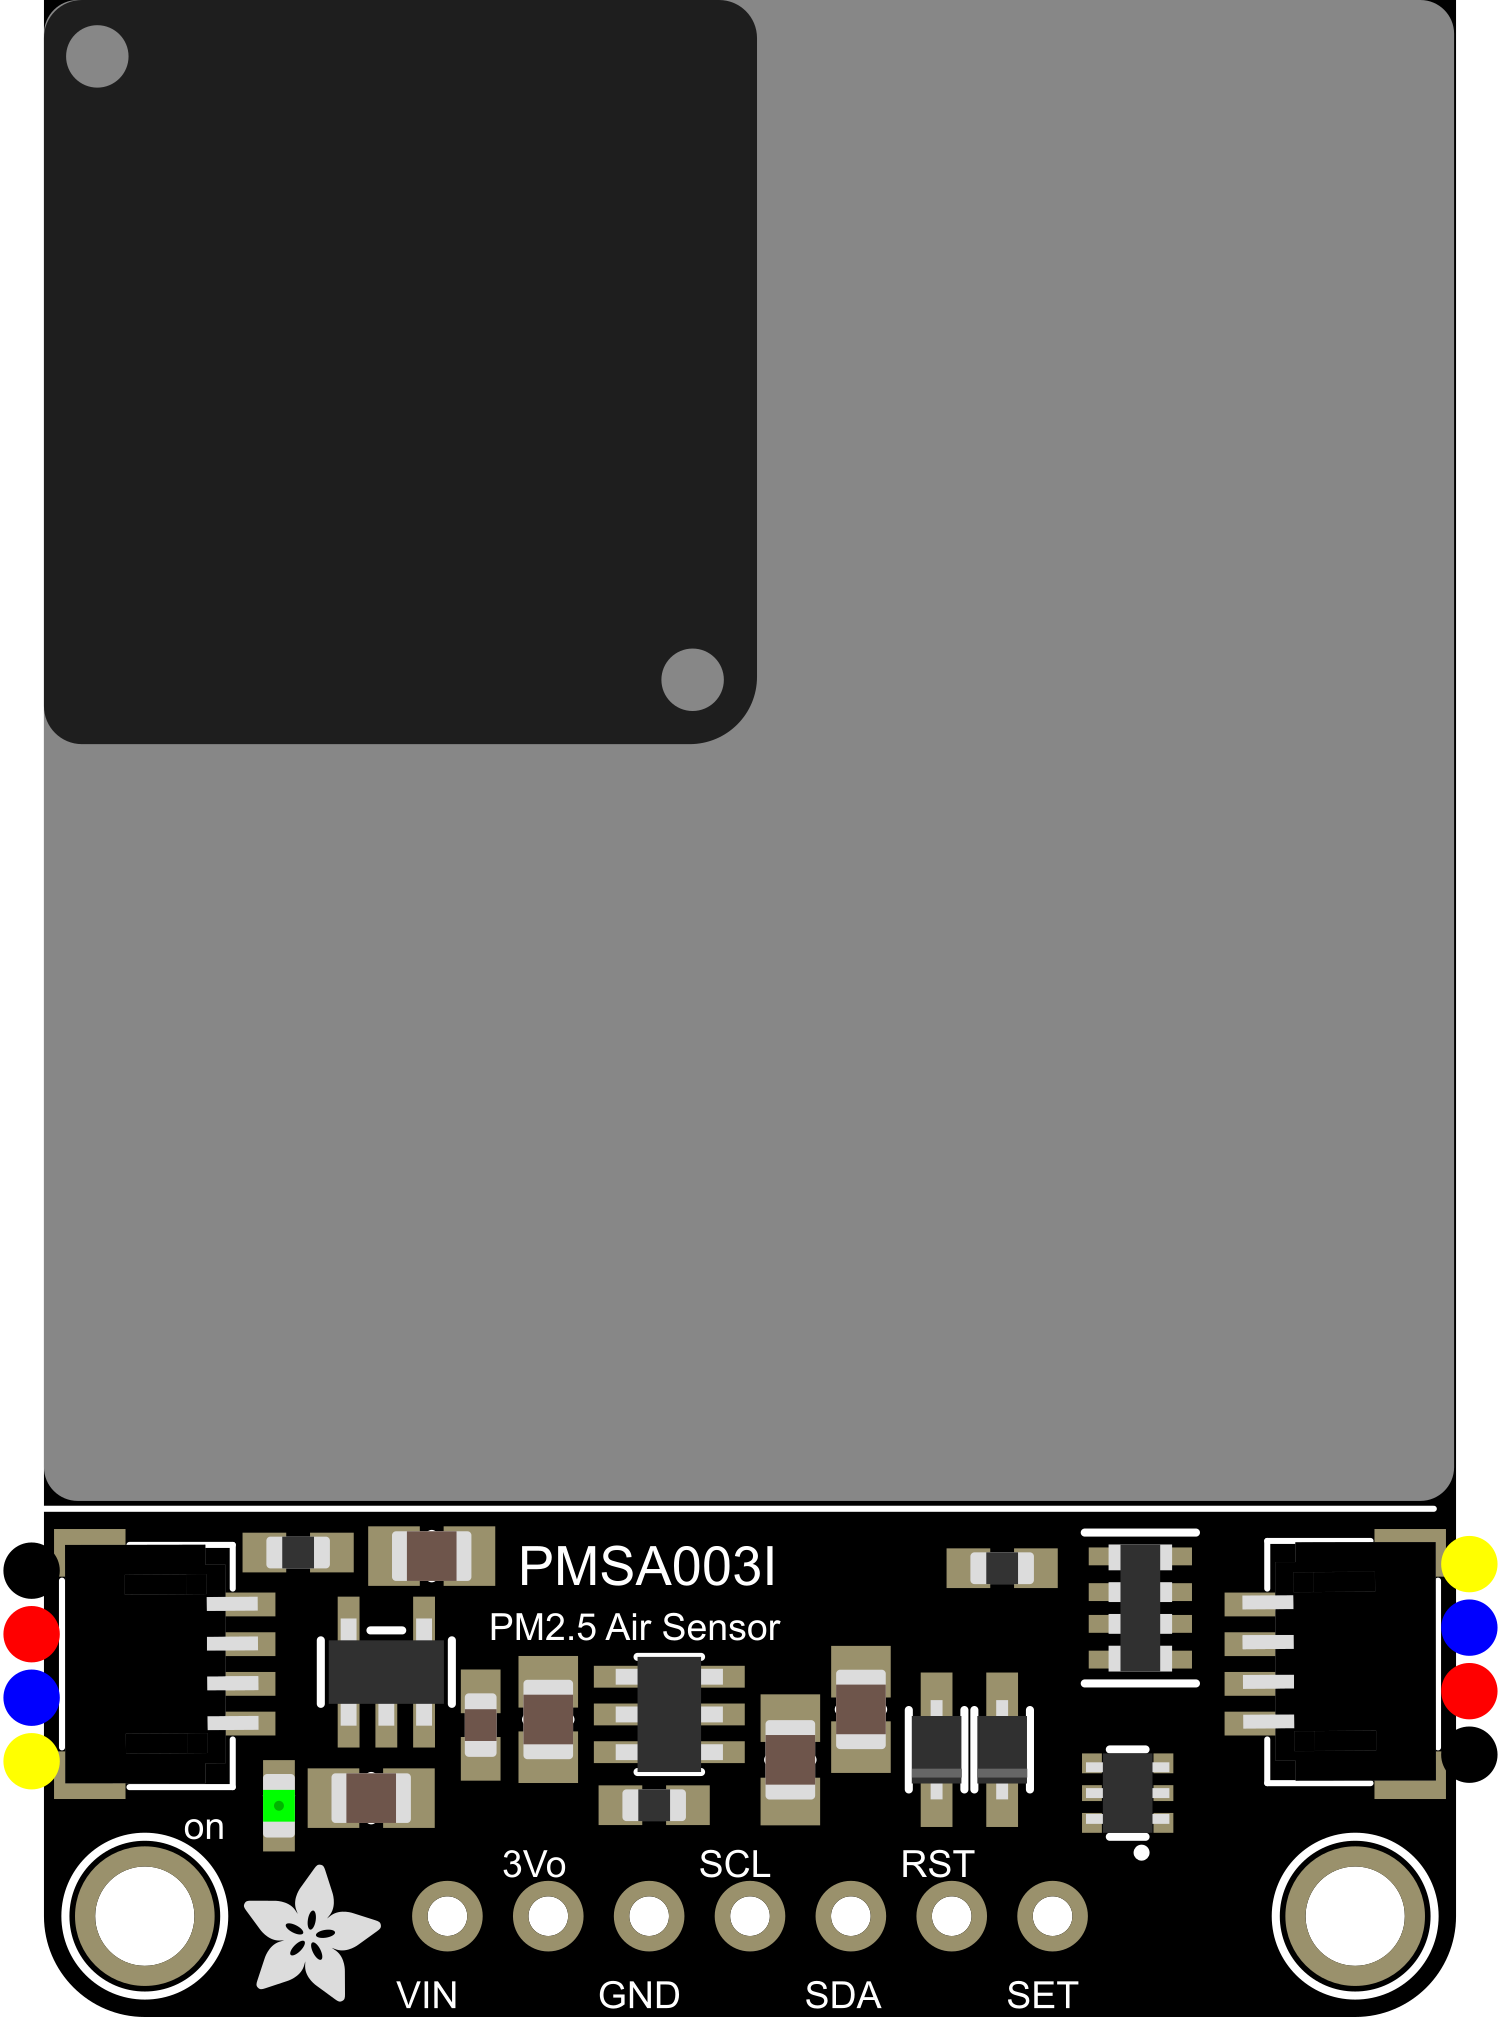
How to Use Adafruit PMSA003I Air Quality Breakout: Examples, Pinouts, and Specs

Image of Adafruit PMSA003I Air Quality Breakout
Cirkit Designer LogoDesign with Adafruit PMSA003I Air Quality Breakout in Cirkit Designer

Introduction

The Adafruit PMSA003I Air Quality Breakout is a sophisticated sensor module designed to measure the concentration of particulate matter in the air, specifically PM2.5 and PM10 particles. These particles are of particular concern for air quality, as they can penetrate deep into the lungs and even enter the bloodstream. The PMSA003I is based on laser scattering technology, providing reliable and accurate readings, making it an excellent choice for indoor air quality monitoring in homes, offices, and industrial environments.

Explore Projects Built with Adafruit PMSA003I Air Quality Breakout

Use Cirkit Designer to design, explore, and prototype these projects online. Some projects support real-time simulation. Click "Open Project" to start designing instantly!
Arduino-Based Air Quality Monitoring System with Bluetooth Connectivity
Image of Air quality part 2: A project utilizing Adafruit PMSA003I Air Quality Breakout in a practical application
This circuit is an air quality monitoring system that uses an Arduino UNO to collect data from a PM2.5 air quality sensor (PMS5003) and an ozone sensor (MQ131). The collected data is then transmitted via an HC-05 Bluetooth module for remote monitoring, with a rocker switch used to control the power supply.
Cirkit Designer LogoOpen Project in Cirkit Designer
ESP32-Based IoT Indoor Air Quality Monitoring System with OLED Display and RGB LED
Image of air quality: A project utilizing Adafruit PMSA003I Air Quality Breakout in a practical application
This IoT indoor air quality monitoring circuit uses an ESP32 microcontroller to read data from a DHT22 temperature and humidity sensor, an MQ-7 carbon monoxide sensor, and a PM2.5 air quality sensor. The collected data is displayed on a 128x64 OLED display, and an RGB LED and PWM fan are controlled based on the air quality readings to indicate and manage air quality levels.
Cirkit Designer LogoOpen Project in Cirkit Designer
ESP32-Based Air Quality Monitoring System with Multiple Sensors
Image of IIIT_H_mini_project: A project utilizing Adafruit PMSA003I Air Quality Breakout in a practical application
This circuit is an air quality monitoring system that uses an ESP32 microcontroller to collect data from various sensors, including the MQ135 and MQ-2 gas sensors, a DHT11 temperature and humidity sensor, and a PMS5003 PM2.5 air quality sensor. The ESP32 processes the sensor data and can potentially transmit it for further analysis or display.
Cirkit Designer LogoOpen Project in Cirkit Designer
ESP32-Based Smart Air Purifier with Wi-Fi and Blynk Integration
Image of new: A project utilizing Adafruit PMSA003I Air Quality Breakout in a practical application
This circuit is a smart air purifier system that uses an ESP32 microcontroller to monitor indoor air quality through various sensors, including a DHT22 for temperature and humidity, an MQ-7 for CO levels, and a PMS5003 for particulate matter. The system adjusts a 12V PWM fan's speed based on air quality readings and integrates with the Blynk app for real-time monitoring and control, including a manual mode switch and an LED indicator.
Cirkit Designer LogoOpen Project in Cirkit Designer

Explore Projects Built with Adafruit PMSA003I Air Quality Breakout

Use Cirkit Designer to design, explore, and prototype these projects online. Some projects support real-time simulation. Click "Open Project" to start designing instantly!
Image of Air quality part 2: A project utilizing Adafruit PMSA003I Air Quality Breakout in a practical application
Arduino-Based Air Quality Monitoring System with Bluetooth Connectivity
This circuit is an air quality monitoring system that uses an Arduino UNO to collect data from a PM2.5 air quality sensor (PMS5003) and an ozone sensor (MQ131). The collected data is then transmitted via an HC-05 Bluetooth module for remote monitoring, with a rocker switch used to control the power supply.
Cirkit Designer LogoOpen Project in Cirkit Designer
Image of air quality: A project utilizing Adafruit PMSA003I Air Quality Breakout in a practical application
ESP32-Based IoT Indoor Air Quality Monitoring System with OLED Display and RGB LED
This IoT indoor air quality monitoring circuit uses an ESP32 microcontroller to read data from a DHT22 temperature and humidity sensor, an MQ-7 carbon monoxide sensor, and a PM2.5 air quality sensor. The collected data is displayed on a 128x64 OLED display, and an RGB LED and PWM fan are controlled based on the air quality readings to indicate and manage air quality levels.
Cirkit Designer LogoOpen Project in Cirkit Designer
Image of IIIT_H_mini_project: A project utilizing Adafruit PMSA003I Air Quality Breakout in a practical application
ESP32-Based Air Quality Monitoring System with Multiple Sensors
This circuit is an air quality monitoring system that uses an ESP32 microcontroller to collect data from various sensors, including the MQ135 and MQ-2 gas sensors, a DHT11 temperature and humidity sensor, and a PMS5003 PM2.5 air quality sensor. The ESP32 processes the sensor data and can potentially transmit it for further analysis or display.
Cirkit Designer LogoOpen Project in Cirkit Designer
Image of new: A project utilizing Adafruit PMSA003I Air Quality Breakout in a practical application
ESP32-Based Smart Air Purifier with Wi-Fi and Blynk Integration
This circuit is a smart air purifier system that uses an ESP32 microcontroller to monitor indoor air quality through various sensors, including a DHT22 for temperature and humidity, an MQ-7 for CO levels, and a PMS5003 for particulate matter. The system adjusts a 12V PWM fan's speed based on air quality readings and integrates with the Blynk app for real-time monitoring and control, including a manual mode switch and an LED indicator.
Cirkit Designer LogoOpen Project in Cirkit Designer

Common Applications and Use Cases

  • Indoor air quality monitoring
  • Environmental monitoring
  • Air purifiers and HVAC systems
  • Health and safety monitoring in workplaces
  • Smart home systems

Technical Specifications

Key Technical Details

  • Particle Sensing Range: 0.3µm to 10µm
  • Effective Range for PM2.5/PM10: 0 to 500 µg/m³
  • Maximum Operating Voltage: 5V DC
  • Maximum Operating Current: 100 mA during active sensing
  • Standby Current: ≤200 µA
  • Interface: I2C (up to 400 kHz) and UART
  • Operating Temperature Range: -10°C to 60°C
  • Dimensions: 50mm x 38mm x 21mm

Pin Configuration and Descriptions

Pin Number Name Description
1 VCC Power supply (3.3V-5V)
2 GND Ground connection
3 SCL I2C clock line
4 SDA I2C data line
5 RX UART receive pin (optional)
6 TX UART transmit pin (optional)
7 RESET Active low reset pin (optional)
8 SET Active low to enter sleep mode (optional)

Usage Instructions

How to Use the Component in a Circuit

  1. Powering the Sensor: Connect the VCC pin to a 3.3V or 5V power supply and the GND pin to the ground.
  2. I2C Communication: Connect the SCL and SDA pins to the corresponding I2C clock and data lines on your microcontroller.
  3. Optional UART Communication: If using UART, connect the RX and TX pins to the TX and RX pins on your microcontroller, respectively.
  4. Reset and Set Pins: The RESET and SET pins are optional for use and can be left unconnected if not required.

Important Considerations and Best Practices

  • Ensure that the power supply is within the specified voltage range to prevent damage.
  • For stable readings, allow the sensor to preheat for at least 30 seconds after powering up.
  • Avoid obstructing the air inlet and outlet of the sensor to ensure accurate measurements.
  • Use pull-up resistors on the I2C lines if your microcontroller does not have built-in pull-ups.
  • Keep the sensor away from high-concentration gases and dust to prevent sensor contamination.

Troubleshooting and FAQs

Common Issues

  • Inaccurate Readings: Ensure that the sensor is not placed near sources of pollution and that there is proper airflow.
  • No Data on I2C: Check the connections and ensure pull-up resistors are in place if needed. Also, verify that the correct I2C address is being used.
  • Sensor Not Powering Up: Confirm that the power supply is within the specified range and that the connections are secure.

Solutions and Tips for Troubleshooting

  • Preheating: Allow the sensor to warm up for at least 30 seconds to a minute before taking readings.
  • Connection Check: Double-check wiring, especially for I2C or UART connections, and ensure that solder joints are solid and not causing intermittent connections.
  • Resetting the Sensor: If the sensor is unresponsive, try toggling the RESET pin to reset the device.

FAQs

  • Q: Can the sensor measure other types of particulate matter besides PM2.5 and PM10?

    • A: The sensor is specifically calibrated for PM2.5 and PM10 measurements. It can detect particles as small as 0.3µm, but the reported values are for PM2.5 and PM10.
  • Q: How often should the sensor be calibrated?

    • A: The PMSA003I comes factory-calibrated and typically does not require additional calibration. However, if you notice significant deviations in readings over time, you may need to consult the manufacturer's guidelines for recalibration.
  • Q: Is the sensor waterproof?

    • A: No, the sensor is not waterproof. It should be protected from moisture and direct exposure to water.

Example Code for Arduino UNO

#include <Wire.h>
#include "Adafruit_PM25AQI.h"

Adafruit_PM25AQI aqi = Adafruit_PM25AQI();

void setup() {
  Serial.begin(9600);
  // Wait for serial monitor to open
  while (!Serial) { delay(10); }

  Serial.println("Adafruit PMSA003I Air Quality Sensor Test");
  
  // Initialize the sensor
  if (!aqi.begin_I2C()) { 
    Serial.println("Could not find PM 2.5 sensor!");
    while (1) delay(10);
  }
}

void loop() {
  PM25_AQI_Data data;

  // Read data from the sensor
  if (!aqi.read(&data)) {
    Serial.println("Could not read from AQI");
    delay(500); // try again in a bit!
    return;
  }

  // Print out the data
  Serial.println("PM 1.0: " + String(data.pm10_standard));
  Serial.println("PM 2.5: " + String(data.pm25_standard));
  Serial.println("PM 10: " + String(data.pm100_standard));
  Serial.println();
  
  delay(1000); // Wait a second before the next reading
}

Note: This example assumes you have installed the Adafruit_PM25AQI library. The code initializes the sensor and reads PM1.0, PM2.5, and PM10 values, outputting them to the serial monitor. Ensure that your Arduino IDE is configured with the correct board and port selected before uploading the code.