How to Use shock sensor: Examples, Pinouts, and Specs
Introduction
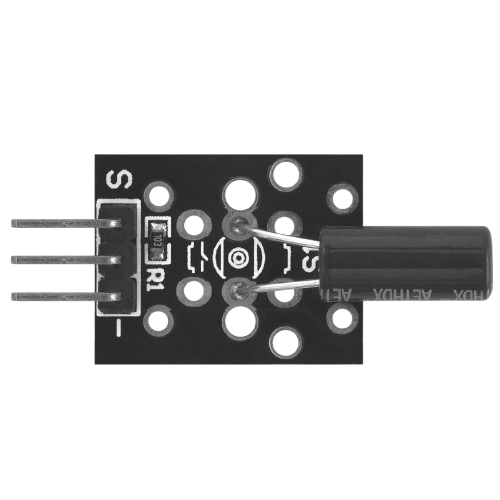
The KU-002 shock sensor, manufactured by Sensor, is a compact and reliable device designed to detect vibrations or impacts. It is commonly used in security systems, automotive applications, and industrial equipment to trigger alarms or initiate specific actions when unauthorized movement or physical disturbances are detected. The sensor operates by detecting mechanical vibrations and converting them into electrical signals, making it an essential component for motion-sensitive applications.
Explore Projects Built with shock sensor

Explore Projects Built with shock sensor
Common Applications
- Security systems to detect break-ins or tampering
- Automotive systems for anti-theft alarms
- Industrial machinery to monitor vibrations or impacts
- Consumer electronics for motion-based triggers
Technical Specifications
The KU-002 shock sensor is a simple yet effective device with the following key specifications:
| Parameter | Value |
|---|---|
| Manufacturer | Sensor |
| Part ID | KU-002 |
| Operating Voltage | 3.3V to 5V |
| Output Type | Digital (High/Low) |
| Sensitivity | Adjustable (via external circuit) |
| Operating Temperature | -20°C to 70°C |
| Dimensions | 10mm x 5mm x 5mm |
| Mounting Type | Through-hole |
Pin Configuration
The KU-002 shock sensor has three pins, as described in the table below:
| Pin | Name | Description |
|---|---|---|
| 1 | VCC | Power supply pin (3.3V to 5V) |
| 2 | GND | Ground connection |
| 3 | OUT | Digital output pin (High when vibration is detected) |
Usage Instructions
How to Use the KU-002 Shock Sensor in a Circuit
- Power the Sensor: Connect the VCC pin to a 3.3V or 5V power source and the GND pin to the ground of your circuit.
- Connect the Output: Attach the OUT pin to a microcontroller's digital input pin or directly to an external circuit (e.g., an LED or buzzer) to monitor the sensor's output.
- Adjust Sensitivity: If the sensor's sensitivity is adjustable via an external circuit, fine-tune it to match your application's requirements.
- Monitor the Output: The OUT pin will output a HIGH signal when a vibration or impact is detected and remain LOW otherwise.
Important Considerations and Best Practices
- Debouncing: The sensor may produce multiple signals for a single vibration. Use a software debounce routine or a capacitor to filter out noise.
- Mounting: Secure the sensor firmly to avoid false triggers caused by unintended vibrations.
- Power Supply: Ensure a stable power supply to avoid erratic behavior.
- Testing: Test the sensor in the intended environment to ensure it responds accurately to the desired level of vibration or impact.
Example: Connecting the KU-002 to an Arduino UNO
Below is an example of how to connect and use the KU-002 shock sensor with an Arduino UNO:
Circuit Connections
- Connect the VCC pin of the sensor to the 5V pin on the Arduino.
- Connect the GND pin of the sensor to the GND pin on the Arduino.
- Connect the OUT pin of the sensor to digital pin 2 on the Arduino.
Arduino Code
// KU-002 Shock Sensor Example with Arduino UNO
// This code reads the sensor's output and turns on an LED when vibration is detected.

const int shockSensorPin = 2; // Pin connected to the sensor's OUT pin
const int ledPin = 13;        // Built-in LED pin on Arduino

void setup() {
  pinMode(shockSensorPin, INPUT); // Set the sensor pin as input
  pinMode(ledPin, OUTPUT);        // Set the LED pin as output
  Serial.begin(9600);             // Initialize serial communication
}

void loop() {
  int sensorValue = digitalRead(shockSensorPin); // Read the sensor's output

  if (sensorValue == HIGH) {
    // If vibration is detected, turn on the LED and print a message
    digitalWrite(ledPin, HIGH);
    Serial.println("Vibration detected!");
  } else {
    // If no vibration is detected, turn off the LED
    digitalWrite(ledPin, LOW);
  }

  delay(100); // Small delay to stabilize readings
}
Troubleshooting and FAQs
Common Issues and Solutions
Sensor Not Responding
- Cause: Incorrect wiring or loose connections.
- Solution: Double-check all connections, ensuring the VCC, GND, and OUT pins are properly connected.
False Triggers
- Cause: Environmental noise or excessive sensitivity.
- Solution: Adjust the sensitivity using an external circuit or relocate the sensor to a more stable position.
No Output Signal
- Cause: Insufficient power supply or damaged sensor.
- Solution: Verify the power supply voltage and replace the sensor if necessary.
Multiple Signals for a Single Vibration
- Cause: Signal bouncing due to mechanical vibrations.
- Solution: Implement a software debounce routine or use a capacitor to filter noise.
FAQs
Q: Can the KU-002 detect continuous vibrations?
A: The KU-002 is designed to detect discrete impacts or vibrations. For continuous vibration monitoring, consider using a dedicated vibration sensor.
Q: Is the KU-002 waterproof?
A: No, the KU-002 is not waterproof. It should be used in dry environments or protected with a waterproof enclosure.
Q: Can I use the KU-002 with a 3.3V microcontroller?
A: Yes, the KU-002 operates within a voltage range of 3.3V to 5V, making it compatible with 3.3V microcontrollers.
Q: How do I increase the sensitivity of the sensor?
A: Sensitivity can be adjusted by modifying the external circuit connected to the sensor. Consult the sensor's datasheet for specific recommendations.
This documentation provides a comprehensive guide to using the KU-002 shock sensor effectively in various applications.