Cirkit Designer
Your all-in-one circuit design IDE
Home /
Component Documentation
How to Use ESP8266MOD HW-625 : Examples, Pinouts, and Specs

Introduction
The ESP8266MOD HW-625 is a compact and powerful Wi-Fi module designed to enable microcontrollers to connect to Wi-Fi networks and establish TCP/IP connections. It features an integrated TCP/IP protocol stack, making it an ideal choice for Internet of Things (IoT) applications. This module is widely used in smart home devices, wireless sensors, and other embedded systems requiring wireless communication.
Explore Projects Built with ESP8266MOD HW-625
ESP8266 NodeMCU Controlled Multi-Channel Thermocouple Interface
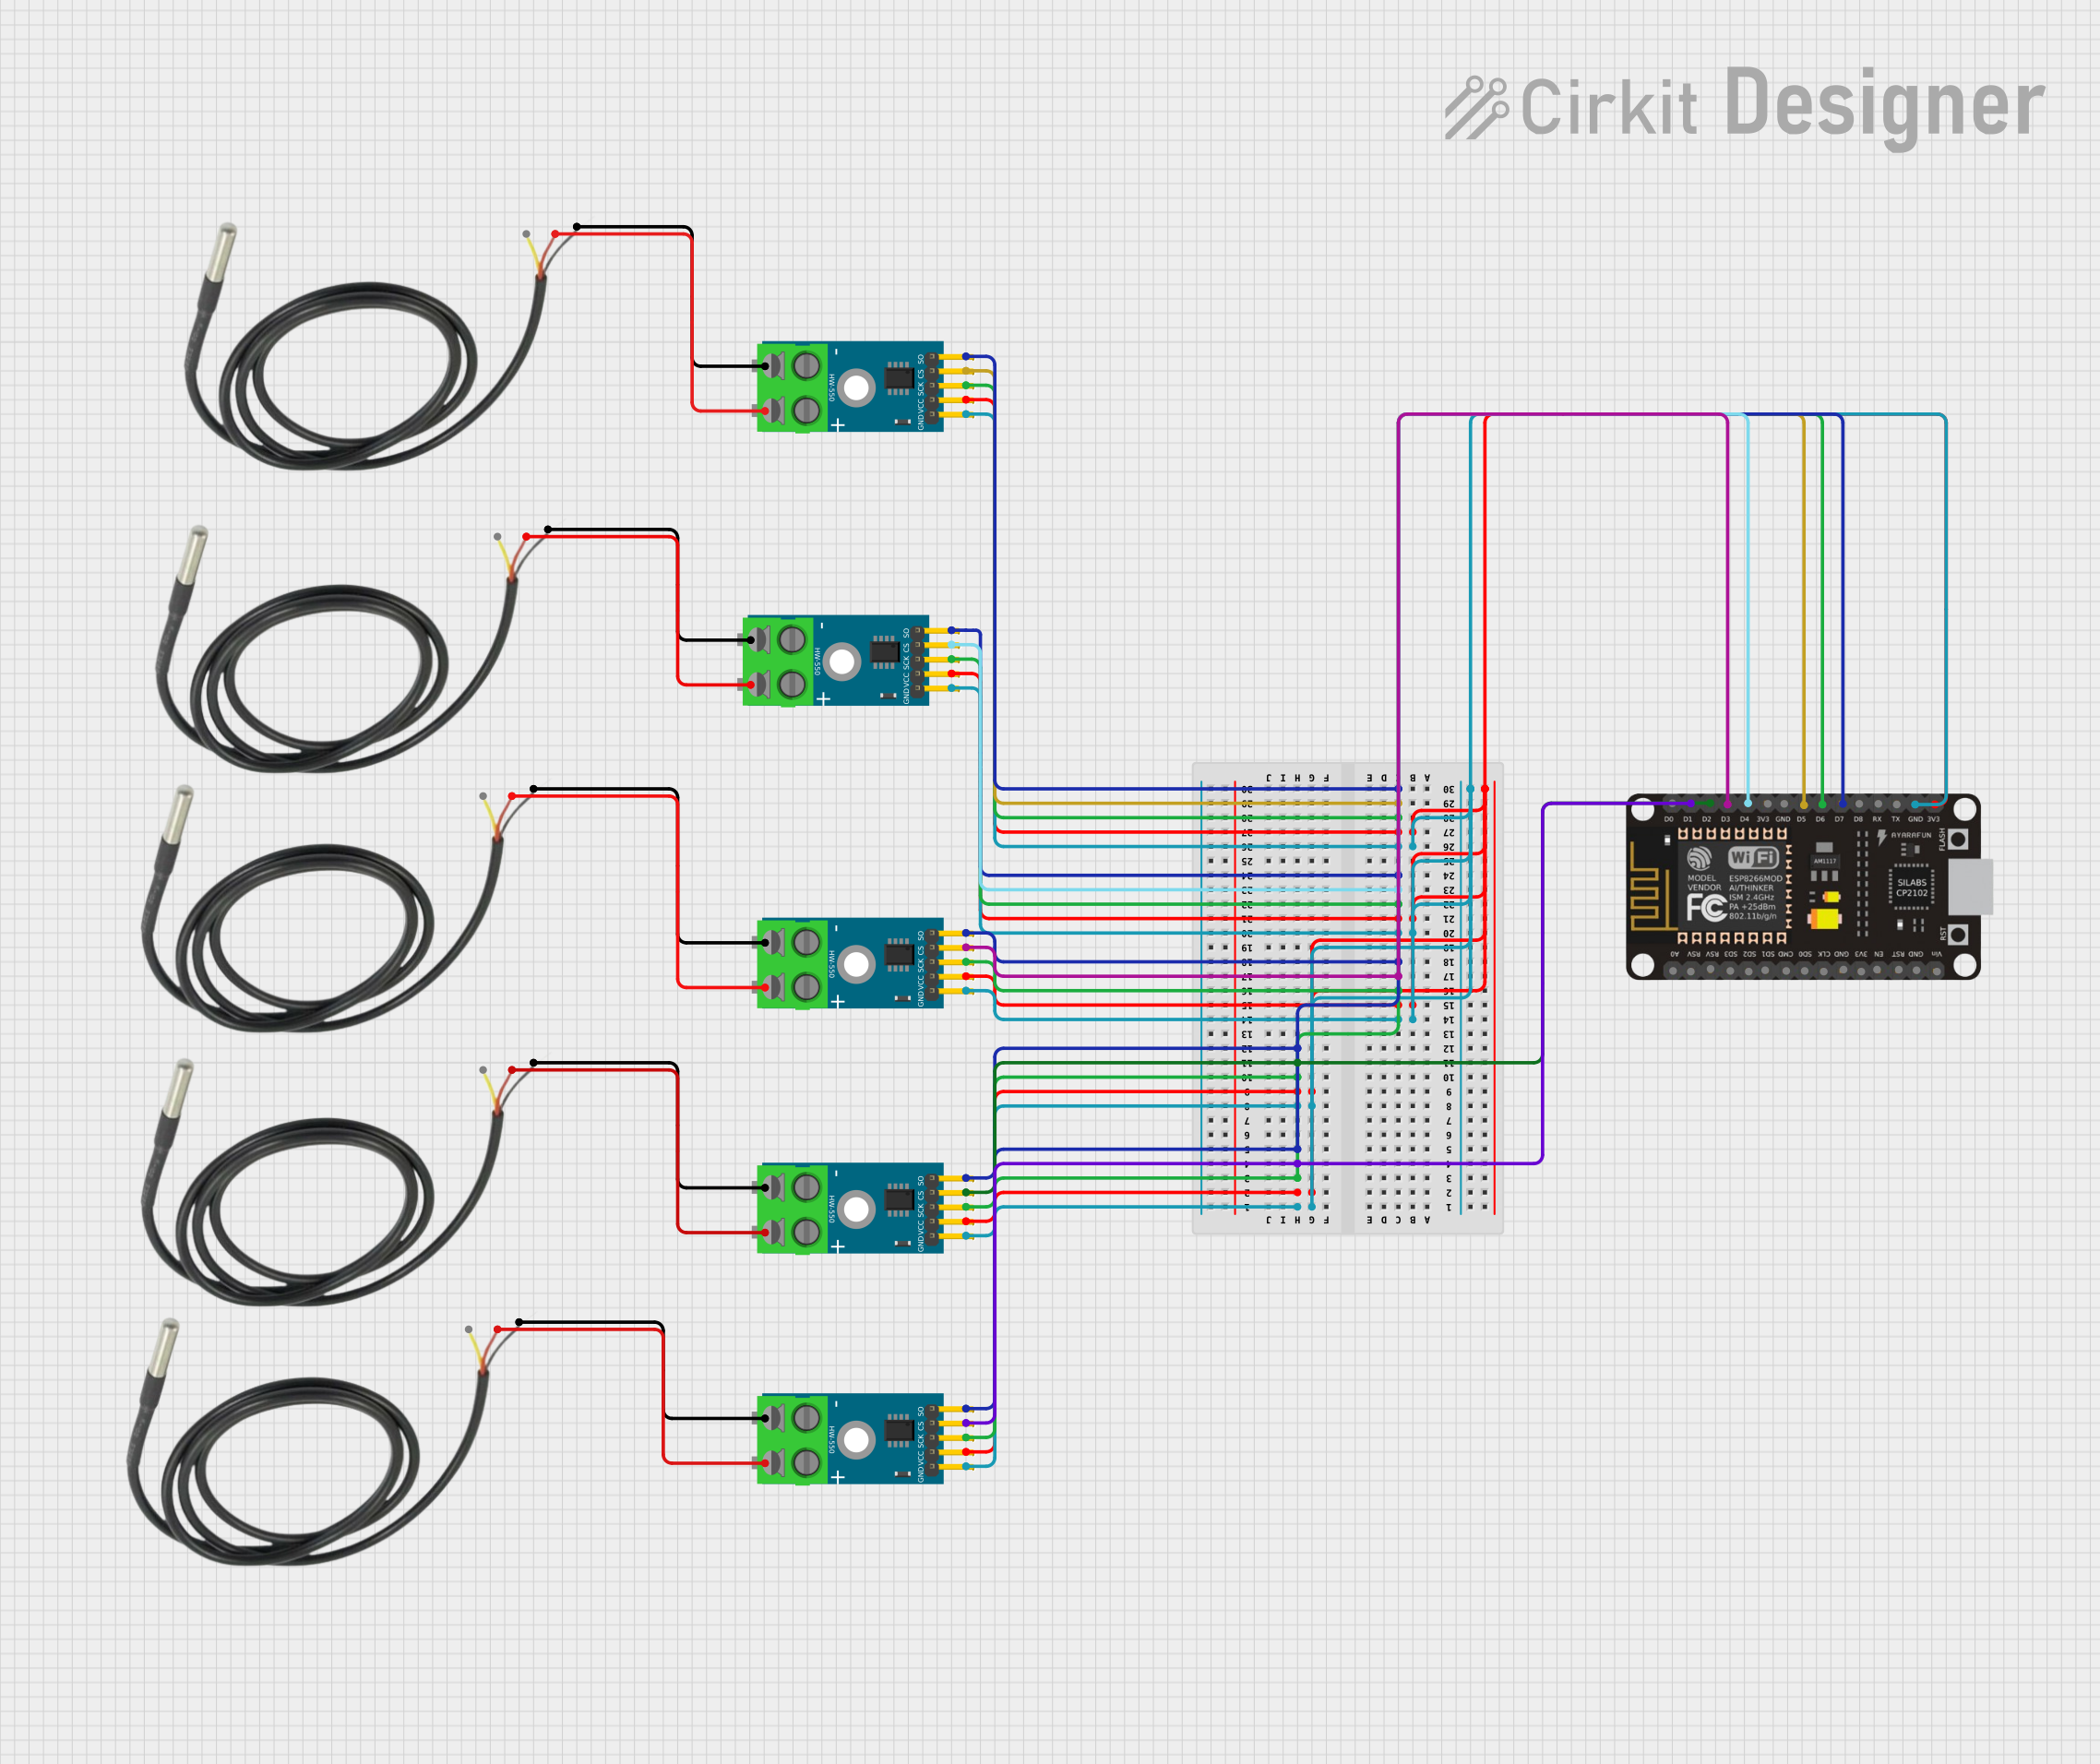
This circuit is designed to interface multiple MAX6675 thermocouple-to-digital converter modules with an ESP8266 NodeMCU microcontroller. Each MAX6675 module is connected to a temperature sensor and the ESP8266 is configured to communicate with the modules via SPI to read temperature data. The ESP8266 NodeMCU manages the chip select (CS) lines individually for each MAX6675 module, allowing for multiple temperature readings from different sensors.
ESP8266 NodeMCU with LoRa and RS-485 Communication Interface
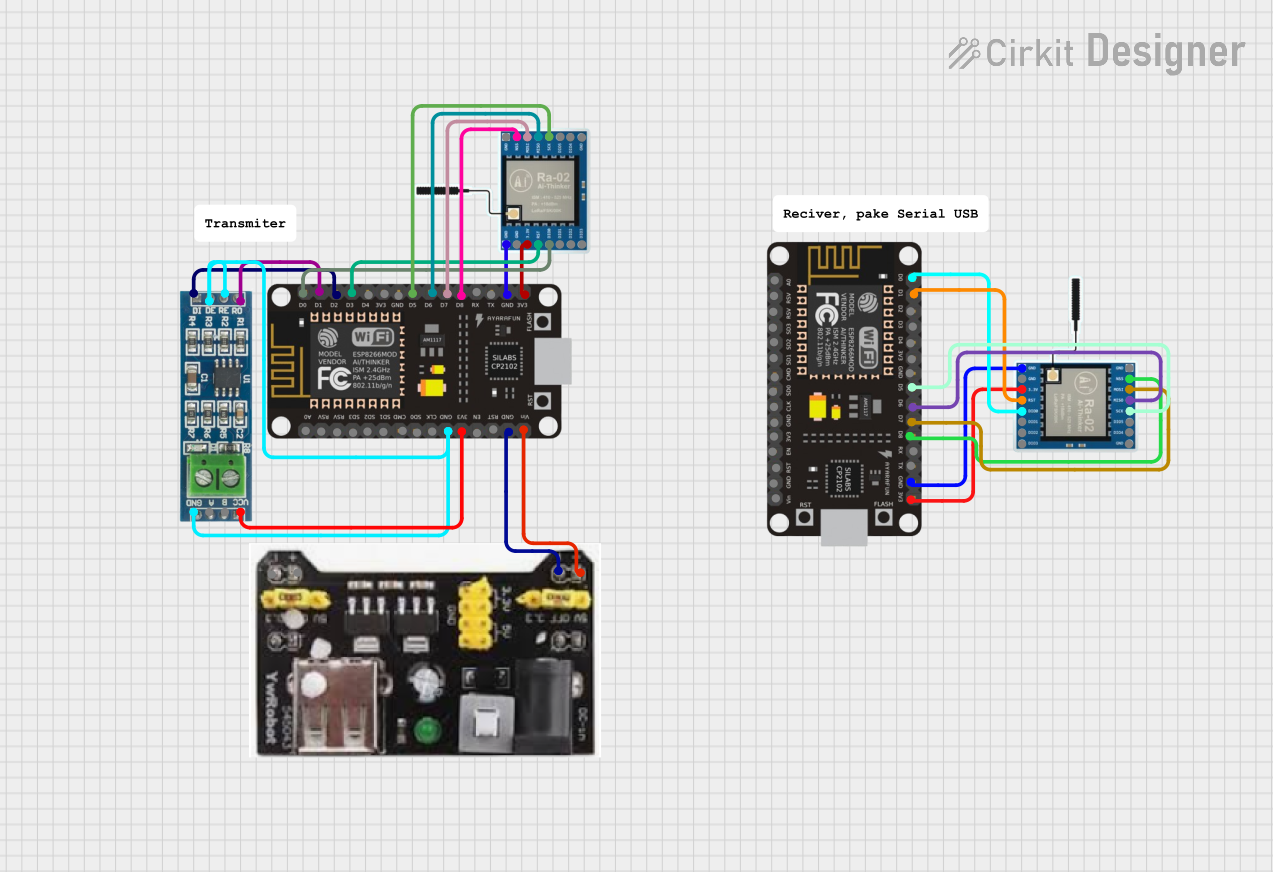
This circuit features two ESP8266 NodeMCU microcontrollers, each interfaced with a LoRa Ra-02 SX1278 module for long-range wireless communication, and an RS-485 module for wired serial communication. The ESP8266 microcontrollers are responsible for handling the communication protocols and data processing. Power is supplied to the microcontrollers via an MB102 Breadboard Power Supply Module, which provides both 3.3V and 5V outputs.
ESP8266 and SIM800L Based GPS Tracker with I2C LCD Display and Battery Power

This circuit integrates an ESP8266 NodeMCU microcontroller with a SIM800L GSM module, a GPS NEO 6M module, and a 16x2 I2C LCD display for communication and location tracking. It also includes a pushbutton for user input, a piezo buzzer for audio alerts, and is powered by a 2x 18650 battery pack through an LM2596 step-down module.
Wi-Fi Enabled Gas Leak Detection and Alert System with ESP8266 and SIM800L
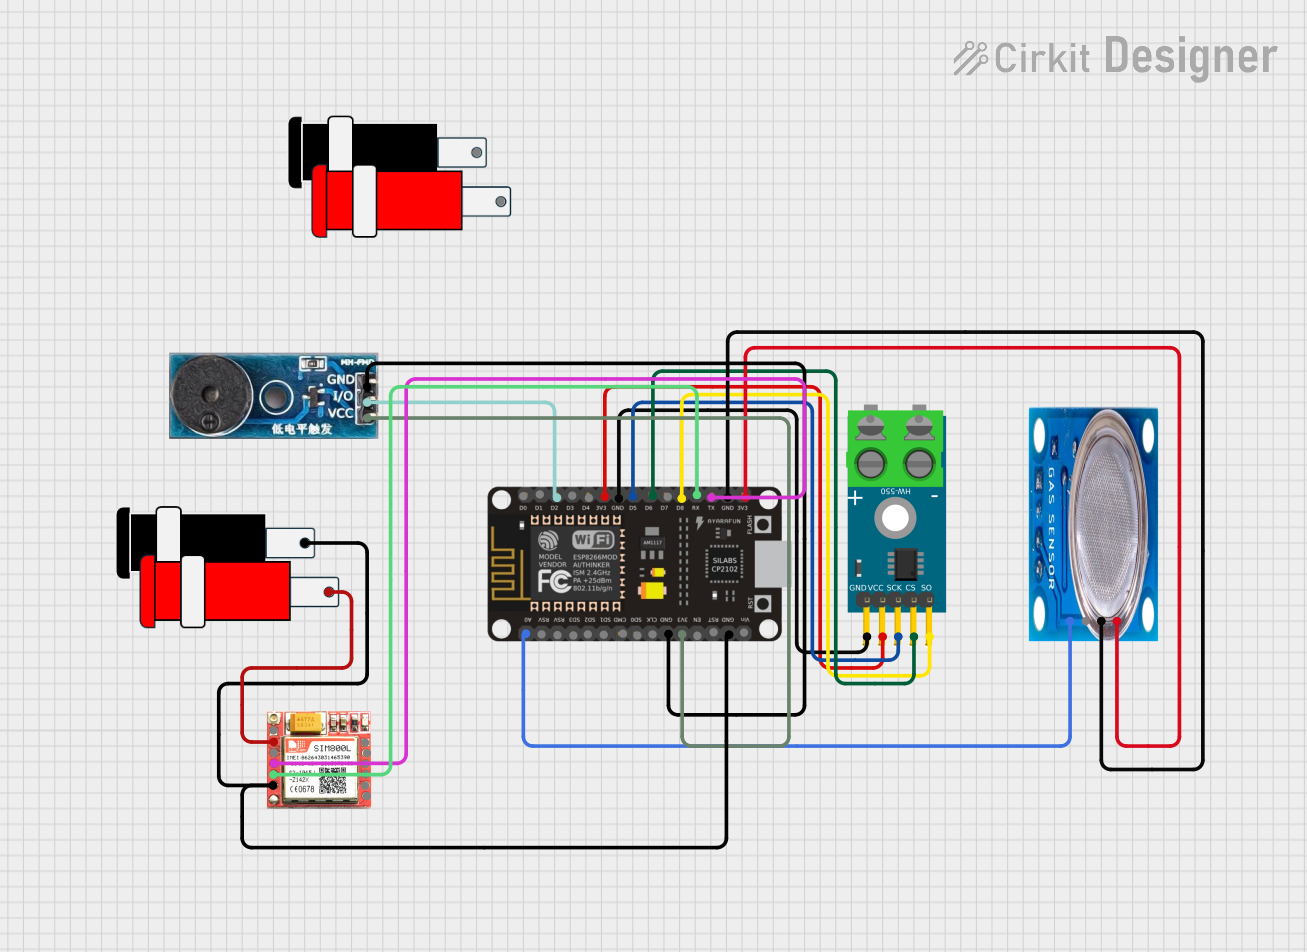
This circuit is a sensor and communication system using an ESP8266 NodeMCU microcontroller. It interfaces with a MAX6675 thermocouple module for temperature sensing, an MQ-5 gas sensor for gas detection, and a SIM800L module for GSM communication. Additionally, a buzzer module is included for audible alerts.
Explore Projects Built with ESP8266MOD HW-625
ESP8266 NodeMCU Controlled Multi-Channel Thermocouple Interface
This circuit is designed to interface multiple MAX6675 thermocouple-to-digital converter modules with an ESP8266 NodeMCU microcontroller. Each MAX6675 module is connected to a temperature sensor and the ESP8266 is configured to communicate with the modules via SPI to read temperature data. The ESP8266 NodeMCU manages the chip select (CS) lines individually for each MAX6675 module, allowing for multiple temperature readings from different sensors.
ESP8266 NodeMCU with LoRa and RS-485 Communication Interface
This circuit features two ESP8266 NodeMCU microcontrollers, each interfaced with a LoRa Ra-02 SX1278 module for long-range wireless communication, and an RS-485 module for wired serial communication. The ESP8266 microcontrollers are responsible for handling the communication protocols and data processing. Power is supplied to the microcontrollers via an MB102 Breadboard Power Supply Module, which provides both 3.3V and 5V outputs.
ESP8266 and SIM800L Based GPS Tracker with I2C LCD Display and Battery Power
This circuit integrates an ESP8266 NodeMCU microcontroller with a SIM800L GSM module, a GPS NEO 6M module, and a 16x2 I2C LCD display for communication and location tracking. It also includes a pushbutton for user input, a piezo buzzer for audio alerts, and is powered by a 2x 18650 battery pack through an LM2596 step-down module.
Wi-Fi Enabled Gas Leak Detection and Alert System with ESP8266 and SIM800L
This circuit is a sensor and communication system using an ESP8266 NodeMCU microcontroller. It interfaces with a MAX6675 thermocouple module for temperature sensing, an MQ-5 gas sensor for gas detection, and a SIM800L module for GSM communication. Additionally, a buzzer module is included for audible alerts.
Common Applications:
- IoT devices and smart home automation
- Wireless data logging and monitoring
- Remote control systems
- Web server hosting on embedded devices
- Wireless sensor networks
Technical Specifications
Key Technical Details:
| Parameter | Value |
|---|---|
| Operating Voltage | 3.0V - 3.6V |
| Operating Current | 80mA (average), 200mA (peak) |
| Wi-Fi Standard | 802.11 b/g/n |
| Frequency Range | 2.4 GHz |
| Flash Memory | 4 MB |
| GPIO Pins | Up to 17 |
| Communication Protocols | UART, SPI, I2C |
| Maximum Data Rate | 72.2 Mbps |
| Operating Temperature | -40°C to 125°C |
| Dimensions | 24mm x 16mm x 3mm |
Pin Configuration and Descriptions:
| Pin Number | Pin Name | Description |
|---|---|---|
| 1 | GND | Ground |
| 2 | TX | UART Transmit (for serial communication) |
| 3 | RX | UART Receive (for serial communication) |
| 4 | CH_PD | Chip Enable (active HIGH, must be HIGH to work) |
| 5 | GPIO0 | General Purpose I/O Pin 0 |
| 6 | GPIO2 | General Purpose I/O Pin 2 |
| 7 | GPIO15 | General Purpose I/O Pin 15 |
| 8 | VCC | Power Supply (3.3V input) |
Usage Instructions
How to Use the ESP8266MOD HW-625 in a Circuit:
- Power Supply: Ensure the module is powered with a stable 3.3V supply. Do not exceed 3.6V as it may damage the module.
- Connections:
- Connect the
GNDpin to the ground of your circuit. - Connect the
VCCpin to a 3.3V power source. - Use the
TXandRXpins for UART communication with a microcontroller. - Pull the
CH_PDpin HIGH (connect to 3.3V) to enable the module.
- Connect the
- GPIO Pins: Use the GPIO pins for additional functionality such as controlling LEDs, sensors, or relays.
- Antenna: Ensure the onboard antenna has sufficient clearance from other components for optimal Wi-Fi performance.
Important Considerations:
- Use a level shifter if interfacing with a 5V microcontroller to avoid damaging the module.
- Add a decoupling capacitor (e.g., 10µF) near the power pins to stabilize the power supply.
- Avoid placing the module near sources of electromagnetic interference (EMI) to maintain signal quality.
Example: Connecting to an Arduino UNO
Below is an example of how to connect the ESP8266MOD HW-625 to an Arduino UNO and send data to a Wi-Fi network.
Wiring:
| ESP8266 Pin | Arduino Pin |
|---|---|
| VCC | 3.3V |
| GND | GND |
| TX | RX (via voltage divider) |
| RX | TX |
| CH_PD | 3.3V |
Code Example:
#include <SoftwareSerial.h>

// Define RX and TX pins for SoftwareSerial
SoftwareSerial esp8266(2, 3); // RX = Pin 2, TX = Pin 3

void setup() {
  Serial.begin(9600); // Start Serial Monitor communication
  esp8266.begin(9600); // Start ESP8266 communication

  // Send AT command to test communication
  esp8266.println("AT");
  delay(1000);

  // Check for response from ESP8266
  while (esp8266.available()) {
    String response = esp8266.readString();
    Serial.println(response); // Print response to Serial Monitor
  }

  // Connect to Wi-Fi network
  esp8266.println("AT+CWJAP=\"YourSSID\",\"YourPassword\"");
  delay(5000);

  // Check connection status
  esp8266.println("AT+CIFSR"); // Get IP address
  delay(1000);
  while (esp8266.available()) {
    String response = esp8266.readString();
    Serial.println(response);
  }
}

void loop() {
  // Add your main code here
}
Notes:
- Replace
"YourSSID"and"YourPassword"with your Wi-Fi network credentials. - Use a voltage divider or logic level shifter on the
TXpin of the Arduino to avoid damaging the ESP8266.
Troubleshooting and FAQs
Common Issues:
No Response from the Module:
- Ensure the
CH_PDpin is pulled HIGH. - Verify the power supply is stable and within the 3.0V-3.6V range.
- Check the UART connections and baud rate settings.
- Ensure the
Wi-Fi Connection Fails:
- Double-check the SSID and password for your Wi-Fi network.
- Ensure the Wi-Fi network operates on the 2.4 GHz band (not 5 GHz).
Module Overheats:
- Verify the power supply voltage and current ratings.
- Ensure proper ventilation and avoid placing the module near heat sources.
Tips for Troubleshooting:
- Use an external USB-to-Serial adapter to test the module independently of the microcontroller.
- Use the
AT+RSTcommand to reset the module if it becomes unresponsive. - Check the Serial Monitor for error codes and refer to the ESP8266 AT command set documentation for details.
By following this documentation, you can effectively integrate the ESP8266MOD HW-625 into your projects and troubleshoot common issues with ease.