How to Use USB-A to Uart: Examples, Pinouts, and Specs
Introduction
The USB-A to UART converter, manufactured by Arduino, is a versatile electronic component designed to facilitate communication between USB devices and UART (Universal Asynchronous Receiver-Transmitter) interfaces. This component is essential for enabling seamless data transfer between microcontrollers, such as Arduino boards, and computers. It is widely used in debugging, programming, and serial communication applications.
Explore Projects Built with USB-A to Uart

Explore Projects Built with USB-A to Uart
Common Applications and Use Cases
- Programming and debugging microcontrollers.
- Establishing serial communication between a computer and embedded systems.
- Interfacing with sensors, modules, or devices that use UART communication.
- Data logging and monitoring in embedded systems.
- Prototyping and testing serial communication protocols.
Technical Specifications
The USB-A to UART converter is designed to provide reliable and efficient communication. Below are its key technical details:
Key Technical Details
- Manufacturer: Arduino
- Input Interface: USB-A (Male)
- Output Interface: UART (TX, RX, GND, VCC)
- Supported Baud Rates: 300 bps to 1 Mbps
- Voltage Levels: 3.3V and 5V (selectable)
- Power Supply: USB-powered
- Operating Temperature: -40°C to 85°C
- Driver Support: Windows, macOS, Linux (requires FTDI or CH340 drivers, depending on the model)
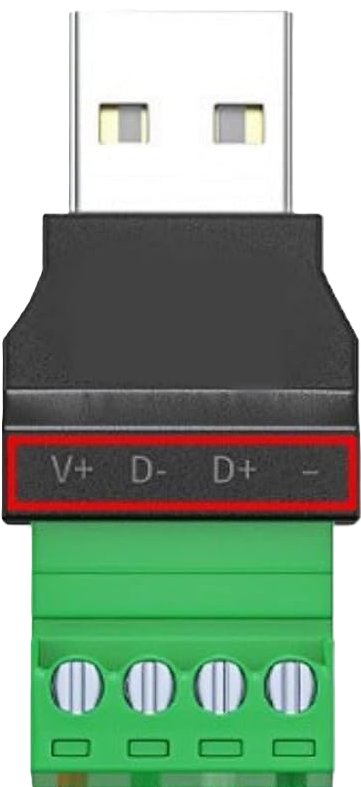
Pin Configuration and Descriptions
The UART side of the converter typically has a 6-pin header. Below is the pin configuration:
| Pin | Name | Description |
|---|---|---|
| 1 | GND | Ground connection. Connect to the ground of the target device. |
| 2 | VCC | Power output. Provides 3.3V or 5V (selectable) to power the target device. |
| 3 | TX | Transmit data. Sends data from the USB to the UART device. |
| 4 | RX | Receive data. Receives data from the UART device to the USB. |
| 5 | RTS | Request to Send. Optional flow control signal. |
| 6 | CTS | Clear to Send. Optional flow control signal. |
Note: Some models may omit RTS and CTS pins if hardware flow control is not supported.
Usage Instructions
How to Use the Component in a Circuit
- Install Drivers: Ensure the appropriate drivers (e.g., FTDI or CH340) are installed on your computer. These drivers allow the USB-A to UART converter to be recognized as a virtual COM port.
- Connect the Converter:
- Plug the USB-A connector into your computer.
- Connect the UART pins (GND, VCC, TX, RX) to the corresponding pins on your microcontroller or target device.
- Ensure the TX pin of the converter connects to the RX pin of the target device, and vice versa.
- Power the Target Device:
- If the target device requires power, use the VCC pin of the converter to supply 3.3V or 5V, depending on the device's requirements.
- Configure Serial Communication:
- Open a serial terminal (e.g., Arduino IDE Serial Monitor, PuTTY) on your computer.
- Select the correct COM port and baud rate to match the target device's settings.
- Test Communication:
- Send and receive data to verify the connection. For example, you can send commands to an Arduino board or read sensor data.
Important Considerations and Best Practices
- Voltage Compatibility: Ensure the voltage level (3.3V or 5V) matches the target device to avoid damage.
- Cross-Connection: Always connect TX to RX and RX to TX between the converter and the target device.
- Driver Installation: Verify that the correct drivers are installed for your operating system.
- Avoid Overloading: Do not draw excessive current from the VCC pin, as it is limited by the USB port's power capacity.
Example Code for Arduino UNO
Below is an example of using the USB-A to UART converter to send and receive data with an Arduino UNO:
// Example: Sending and receiving data via UART using Arduino UNO

void setup() {
  Serial.begin(9600); // Initialize serial communication at 9600 baud
  Serial.println("USB-A to UART Test"); // Send a test message
}

void loop() {
  if (Serial.available() > 0) {
    // Check if data is available to read
    char receivedChar = Serial.read(); // Read the incoming character
    Serial.print("Received: ");
    Serial.println(receivedChar); // Echo the received character
  }
  delay(100); // Small delay to avoid overwhelming the serial buffer
}
Note: Ensure the baud rate in the code matches the baud rate set in your serial terminal.
Troubleshooting and FAQs
Common Issues and Solutions
Device Not Recognized:
- Cause: Missing or incorrect drivers.
- Solution: Install the appropriate drivers (FTDI or CH340) for your operating system.
No Data Transmission:
- Cause: Incorrect TX/RX connections or mismatched baud rate.
- Solution: Verify that TX is connected to RX and RX to TX. Ensure the baud rate matches on both ends.
Power Issues:
- Cause: Insufficient power supply to the target device.
- Solution: Check the VCC pin voltage and ensure it matches the target device's requirements.
Garbage Data in Serial Monitor:
- Cause: Baud rate mismatch or electrical noise.
- Solution: Confirm the baud rate settings and use shorter, shielded cables to reduce noise.
FAQs
Q: Can I use this converter with a 1.8V device?
- A: No, this converter supports 3.3V and 5V devices only. Use a level shifter for 1.8V devices.
Q: How do I know which COM port to select?
- A: Check your computer's Device Manager (Windows) or System Information (macOS/Linux) to identify the COM port assigned to the converter.
Q: Is hardware flow control mandatory?
- A: No, most applications do not require RTS/CTS flow control. You can leave these pins unconnected if not needed.
Q: Can I use this converter to program an Arduino board?
- A: Yes, but ensure the Arduino board has a bootloader installed and connect the TX, RX, and GND pins correctly.
By following this documentation, you can effectively use the Arduino USB-A to UART converter for a wide range of serial communication applications.