How to Use KY-039: Examples, Pinouts, and Specs
Introduction
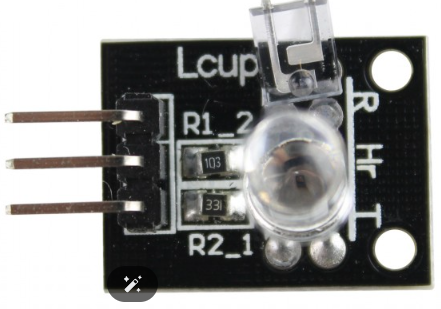
The KY-039 is a heart rate sensor module designed to measure heart rate by detecting blood flow through the skin. It utilizes an infrared LED and a photodetector to sense changes in light intensity caused by blood flow. This compact and cost-effective module is widely used in wearable devices, fitness trackers, and health monitoring systems. Its simplicity and compatibility with microcontrollers make it a popular choice for DIY projects and prototyping.
Explore Projects Built with KY-039


Explore Projects Built with KY-039
Common Applications
- Wearable health monitoring devices
- Fitness trackers
- Biomedical research projects
- DIY heart rate monitoring systems
- Educational electronics projects
Technical Specifications
The KY-039 module is designed for ease of use and integration into various electronic systems. Below are its key technical details:
Key Specifications
| Parameter | Value |
|---|---|
| Operating Voltage | 3.3V - 5V |
| Operating Current | ~20mA |
| Output Signal | Analog |
| Sensor Type | Infrared LED and Photodetector |
| Dimensions | 38mm x 15mm x 10mm |
Pin Configuration
The KY-039 module has three pins for interfacing with microcontrollers or other devices. The table below describes each pin:
| Pin Name | Description |
|---|---|
| S | Analog signal output (heart rate data) |
| + | Power supply (3.3V - 5V) |
| - | Ground (GND) |
Usage Instructions
The KY-039 module is straightforward to use and can be connected to a microcontroller, such as an Arduino UNO, to measure heart rate. Follow the steps below to integrate and use the KY-039 in your project:
Connecting the KY-039 to an Arduino UNO
- Power the Module: Connect the
+pin of the KY-039 to the 5V pin on the Arduino UNO and the-pin to the GND pin. - Signal Connection: Connect the
Spin of the KY-039 to an analog input pin on the Arduino UNO (e.g., A0). - Prepare the Circuit: Ensure the module is securely connected and avoid excessive movement during operation for accurate readings.
Sample Arduino Code
The following code demonstrates how to read data from the KY-039 module and display the heart rate signal on the serial monitor:
// KY-039 Heart Rate Sensor Example Code
// Connect the S pin to A0, + pin to 5V, and - pin to GND on the Arduino UNO.

const int sensorPin = A0; // KY-039 signal pin connected to A0

void setup() {
  Serial.begin(9600); // Initialize serial communication at 9600 baud
  pinMode(sensorPin, INPUT); // Set the sensor pin as input
}

void loop() {
  int sensorValue = analogRead(sensorPin); // Read the analog value from the sensor
  Serial.print("Heart Rate Signal: ");
  Serial.println(sensorValue); // Print the sensor value to the serial monitor
  delay(10); // Small delay for stable readings
}
Important Considerations
- Placement: Place your finger gently on the sensor to ensure proper contact with the infrared LED and photodetector.
- Ambient Light: Avoid using the sensor in environments with excessive ambient light, as it may interfere with the readings.
- Stability: Keep the sensor and your finger steady during measurement to improve accuracy.
- Power Supply: Ensure a stable power supply to avoid fluctuations in the sensor's output.
Troubleshooting and FAQs
Common Issues and Solutions
No Output or Erratic Readings
- Cause: Poor connection or loose wiring.
- Solution: Check all connections and ensure the pins are securely connected.
Inconsistent Readings
- Cause: Excessive movement or improper finger placement.
- Solution: Keep the sensor and your finger steady during operation.
Low Signal Sensitivity
- Cause: Insufficient contact between the finger and the sensor.
- Solution: Ensure the finger is placed directly over the infrared LED and photodetector.
Interference from Ambient Light
- Cause: Strong ambient light affecting the sensor.
- Solution: Use the sensor in a dimly lit environment or shield it from external light sources.
FAQs
Q1: Can the KY-039 measure heart rate directly?
A1: The KY-039 outputs an analog signal corresponding to blood flow changes. You need to process this signal (e.g., using a microcontroller) to calculate the heart rate.
Q2: Is the KY-039 compatible with 3.3V systems?
A2: Yes, the KY-039 can operate with both 3.3V and 5V power supplies, making it compatible with a wide range of microcontrollers.
Q3: How can I improve the accuracy of the readings?
A3: Ensure stable placement of the sensor, minimize movement, and use the sensor in a low-light environment to reduce interference.
Q4: Can I use the KY-039 with microcontrollers other than Arduino?
A4: Yes, the KY-039 can be used with any microcontroller that has an analog input pin, such as ESP32, Raspberry Pi (with an ADC), or STM32.
By following this documentation, you can effectively integrate and use the KY-039 heart rate sensor module in your projects.