Cirkit Designer Logo
Cirkit Designer
Your all-in-one circuit design IDE
Home / 
Component Documentation

How to Use 3.2" TTL Display: Examples, Pinouts, and Specs

Image of 3.2" TTL Display
Cirkit Designer LogoDesign with 3.2" TTL Display in Cirkit Designer

Introduction

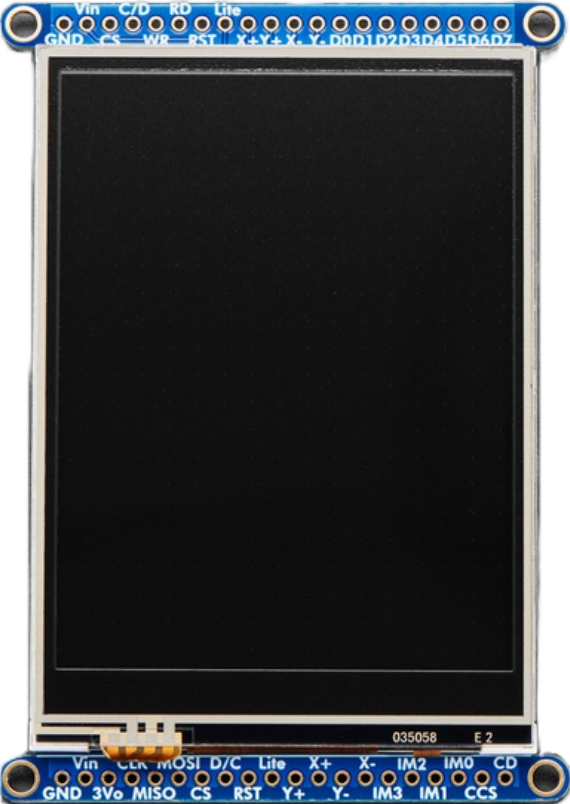
The Adafruit 3.2" TTL Display is a Thin Film Transistor (TFT) display module designed for graphical interface applications. It features a 3.2-inch screen with vibrant color rendering and a resolution suitable for displaying text, images, and graphical data. Utilizing TTL (Transistor-Transistor Logic) signaling, this display is compatible with a wide range of microcontrollers, including Arduino and Raspberry Pi, making it an excellent choice for embedded systems, IoT devices, and user interface projects.

Explore Projects Built with 3.2" TTL Display

Use Cirkit Designer to design, explore, and prototype these projects online. Some projects support real-time simulation. Click "Open Project" to start designing instantly!
Arduino Mega 2560 Controlled TFT Touchscreen Interface
Image of Tablero Moto: A project utilizing 3.2" TTL Display in a practical application
This circuit connects an Arduino Mega 2560 microcontroller to a 3.5-inch 480x320 TFT LCD display. The Arduino provides power, ground, and digital signals to control the display, including data lines for pixel information and control lines for reset, write, and command/data selection. The embedded code initializes the display and configures the Arduino's pins for communication, likely to create a user interface or visual output for a project.
Cirkit Designer LogoOpen Project in Cirkit Designer
Arduino Nano 33 BLE Battery-Powered Display Interface
Image of senior design 1: A project utilizing 3.2" TTL Display in a practical application
This circuit features a Nano 33 BLE microcontroller interfaced with a TM1637 4-digit 7-segment display for information output, powered by a 3.7V battery managed by a TP4056 charging module. The microcontroller communicates with the display to present data, while the TP4056 ensures the battery is charged safely and provides power to the system.
Cirkit Designer LogoOpen Project in Cirkit Designer
ESP32C3-Based Thermal Imaging Camera with TFT Display
Image of MLX90640-XIAO-ESP32-1.3: A project utilizing 3.2" TTL Display in a practical application
This circuit connects a 1.3 inch TFT Module 240×240 ST7789 display, a GY-MCU90640 thermal camera module, and a XIAO ESP32C3 microcontroller to create a thermal imaging system. The ESP32C3 microcontroller is programmed to read temperature data from the thermal camera, process it, and display a visual representation of the temperature distribution on the TFT screen. The circuit is designed for applications requiring thermal monitoring, such as detecting heat sources or monitoring temperature variations in an environment.
Cirkit Designer LogoOpen Project in Cirkit Designer
Arduino Nano Controlled LCD Interface with Pushbutton Inputs
Image of MacroDisplay: A project utilizing 3.2" TTL Display in a practical application
This circuit features a Nano 3.0 ATmega328P microcontroller connected to a 16x2 I2C LCD display for output. Two pushbuttons, each with a 10k Ohm pull-down resistor, are connected to digital pins D2 and D3 of the microcontroller for input. The LCD and pushbuttons are powered by the 5V output from the microcontroller, and all components share a common ground.
Cirkit Designer LogoOpen Project in Cirkit Designer

Explore Projects Built with 3.2" TTL Display

Use Cirkit Designer to design, explore, and prototype these projects online. Some projects support real-time simulation. Click "Open Project" to start designing instantly!
Image of Tablero Moto: A project utilizing 3.2" TTL Display in a practical application
Arduino Mega 2560 Controlled TFT Touchscreen Interface
This circuit connects an Arduino Mega 2560 microcontroller to a 3.5-inch 480x320 TFT LCD display. The Arduino provides power, ground, and digital signals to control the display, including data lines for pixel information and control lines for reset, write, and command/data selection. The embedded code initializes the display and configures the Arduino's pins for communication, likely to create a user interface or visual output for a project.
Cirkit Designer LogoOpen Project in Cirkit Designer
Image of senior design 1: A project utilizing 3.2" TTL Display in a practical application
Arduino Nano 33 BLE Battery-Powered Display Interface
This circuit features a Nano 33 BLE microcontroller interfaced with a TM1637 4-digit 7-segment display for information output, powered by a 3.7V battery managed by a TP4056 charging module. The microcontroller communicates with the display to present data, while the TP4056 ensures the battery is charged safely and provides power to the system.
Cirkit Designer LogoOpen Project in Cirkit Designer
Image of MLX90640-XIAO-ESP32-1.3: A project utilizing 3.2" TTL Display in a practical application
ESP32C3-Based Thermal Imaging Camera with TFT Display
This circuit connects a 1.3 inch TFT Module 240×240 ST7789 display, a GY-MCU90640 thermal camera module, and a XIAO ESP32C3 microcontroller to create a thermal imaging system. The ESP32C3 microcontroller is programmed to read temperature data from the thermal camera, process it, and display a visual representation of the temperature distribution on the TFT screen. The circuit is designed for applications requiring thermal monitoring, such as detecting heat sources or monitoring temperature variations in an environment.
Cirkit Designer LogoOpen Project in Cirkit Designer
Image of MacroDisplay: A project utilizing 3.2" TTL Display in a practical application
Arduino Nano Controlled LCD Interface with Pushbutton Inputs
This circuit features a Nano 3.0 ATmega328P microcontroller connected to a 16x2 I2C LCD display for output. Two pushbuttons, each with a 10k Ohm pull-down resistor, are connected to digital pins D2 and D3 of the microcontroller for input. The LCD and pushbuttons are powered by the 5V output from the microcontroller, and all components share a common ground.
Cirkit Designer LogoOpen Project in Cirkit Designer

Common Applications

  • Graphical user interfaces for embedded systems
  • IoT dashboards and control panels
  • Portable gaming devices
  • Data visualization for sensors and real-time monitoring
  • Educational and prototyping projects

Technical Specifications

Below are the key technical details of the Adafruit 3.2" TTL Display:

Specification Details
Display Type TFT (Thin Film Transistor)
Screen Size 3.2 inches
Resolution 320 x 240 pixels (QVGA)
Color Depth 16-bit (65,536 colors)
Interface TTL (Transistor-Transistor Logic)
Operating Voltage 3.3V logic, 5V power input
Backlight LED, adjustable brightness
Dimensions 76.9mm x 63.9mm x 4.6mm
Viewing Angle Wide viewing angle
Touchscreen (Optional) Resistive or capacitive (varies by model)

Pin Configuration

The display module features a 40-pin header for interfacing. Below is the pinout description:

Pin Number Name Description
1-8 DB0-DB7 Data bus (8-bit parallel interface)
9 RD Read signal (active low)
10 WR Write signal (active low)
11 RS Register select (command/data selection)
12 CS Chip select (active low)
13 RESET Reset signal (active low)
14 VCC Power supply (5V input)
15 GND Ground
16 LED+ Backlight positive terminal
17 LED- Backlight negative terminal
18-40 NC Not connected (reserved for future use)

Usage Instructions

Connecting the Display to an Arduino UNO

To use the Adafruit 3.2" TTL Display with an Arduino UNO, follow these steps:

  1. Wiring the Display:

    • Connect the DB0-DB7 pins to Arduino digital pins 2-9 for data communication.
    • Connect the RD, WR, RS, and CS pins to Arduino digital pins 10-13.
    • Connect the RESET pin to Arduino digital pin 8.
    • Connect VCC to the 5V pin on the Arduino and GND to the Arduino GND.
    • For the backlight, connect LED+ to 5V and LED- to GND.
  2. Install Required Libraries:

    • Download and install the Adafruit GFX and Adafruit TFTLCD libraries from the Arduino Library Manager.
  3. Upload Example Code: Use the following example code to display a simple graphic on the screen:

    // Include necessary libraries
    #include <Adafruit_GFX.h>    // Core graphics library
    #include <Adafruit_TFTLCD.h> // Hardware-specific library for the display
    
    // Define pin connections
    #define LCD_CS A3 // Chip select
    #define LCD_CD A2 // Command/Data
    #define LCD_WR A1 // LCD Write
    #define LCD_RD A0 // LCD Read
    #define LCD_RESET A4 // Reset
    
    // Initialize the display
    Adafruit_TFTLCD tft(LCD_CS, LCD_CD, LCD_WR, LCD_RD, LCD_RESET);
    
    void setup() {
      tft.reset(); // Reset the display
      tft.begin(0x9341); // Initialize with the display driver ID
      tft.fillScreen(0x0000); // Clear the screen (black)
      tft.setTextColor(0xFFFF); // Set text color to white
      tft.setTextSize(2); // Set text size
      tft.setCursor(10, 10); // Set cursor position
      tft.println("Hello, World!"); // Display text
    }
    
    void loop() {
      // No actions in the loop
    }
    

Important Considerations

  • Ensure the display operates at 3.3V logic levels. Use a level shifter if your microcontroller operates at 5V logic.
  • Avoid excessive current draw on the backlight. Use a current-limiting resistor if necessary.
  • Handle the display carefully to avoid damaging the fragile TFT screen.

Troubleshooting and FAQs

Common Issues

  1. The display does not turn on:

    • Verify all power and ground connections.
    • Ensure the RESET pin is properly connected and initialized in the code.
  2. No image or incorrect display output:

    • Check the wiring of the data and control pins.
    • Confirm the correct driver ID is passed to the tft.begin() function.
  3. Backlight not working:

    • Ensure LED+ and LED- are connected to the correct power and ground pins.
    • Check for any loose connections or damaged backlight components.
  4. Touchscreen not responding (if applicable):

    • Verify the touchscreen pins are connected to the correct analog inputs.
    • Install and configure the Adafruit TouchScreen library.

Tips for Troubleshooting

  • Use a multimeter to check for continuity and proper voltage levels on all pins.
  • Test the display with example sketches from the Adafruit TFTLCD library to rule out software issues.
  • Consult the Adafruit forums or support for additional help if problems persist.