
How to Use LilyPad FTDI Basic Breakout (5V): Examples, Pinouts, and Specs
 Design with LilyPad FTDI Basic Breakout (5V) in Cirkit Designer
Introduction
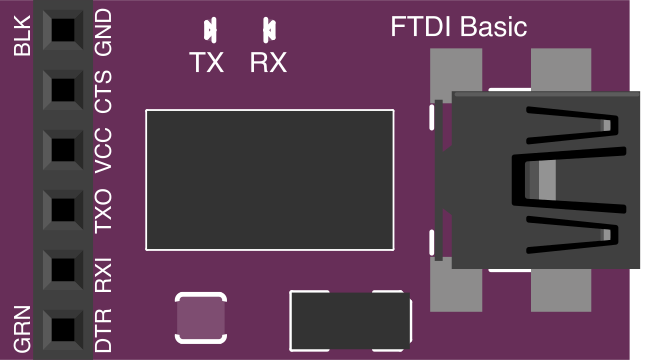
The LilyPad FTDI Basic Breakout (5V), manufactured by SparkFun (Part ID: DEV-10275), is a compact USB-to-serial converter designed specifically for use with LilyPad Arduino projects. This breakout board simplifies the process of programming and communicating with LilyPad boards by providing a reliable interface between your computer and the microcontroller.
The board operates at 5V and features a straightforward pin layout that aligns with the LilyPad Arduino's programming header. Its small form factor and ease of use make it an essential tool for hobbyists and developers working on wearable electronics and e-textile projects.
Explore Projects Built with LilyPad FTDI Basic Breakout (5V)
 Open Project in Cirkit Designer
 Open Project in Cirkit Designer
 Open Project in Cirkit Designer
 Open Project in Cirkit Designer
Explore Projects Built with LilyPad FTDI Basic Breakout (5V)
Open Project in Cirkit DesignerOpen Project in Cirkit DesignerOpen Project in Cirkit DesignerOpen Project in Cirkit DesignerCommon Applications
- Programming LilyPad Arduino boards
- Serial communication between a computer and a LilyPad project
- Debugging and testing wearable electronics
- Prototyping e-textile designs
Technical Specifications
Below are the key technical details of the LilyPad FTDI Basic Breakout (5V):
| Specification | Details |
|---|---|
| Manufacturer | SparkFun |
| Part ID | DEV-10275 |
| Operating Voltage | 5V |
| USB Interface | Mini-B USB |
| Chipset | FTDI FT232RL |
| Communication Protocol | UART (Universal Asynchronous Receiver-Transmitter) |
| Pinout Compatibility | Designed for LilyPad Arduino programming headers |
| Dimensions | 1.3" x 0.6" (33mm x 15mm) |
| Weight | 2g |
Pin Configuration and Descriptions
The LilyPad FTDI Basic Breakout (5V) has six pins that correspond to the standard programming header on LilyPad Arduino boards. Below is the pin configuration:
| Pin | Label | Description |
|---|---|---|
| 1 | DTR | Data Terminal Ready - Used to reset the LilyPad Arduino for programming |
| 2 | RXI | Receive Data - Serial data received from the computer |
| 3 | TXO | Transmit Data - Serial data sent to the computer |
| 4 | VCC | 5V Power Output - Supplies power to the LilyPad Arduino |
| 5 | CTS | Clear to Send - Flow control signal (not typically used in LilyPad applications) |
| 6 | GND | Ground - Common ground connection |
Usage Instructions
Connecting the LilyPad FTDI Basic Breakout (5V)
- Align the Pins: Match the pins on the breakout board (DTR, RXI, TXO, VCC, CTS, GND) with the corresponding pins on the LilyPad Arduino's programming header.
- Secure the Connection: Use a 6-pin header or alligator clips to ensure a stable connection between the breakout board and the LilyPad Arduino.
- Connect to Computer: Plug the Mini-B USB connector into the breakout board and the other end into your computer's USB port.
- Install Drivers: If this is your first time using the breakout board, install the FTDI drivers from the SparkFun website or FTDI's official site.
- Upload Code: Open the Arduino IDE, select the correct board (e.g., LilyPad Arduino) and port, and upload your sketch.
Example Code for Arduino UNO
Although the LilyPad FTDI Basic Breakout is designed for LilyPad boards, the following example demonstrates how to send and receive serial data using the Arduino IDE. This code can also be adapted for LilyPad Arduino projects.
// Example: Sending and receiving serial data using the LilyPad FTDI Basic Breakout

void setup() {
  Serial.begin(9600); // Initialize serial communication at 9600 baud
  Serial.println("FTDI Basic Breakout Test"); // Send a test message
}

void loop() {
  if (Serial.available() > 0) {
    // Check if data is available to read
    char receivedChar = Serial.read(); // Read the incoming character
    Serial.print("You sent: ");
    Serial.println(receivedChar); // Echo the received character back
  }
  delay(100); // Small delay to avoid overwhelming the serial monitor
}
Best Practices
- Avoid Overcurrent: Do not exceed the 5V power rating to prevent damage to the breakout board or connected devices.
- Secure Connections: Ensure all connections are stable to avoid intermittent communication issues.
- Driver Updates: Keep FTDI drivers up to date for compatibility with the latest operating systems.
- Use Proper Tools: Use a high-quality USB cable to ensure reliable data transfer.
Troubleshooting and FAQs
Common Issues
The board is not recognized by the computer.
- Solution: Ensure the FTDI drivers are installed correctly. Check the USB cable for damage or try a different USB port.
Unable to upload code to the LilyPad Arduino.
- Solution: Verify that the correct board and port are selected in the Arduino IDE. Ensure the DTR pin is properly connected to the LilyPad Arduino.
No serial data is being received.
- Solution: Check the RXI and TXO connections. Ensure the baud rate in the Arduino IDE matches the
Serial.begin()setting in your code.
- Solution: Check the RXI and TXO connections. Ensure the baud rate in the Arduino IDE matches the
The board gets hot during use.
- Solution: Disconnect the board immediately. Check for short circuits or excessive current draw from connected devices.
FAQs
Q: Can I use this breakout board with non-LilyPad Arduino boards?
A: Yes, the LilyPad FTDI Basic Breakout (5V) can be used with other Arduino boards that have a compatible 6-pin programming header.
Q: Does this board support 3.3V devices?
A: No, this version operates at 5V. For 3.3V devices, use the 3.3V version of the FTDI Basic Breakout.
Q: How do I know if the drivers are installed correctly?
A: Check your computer's device manager (Windows) or system report (Mac) to see if the FTDI device is listed under USB devices or COM ports.
Q: Can I use this board for debugging?
A: Yes, the breakout board can be used for serial debugging by sending and receiving data via the Arduino IDE's Serial Monitor.
By following this documentation, you can effectively use the LilyPad FTDI Basic Breakout (5V) for your wearable electronics and e-textile projects.