Cirkit Designer Logo
Cirkit Designer
Your all-in-one circuit design IDE
Home / 
Component Documentation

How to Use Adafruit AS7341: Examples, Pinouts, and Specs

Image of Adafruit AS7341
Cirkit Designer LogoDesign with Adafruit AS7341 in Cirkit Designer

Introduction

The Adafruit AS7341 is an advanced multi-spectral sensor that provides precise measurements of light intensity across multiple wavelengths. This sensor is capable of detecting and measuring a wide range of colors and light wavelengths, making it an invaluable tool for applications such as color sensing, color calibration, ambient light sensing, and spectral analysis for material identification.

Common applications include:

  • Scientific research
  • Industrial color matching and quality control
  • Environmental monitoring
  • Health and wellness monitoring
  • Art and preservation

Explore Projects Built with Adafruit AS7341

Use Cirkit Designer to design, explore, and prototype these projects online. Some projects support real-time simulation. Click "Open Project" to start designing instantly!
Arduino Mega 2560 Multi-Sensor Data Logger with I2C Multiplexer
Image of Gesamt Schaltplan: A project utilizing Adafruit AS7341 in a practical application
This circuit uses an Arduino Mega 2560 to interface with multiple sensors, including an Adafruit ADXL326 accelerometer, a pressure transducer, and two MLX90614 IR temperature sensors connected via an Adafruit TCA9548A I2C multiplexer. The Arduino reads data from these sensors and outputs the values to the Serial Monitor.
Cirkit Designer LogoOpen Project in Cirkit Designer
ESP32 and ADXL343-Based Battery-Powered Accelerometer with SPI Communication
Image of vibration module: A project utilizing Adafruit AS7341 in a practical application
This circuit features an ESP32 microcontroller interfaced with an ADXL343 accelerometer via SPI communication, powered by a 12V battery regulated down to 5V and 8V using 7805 and 7808 voltage regulators. The ESP32 reads accelerometer data and outputs it via serial communication, with additional components including a pushbutton and a rocker switch for user input.
Cirkit Designer LogoOpen Project in Cirkit Designer
Arduino Nano Controlled Smart Relay with APDS-9960 Gesture Sensor
Image of contactless smart switch: A project utilizing Adafruit AS7341 in a practical application
This circuit features an Arduino Nano microcontroller interfaced with an Adafruit APDS-9960 sensor and a 2-channel relay module. The APDS-9960 sensor, which is capable of gesture detection, is connected to the Arduino via I2C communication lines (SCL, SDA) and powered by the Arduino's 3.3V output. The relay module is controlled by the Arduino through a digital pin (D7) and is used to switch an AC-powered bulb on and off, with the relay's common (COM) terminal connected to the AC source and the normally open (NO1) terminal connected to the bulb.
Cirkit Designer LogoOpen Project in Cirkit Designer
Arduino Mega 2560 Based Health Monitoring Station with TFT Display and Environmental Sensing
Image of test1: A project utilizing Adafruit AS7341 in a practical application
This circuit features an Arduino Mega 2560 microcontroller connected to an ili9341 TFT display, a DHT11 temperature and humidity sensor (KY-015), a MAX30100 pulse oximeter, a DS1307 real-time clock (RTC), and a pushbutton with a pull-up resistor. The Arduino controls the display to show sensor readings, including heart rate, blood oxygen saturation (SpO2), temperature, humidity, and the current time. A pushbutton toggles the display between showing environmental data and health-related metrics.
Cirkit Designer LogoOpen Project in Cirkit Designer

Explore Projects Built with Adafruit AS7341

Use Cirkit Designer to design, explore, and prototype these projects online. Some projects support real-time simulation. Click "Open Project" to start designing instantly!
Image of Gesamt Schaltplan: A project utilizing Adafruit AS7341 in a practical application
Arduino Mega 2560 Multi-Sensor Data Logger with I2C Multiplexer
This circuit uses an Arduino Mega 2560 to interface with multiple sensors, including an Adafruit ADXL326 accelerometer, a pressure transducer, and two MLX90614 IR temperature sensors connected via an Adafruit TCA9548A I2C multiplexer. The Arduino reads data from these sensors and outputs the values to the Serial Monitor.
Cirkit Designer LogoOpen Project in Cirkit Designer
Image of vibration module: A project utilizing Adafruit AS7341 in a practical application
ESP32 and ADXL343-Based Battery-Powered Accelerometer with SPI Communication
This circuit features an ESP32 microcontroller interfaced with an ADXL343 accelerometer via SPI communication, powered by a 12V battery regulated down to 5V and 8V using 7805 and 7808 voltage regulators. The ESP32 reads accelerometer data and outputs it via serial communication, with additional components including a pushbutton and a rocker switch for user input.
Cirkit Designer LogoOpen Project in Cirkit Designer
Image of contactless smart switch: A project utilizing Adafruit AS7341 in a practical application
Arduino Nano Controlled Smart Relay with APDS-9960 Gesture Sensor
This circuit features an Arduino Nano microcontroller interfaced with an Adafruit APDS-9960 sensor and a 2-channel relay module. The APDS-9960 sensor, which is capable of gesture detection, is connected to the Arduino via I2C communication lines (SCL, SDA) and powered by the Arduino's 3.3V output. The relay module is controlled by the Arduino through a digital pin (D7) and is used to switch an AC-powered bulb on and off, with the relay's common (COM) terminal connected to the AC source and the normally open (NO1) terminal connected to the bulb.
Cirkit Designer LogoOpen Project in Cirkit Designer
Image of test1: A project utilizing Adafruit AS7341 in a practical application
Arduino Mega 2560 Based Health Monitoring Station with TFT Display and Environmental Sensing
This circuit features an Arduino Mega 2560 microcontroller connected to an ili9341 TFT display, a DHT11 temperature and humidity sensor (KY-015), a MAX30100 pulse oximeter, a DS1307 real-time clock (RTC), and a pushbutton with a pull-up resistor. The Arduino controls the display to show sensor readings, including heart rate, blood oxygen saturation (SpO2), temperature, humidity, and the current time. A pushbutton toggles the display between showing environmental data and health-related metrics.
Cirkit Designer LogoOpen Project in Cirkit Designer

Technical Specifications

Key Technical Details

  • Spectral Range: Approximately 350 nm to 1000 nm
  • Channels: 11 independent channels
  • Resolution: 16-bit digital output
  • Interface: I2C (up to 400 kHz)
  • Operating Voltage: 3.3V to 5V
  • Current Consumption: 5 mA typical
  • Operating Temperature: -30°C to 70°C

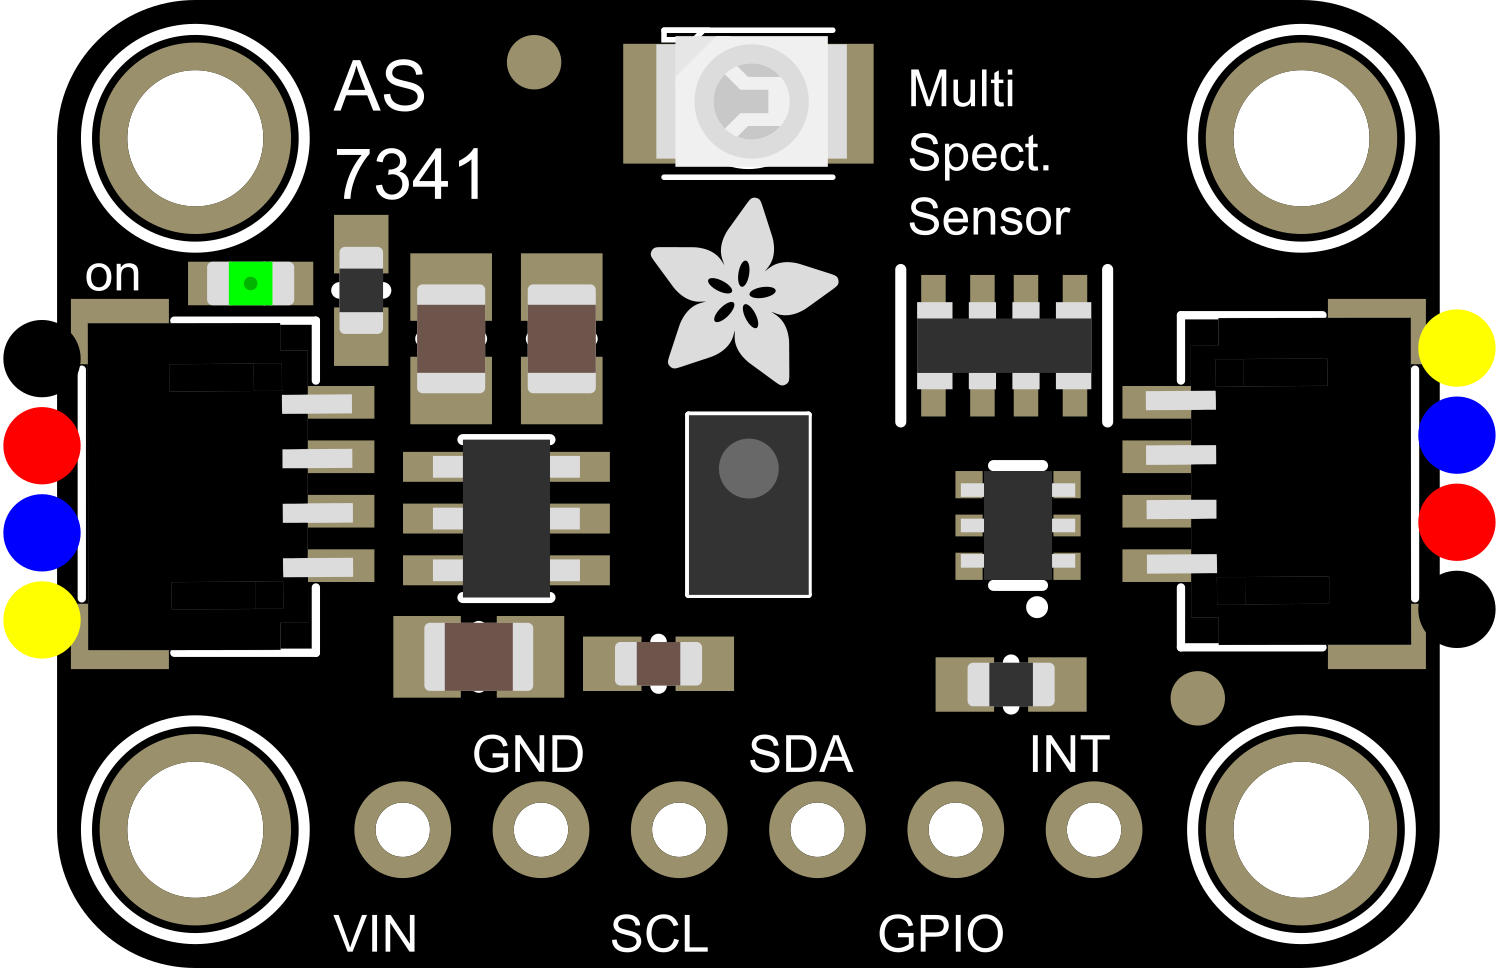
Pin Configuration and Descriptions

Pin Number Name Description
1 VIN Power supply (3.3V to 5V)
2 GND Ground connection
3 SCL I2C clock line
4 SDA I2C data line
5 INT Interrupt output (active low)
6 RST Reset input (active low)

Usage Instructions

Integration with a Circuit

To use the AS7341 in a circuit, follow these steps:

  1. Connect the VIN pin to a 3.3V or 5V power supply.
  2. Connect the GND pin to the ground of your power supply.
  3. Connect the SCL and SDA pins to the I2C clock and data lines on your microcontroller, such as an Arduino UNO.
  4. (Optional) Connect the INT pin to an available digital input on your microcontroller if you wish to use the interrupt feature.
  5. (Optional) Connect the RST pin to a digital output on your microcontroller if you wish to control the reset function.

Important Considerations and Best Practices

  • Ensure that the power supply is within the specified voltage range.
  • Use pull-up resistors on the I2C lines if they are not already present on the microcontroller board.
  • Avoid exposing the sensor to direct sunlight or high-intensity light sources that could damage the sensor.
  • Calibrate the sensor for the specific application to ensure accurate readings.

Example Code for Arduino UNO

#include <Wire.h>
#include <Adafruit_AS7341.h>

Adafruit_AS7341 as7341;

void setup() {
  Serial.begin(9600);
  // Initialize the AS7341 sensor
  if (!as7341.begin()) {
    Serial.println("Failed to initialize AS7341!");
    while (1);
  }
  Serial.println("AS7341 initialized successfully.");
}

void loop() {
  // Read and print the raw values from each channel
  Serial.print("F1: "); Serial.println(as7341.readChannel(AS7341_CHANNEL_415nm));
  Serial.print("F2: "); Serial.println(as7341.readChannel(AS7341_CHANNEL_445nm));
  // Add additional channels as needed
  delay(1000); // Delay for 1 second before reading again
}

This example initializes the AS7341 sensor and reads the raw values from two of the channels, printing them to the Serial Monitor. Make sure to include the Adafruit AS7341 library in your Arduino IDE before uploading the code.

Troubleshooting and FAQs

Common Issues

  • Sensor not detected: Ensure that the wiring is correct and that the sensor is properly powered.
  • Inaccurate readings: Calibrate the sensor for your specific lighting conditions.
  • I2C communication errors: Check for proper pull-up resistors and that no other device is conflicting on the I2C bus.

Solutions and Tips for Troubleshooting

  • Double-check all connections and ensure that the sensor is not exposed to extreme lighting conditions.
  • Use the interrupt feature to manage the timing of light measurements effectively.
  • If using multiple I2C devices, ensure that each device has a unique address and that the bus is not overloaded.

FAQs

Q: Can the AS7341 sensor measure UV light? A: The AS7341 is designed for visible light and near-infrared (NIR) measurements. It does not have a dedicated UV channel.

Q: Is the AS7341 sensor waterproof? A: No, the AS7341 sensor is not waterproof. Protect it from moisture and liquids.

Q: How do I calibrate the sensor? A: Calibration involves taking readings under a known light source and adjusting the readings accordingly. Adafruit provides a detailed guide on calibration procedures.

For further assistance, consult the Adafruit AS7341 datasheet and the Adafruit support forums.